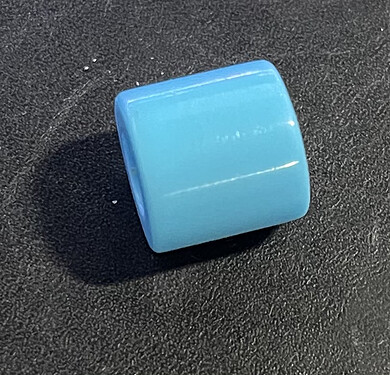
Horizontal Gaps & Vertical Lines (back of print)

I am attempting to print round spacers for a project using PLA from Snapmaker and Hatchbox. They are ~12mm round, 12mm tall, so all the movement is pretty well focused and contained to a small area of the bed.

The prints are completing successfully, though I am running into a wall, having ran through nearly 12x 1h prints and they each have the same two issues.

  1. Horizontally, decreasing layer height results in line visibility decreasing at the expense of increased time to complete, though throughout the print there are either several empty ā€œdotsā€ (about the size of a dead pixel) or extended horizontal lines about 2-3mm ā€“ both appear empty about 1-2 layers deep.

  2. There is a divided vertical line split only by a small filled gap on the back of every print ā€“ almost as if the print is being marked at the 50% mark. Watching the print from the back, the position of the line is exactly where the extruder stops before it continues the print. I donā€™t understand why between the end of the first line and the next, 4-6 layers fill without any issues.

What Iā€™ve Done

  1. Calibrated the bed. I first heated the nozzle to 205 and the bed to 80, quickly tightened down the screws for the frame, and then brought the nozzle down to a 0.05 gap. Originally, I tried zeroing fully, however, the first print resulted in dragging on one side of the print be, so I brought it up a bit.

  2. Checked the consistency for the PLA from Snapmaker and Hatchbox using a micrometer ā€“ all in range for their tolerances. The Snapmaker filament is Black, the Hatchbox is glow in the dark.

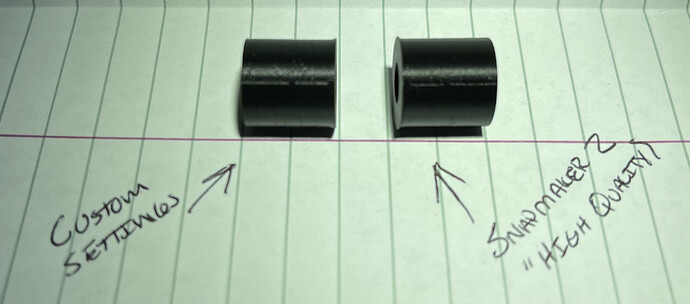
  3. Tested Snapmaker recommendations for Fast Print, Normal, and High Quality before moving on to my own settings to further reduce layer size and speeds, reduce print temperature from 200-205 to 190-195 (see attachment for the settings of the last run).

  4. Tried printing outer walls before inner walls ā€“ this doesnā€™t seem to make a difference. Increasing or decreasing the wall or top/bottom thickness doesnā€™t seem to help either.

  5. Checked for wobble in the bed ā€“ itā€™s solid and thereā€™s no visible movement during the print, and it would take a good bit of force to make it wobble by hand.

  6. The printer unit is tightened down well; no movement during prints or when pushing on it.

Any ideas on what I am doing wrong, or where I can improve to remove the vertical lines and further reduce or remove the horizontal gaps?

Are you having the problems with both hatchbox and SM filament?

Did you calibrate extrusion?
-S

Hey check out this linear advance guideā€¦ its made a world of wonders for me

It requires some trial and error printing lines on the bed and comparing to find the best one, then boiling it down to a smaller decimal again

Teaching Tech 3D Printer Calibration (teachingtechyt.github.io)

Also, if you are having a line at the halfway point as the print goes upā€¦ is there another one directly across? i had that problem, it was a loose linear module allowing the print head to pivot as it rotatedā€¦

i have a thread about that i can try to dig up for you with what i did about it, involved getting a replacement but i had a workaround while it showed up involving trading linear modules.

Holes that occur at the same location as you add layers could be related to retraction. For this print, stringing shouldnā€™t be a problem. Iā€™d try turning off everything in the ā€œRetraction and Z Hopā€ section.

The vertical seam is caused by the slicer starting each new layer at the same location. Itā€™s easy to see when itā€™s printing infill. Itā€™ll print the infill, then go to the same spot on the wall to start the wall print. As far as I know, Luban doesnā€™t have any settings to address this. I think Cura and others do, but I havenā€™t played with them yet.

Is that some over extrusion on the first layer, or did you deliberately give it that flange? At first I thought it was over extrusion, but itā€™s usually a single layer, not several layers with a radius. If you intended for the diameter to be consistent through the whole cylinder, there are some things you can do to adjust that first layer.

@sdj544

Yes, both SM and HB, as well as a few other brands. I have not calibrated, yet. I avoided this step first as my projects are small in natureā€“I donā€™t intend on printing anything large. Most prints are spacers or work holding for my CNC machine (and as long as itā€™s sturdy and holds, I donā€™t mind what those look like).

Do you believe calibration would fix these specific issues? The middle of the project prints round, as it should, which makes me believe extrusion is doing good, but I am very open to testing calibration so I donā€™t waste PLA.

@MooseJuice

Appreciate the link! Iā€™ll give that a few runs to see if my results are similar.

The vertical lines are only on the back of the project, exactly where the extruder pauses on the z axis. With the middle of the project printing correctly (round, no vertical lines), I donā€™t believe there would be an issue with alignment or mounting, though I did re-mount and ensure itā€™s level and does not move.

Iā€™d still very much love to read over your thread if you are able to share? If itā€™s not an issue now, having the knowledge on what to look for will still be largely helpful!

@clewis

Retract is off for these projects to keep the nozzle on the project as much as possible. Given the travel distance, even if strings were visible, quick sanding would break them quickly, so this ended up being the first thing I turned off :slight_smile:

On the flange, thereā€™s not one present on the 3D model. I originally had the bed temp too high for PLAā€“at least, based on what Iā€™ve read. On one, I also had the z height down 0.05 too far, which ended up causing some flattening as well as dragging on the bed.


I am now testing the project in Cura. It seems the random z is exactly what I need looking at the 50% mark for the current spacer. Right now, thereā€™s no vertical line, though we shall see once the project is complete.

The goal here would be to scale this up so I am not having to print one at a time. Iā€™d like to run 10-20x, though the time per is about 50 minutes. The first attempt to print 8 also resulted in major warping and only 1 of 8 were usable (though I will be cutting the warped section so I can reuse for smaller spacers).

If Cura is the fix, is there a good way to optimize both time to print (while keeping solid structure) and preventing warping?

Loose Linear Module w/ Workaround Attempt - Snapmaker 2.0 - Snapmaker: where creation happens this is where the most detail is, there was another one before hand when i was just figuring out the issue but this has pretty much all the detail

I like your enthusiasm!

but yeah z-seams are a thing, cura does have some ways to hide it and is pretty effective for the most part :smiley:

maximizing the yield of parts on your sheet - cura will certainly help, alot of it will be trial and error to figure out what works and what doesnt, especially because the print sheet isnt very flat. but im sure you can get a number of them going at once with a little tinkering yeah.

calibration with a bigger grid will help you out, and pre-heating the bed a little above your print temperature right before doing so will be a great improvement as wellā€¦ at least it was for me.

simplify3d cut my print times down by like 25% or more compared to cura, but - it has some flaws of its own and is expensive.

Yea, in my opinion, if the seam is leaving a gap thatā€™s a sign of underextrusion. It should at least be flush or proud so that it can be sanded off.

Bare minimum do the e-steps calibration and flow calibration from moose juiceā€™s link above.

If things are going well, Iā€™d recommend doing the lin advance test too, my machine was way off what it should be, and that can result in weird over / underextrusion as well.

1 Like

linear advance made the biggest difference of all for me in terms of line consistancy

Cura definitely solved the vertical line issues; they are non-existent now. It seems in solving one issue, another popped up though.

Close to the center of the print there appears to be a fracture or shift of z height, which is introducing a band. As with the vertical line issue, this band only appears on half of the print and that half appears to be on the back (which is where the vertical line appeared prior to using Cura).

That said, I did opt to use ABS on this print as UPS dropped it off right before I started the other. Nozzle temps were solid around 230, with the bed heated to 90 (which appears to be peak for my unit; I canā€™t get it to 100 in any reasonable amount of time).

Iā€™ll swap back to PLA and test again soon, though ABS was much easier to sand. The image below is one with the band, though the sanding time for this was about 2-3 minutes (put it on a small lathe with a pen blank rod).

I solvent smooth PLA, but the solvents are much more dangerous than acetone

Yeah i have hard sci-weld 4 can do it, which i have some at work, but figured id stay clear of that for nowā€¦

is it the MEK?

we are going to buy MEK soon to strip powder coating for our new powder line.

thats not something people should play with willy nilly, but im sure i will anyhow.

No, DCM. Would not recommend, extremely cancerous.

Thereā€™s a few others that are much safer to work with than DCM, but I havenā€™t tried them. THF is a popular one.

ah. yeah probably shouldnt goof with that very much.

I have also read about a special PLA blend that some company made to sell along with some equipment that creates some kind of vapor bath out of some type of alcohol solution, but sounds expensive to me.

1 Like

So I have to admit, I was wrong to avoid calibrating the extruder. After calibration, the print was as close to near perfect as I could expect. No lines vertically, the horizontal lines were very difficult to pick up w/o touching and running my nail over the layers, and no fracture/uneven layer.

I was able to pull the print, sand with 1000-2000 grit, and then polish with Novus on the buffing wheel. All in all, the final stage took about 6-7m, though the print took about 45m.


Now I need to find a way to cut the time to print down while keeping the print structurally dense, if that is possible :slight_smile:

All in all, this is NovaMaker Sky Blue ABS, 1.75mm and the bed was painstakingly heated to 90, with the nozzle at 225 throughout the entire project.

The base was a bit uneven prior to sanding, though not warped. I am going to try lowering the temp on the bed to 75-80 as hitting 90 is both time-consuming and I feel the bed is not well-equipped to get to and maintain 90 consistently. The option to set 100 is there, though Luban will kick it back to 80 first chance it gets.


The only issue I ran into was with the calibration. The first run to extrude worked perfectly and I was able to set the new value (mine was off by 12mm), though attempting to run the extrude command again via console resulted in the filament being unloaded instead of pulled through.

I tried turning it off/on again, and running the same commands over, though even now, it still kicks the filament back out when the command below is ran.

G1 E100 F300

Should this command use different values once the offset is saved?

That one i am not going to be able to guide you on, i defer to the pros.

i should warn you that with ABS if the bed is not hot enough it can and will warp (adhesion issues as well as the temperature differences cause the cooler layers to pull away from hot ones), and ideally abs is in an enclosure of some kind (even a box would help) to keep the temperature consistent throughout the part.

regarding speed, i think youll find relatively soon that your next adventure is into cura, where there are settings for a lot more things such as initial layers, perimeters, tops, skins, etcā€¦ all can be different speeds, different extrusion widths, overlaps, more infill options, more than youll care to understand, but it does allow you to unlock those options in tiers of difficulty. each thing you understand will contribute to the outcome of the part dimensionally, structural integrity, aesthetics and print duration.

Commands you donā€™t recognize can be looked up here https://marlinfw.org/docs/gcode/G000-G001.html

Yes, g1 e100 is an extrusion command.

he is saying that it is retracting instead of extruding?

That behavior of that command depends on if youā€™re in g90 or g91 and where the extruder axis currently is

1 Like

@MooseJuice

All good, I greatly appreciate everyoneā€™s help! Honestly, had I not posted here I would still be hitting my head against a wall trying to figure out why my print looked so rough.

On Cura, it was the key to getting to this point post-calibration. I am looking at a few options and may be able to pull it down to ~30m from 45-50m (average). There are plenty of infill options, though they do not seem to apply given the design of the print coming from Fusion 360.

@brent113

@MooseJuice is correct. The first time the command was executed, it extruded as expected. When I saved the changes and went back to run it again to see if the changes would provide consistency, it failed to extrude and instead did the reserveā€“unloading the filament where I could pull without even the slightest resistance.