Hi,
I would like to know what’s best solution to clean Snapmaker bed. I had some fine film stick on and can’t remove it with scripper. Can I use accetone to clean it?
Thank you for your inputs
Hi,
I would like to know what’s best solution to clean Snapmaker bed. I had some fine film stick on and can’t remove it with scripper. Can I use accetone to clean it?
Thank you for your inputs
I have the problem getting of the prints for my A350, really hard to get them of and after getting of i had sticky filament at the printing bed.
I‘m using the standard printing sets from luban (70C first layer, 50C printing), before using i cleaned it always with isopropanol.
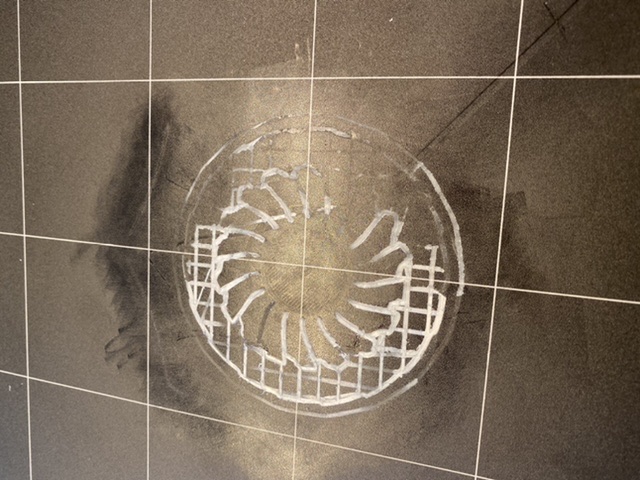
Any tips?
hey @Raptor, i use a painters spatula with bent/straightened edges (i don´t know if this translation is understandable,- the profile looks a tiny little bit like a U)
for preparing the next print i take brake cleaner for the bed.
Ok i‘ll have a look.
I don‘t want to damage the bed… most people have problems with the bed (other printers) because the print don’t stick at the first layer.
A friend of mine using an ultrabed in have absolutely no problems. I thought about modifying my A350 and use an ultrabed too, but the problem is the autoleveling and using a induction sensor for it. The sensor wouldn’t detect the glas bed.
i think you could also take a mechanic switch like other printers have.
design a holder on the print head for it and make the electrical connection should be no problem.
i have the stick too much problem with semiflex filament at snapmaker 1,- i use babypowder under the first layer.
Hi folks,
I found a guys who prints on carbon sheet and only clean out with 50/50 water and alcool with no mess. I'll give a try and let you know. Here the the link below!
Please don’t use brake cleaner. The print bed and other plastic parts don’t like this agessive cleaners.
I suggest to use it only far away from the printer.
The beta-controller of my SM1 got it’s white “scars” from brake cleaner.
I found a very interesting article about the solubility of PLA:
Word-File (903.0 KB)
convertred from the PDF from: https://www.researchgate.net/post/Solubility_of_PLA
Is the sensor adjustable (hight)?
If so, i would put it a bit higher (thickness from UB) and put the ultrabed on top of the magnetic bed from SM2.
Or maybe your solution with a mechanic switch.
Yes the height is adjustable. But we don’t recommend adjusting the height of the sensor, as it is properly set at 1.5mm above the print probe out of the factory. The sensor will only detect medal but not other materials such as PLA or ABS.If you do want to adjust the height, be careful and make sure that the sensor does work after adjustment. Otherwise it will cause severe calibration problems. Please note that such adjustment is not covered under warranty.
I‘ll have a look on this, also had the cali fail issues while fast calibration on point 5 (hits bed)
Are there other people having problems with sticky (heavy to remove) prints?
What are reasons for that? Printing bed to clean?! 
Wrong temps? (Using default 70/50C for my prints)
You might want to send support a message to make sure on this. But assuming you can use it. I would highly recommend every month or 2 (depending on how often you print) that you clean the plate with this. In my experience, a very very small amount of filament is on the plate (not enough for you to see) after so many prints. This can make it harder for your prints to stick. I’m not sure if the V2 can print PETG. Assuming it does, I would do this every 3-5 prints.
Just watch out after doing this. Prints might stick too well.
I made my first print and started damaging the print bed trying to scrape off the skirt around the actual print.
I discovered if I take a heat gun to soften the PLA (maybe you can use a hair dryer if you don’t have a heat gun), I can then take a scraper and easily remove the left over PLA and clean it up easily.
Hope that helps!
Definitely ask snapmaker before using acetone. Some build surfaces have coatings to help with adhesion, and acetone can damage or remove them.
Acetone is definitely not recommended. Someone on FB tried it with negative results. Isopropyl/rubbing alcohol is what to use.
Heating up bed to 80C has worked best for me. Sometimes get started with a fingernail or razor blade. Sometimes rubbing with a towel if it’s super thin. Sometimes wetting towel with alcohol (be careful with flammability. I’ve been using 70% for this) and rubbing. It’s usually the skirt that gives me the most trouble since it’s so thin.
-S
yeah, i have had negative results using acetone on my ender 3, and the build surface seems very similar. I also have issues with skirts (on all my printers) so i turn them off.
I’ve also tried many of the discussed solutions. The razor blade/widget recommendation has caused me to destroy sections of the hot plate. Add to your repertoire Mr. Clean Magic Eraser (a white very fine sponge-like product). Sometimes its just the thing.
Hadn’t thought of mr clean eraser.
That with a heated bed would work great I’d think.
On my razor blade I grind off the corners a little. Also if you use vertically as a scraper and drag it it can be very effective. Either way I’m super careful and last resort.
I agree that the skirt Is what seems to stick and hard to get off so I tend to not use them anymore.
Also, if you’re not changing color or types, if the remnants are that thin you can’t scrape them off, you can probably just ignore it
-S
I had my first print on my A350 fail with bad layer adhesion and when I went to remove it from the bed the next morning it had adhered so well to the print bed i actually ripped the print apart when trying to remove it. I finally after support told me I was probably just too close to the bed and to print on top of it to remove it(not possible as it was half the print stuck to the bed) also bent my scraper trying to remove it i finally broke down and heated the bed to as hot as it would go 100C? And then I could scrape/peel it off as the pla was soft at that temp. Left the imprint on the bed.
