U1 Product FAQ – Official Info Summary

Hi everyone,

We’ve created a FAQ page for the Snapmaker U1 to help you get a clearer picture of the product. You’re welcome to check it out and share it if you think it might help others too. The page will be updated regularly as more details come in:
:backhand_index_pointing_right: https://support.snapmaker.com/hc/en-us/articles/33344279396759-FAQ-for-Snapmaker-U1-3D-Printer

3 Likes

We’ve gathered the most frequently asked questions from the U1 community and compiled them here for easy reference. If you have any further questions, feel free to ask in the forum.
We know many of you are also curious about the launch price and date. These details aren’t ready to be shared just yet, but we’ll keep you updated as soon as we can.

Q: What is the timeline from the launch of the Kickstarter campaign to the shipment of the units?

A: Shipping priority will be based on both the Kickstarter backer number and the order in which the deposit is placed. Users who place a deposit early and support the campaign early on Kickstarter will be prioritized for shipment.

Shipping time may also vary slightly depending on the destination country or region.

Compared with our previous Kickstarter campaigns, we have made significant improvements in production planning and fulfillment to reduce the waiting time and provide a better overall experience for backers.

Our goal is to keep the time between the end of the campaign and the actual delivery to users within three months. In particular, we aim to ensure that the first two batches are shipped within this three-month target.

More details about the shipping timeline and policy will be announced when the campaign goes live on Kickstarter.

Q: How fast and reliable is the tool changing on the U1?

A: A single toolhead switch takes around 5 seconds. This includes the time from placing the first printhead back at the prime tower to picking up the second one and positioning it at the tower. The process is designed for both speed and consistency, ensuring reliable tool changes throughout long prints.

As for reliability, we’ve conducted dedicated durability tests using multiple machines, each running over 1 million toolhead switches without any mechanical failures. This extensive testing gives us strong confidence in the long-term mechanical stability of the system.

Q: Is there a nozzle every toolhead or is it using one nozzle? How is calibration?

A: Each printhead has its own dedicated hotend. The toolheads are equipped with built-in sensors and support automatic calibration. We recommend manually cleaning the hotend tip before calibration to ensure accuracy.

Q: Will review units be sent to independent testers (e.g., CNC Kitchen) before the Kickstarter campaign ends?

A: Yes, we are working with independent reviewers, but the reviewer list will not be made public at this time.

Please follow our YouTube channel for updates as soon as they become available.

Q: Is the chamber passively or actively heated? If active, to what temp?

A: The U1 uses passive heat retention. It does not feature active chamber heating.

Q: What slicer/software will the U1 use?

A: The Snapmaker U1 supports Snapmaker Orca and Orcaslicer. You can import standard G-code files for printing.

Q: Will klipper/firmware be open source, or Snapmaker’s own version?

A: The Snapmaker U1 runs on Klipper firmware, providing faster processing speeds and greater flexibility for advanced features.

More information is still being evaluated, and we’ll keep the community updated as things progress.

Q: Which nozzles and filaments are best suited for the U1?

A: The Snapmaker U1 comes equipped with 4 standard 0.4 mm hotends, along with one spare hotend, ideal for balancing print quality and speed. The hotends used are standard 304 stainless steel models.

Filament compatibility (more materials and material combination tests are still ongoing. Stay tuned!):

  • Basic Material Compatibility: PLA, PETG, TPU, PVA

  • With Optional Seal Cover (Coming Soon): PET ABS, ASA

  • With Seal Cover & Hardened Steel Hotend(Coming Soon): PC, PA, PA-CF, PA-GF (more options in testing)

We’re continuing to test more material combinations to expand compatibility. Please refer to the U1 product page for the latest updates.

Q: How long will it take from unpacking to first print?

A: Not including the time to install the Snapmaker App and Snapmaker Orca, it takes about 120 minutes from unboxing to the first print. This includes approximately 15 minutes for unboxing, 40 minutes for assembly, and 65 minutes for initial setup and calibration.

Please note: The calibration process is mostly automated, but a few manual steps such as placing and removing the PEI sheet are still needed.

Q: What is the usable bed size?

A: The actual usable bed size is 270mm*270mm.

Q: Regarding questions about the Purge Tower, Prime Tower, or Zero Purge on the U1.
A: Great question! When we say “Zero Purge,” we’re referring to eliminating what is colloquially referred to as “filament poop”.
This is the waste caused by purging and cutting in filament changer systems, where a single hotend handles multiple filaments. In those systems, the hotend has to be thoroughly purged whenever switching materials to avoid cross-contamination. That process typically produces a lot of waste.
Snapmaker U1 is different. It uses a toolchanger system, where each filament is assigned its own dedicated printhead. Since there’s no need to flush out the old material, there’s no need to purge.
Now, the U1 does still create waste in the form of a small tower, which we call the prime tower. It’s used to clear small amounts of degraded filament that may have sat in a heated hotend during standby. This helps stabilize extrusion and ensures clean starts after switching heads, avoiding issues like oozing or poor layer bonding.
So yes, generally, Snapmaker U1 does create some waste, but massively less than filament changing systems, which produce both purge and prime waste.
That’s how U1 delivers clean, efficient multi-material printing that lives up to the “Zero Purge” promise.

Learn more about Snapmaker U1:
Product page: Snapmaker U1 | Next-Gen Multi-Color 3D Printer Awaits
FAQ: https://support.snapmaker.com/hc/en-us/articles/33344279396759-FAQ-for-Snapmaker-U1-3D-Printer

1 Like

We’ve seen a lot of great questions and feedback since the Kickstarter launch and price reveal. To help everyone get a clearer picture, we’ve put together a quick FAQ based on what the community is asking most. Feel free to check it out and let us know if there’s anything else you’d like to see covered. We’ll keep updating it as more details are confirmed, so feel free to check back from time to time.

https://support.snapmaker.com/hc/en-us/articles/33344279396759-FAQ-for-Snapmaker-U1-3D-Printer

2 Likes

Hi, community members! The second round of Q&A is here! We took a few extra days to confirm details so you get the most accurate answers. This edition is packed with important info, so please take a minute to read through it carefully. :heart_hands:

Is the early bird price limited in quantity, or guaranteed for all reservation users?

No, paying a deposit does not guarantee an Early Bird slot because these slots are limited and allocated on a first-come, first-served basis. However, there will be thousands of Early Bird slots available, giving you a very good chance to secure one.

Approximately 10 minutes before the campaign officially starts, we will send a Kickstarter link to those who have paid a deposit. This early access allows you to review product details, reviews, pledge options, and shipping information in advance. It helps you make an informed decision and be ready to purchase the U1 immediately when the campaign goes live.

Important: Please make sure you have registered a Kickstarter account using the same email address you used to pay your deposit. If you do not have a Kickstarter account, clicking the U1 Kickstarter link will redirect you to the general Kickstarter page, which may cause delays and risk missing out on an Early Bird slot.

We recommend placing your order early once the U1 Kickstarter campaign is live to secure the Early Bird deal. After slots sell out, the discount will no longer be available. You can cancel your pledge anytime before the campaign ends.

If you miss the Early Bird but back any other reward tier, you will still qualify for a $100 cashback after your U1 ships.

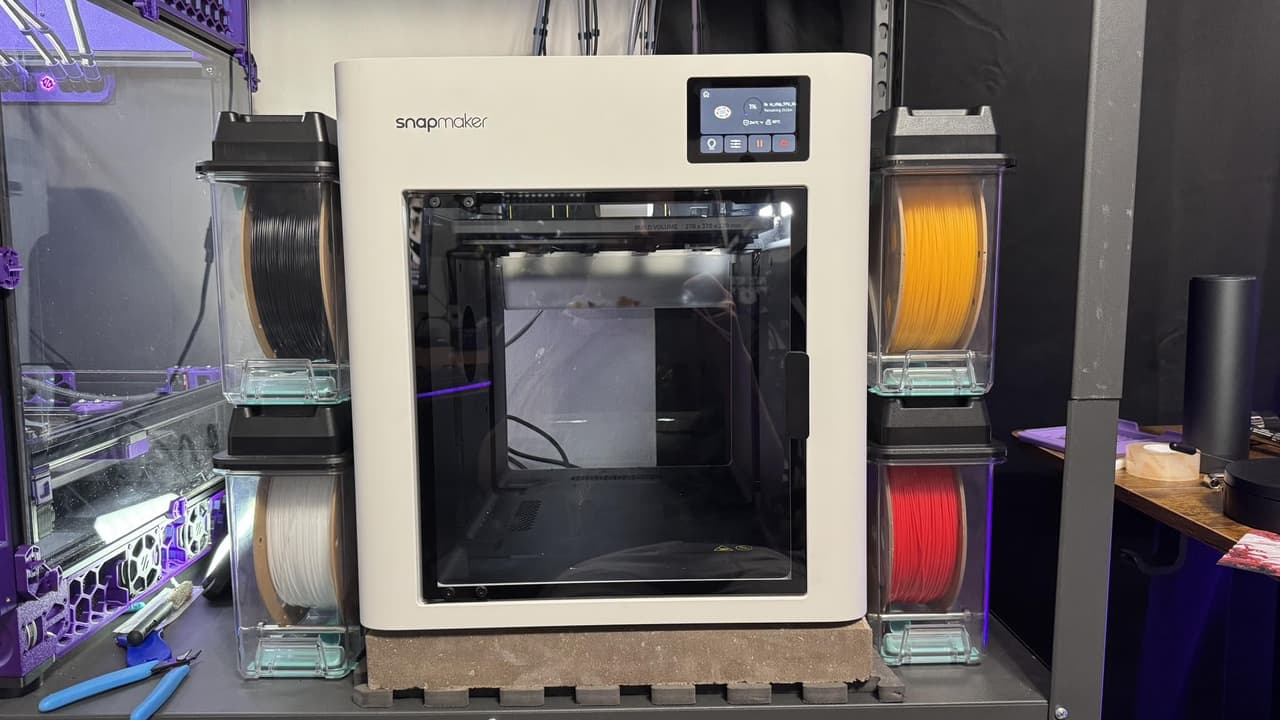
What is the full footprint of the U1, including cable clearance and protruding parts?

The full footprint of the Snapmaker U1 is approximately 584mm (W) × 499mm (D) × 730mm (H). This includes space for cables and any protruding parts. The printer weighs around 18.2kg.

How much tax or VAT will I need to pay?

The product price does not include taxes or VAT by default. However, if your shipping address is in the European Union, United States, Canada, United Kingdom, Australia, Japan, or Korea, we will ship the product from China to a local warehouse in your region and then deliver it to you. In these cases, Snapmaker will cover the additional tax costs, so you won’t pay any extra taxes.

For users in Norway and Switzerland, orders will be shipped from our Germany warehouse. Please note that you are responsible for any applicable taxes or customs duties according to your local regulations.

For users outside these regions, orders ship directly from our China warehouse, and you are responsible for any taxes or customs duties according to your local regulations. Tax rates vary by country.

We are finalizing the full list of supported shipping countries and regions and will share it within the week.

Can users who paid a deposit get early access to the Kickstarter page?

We have received many requests about this. To accommodate, we will send the Kickstarter page link to users who paid a deposit about 10 minutes before the campaign officially starts. This will allow you to review the product features, reviews, pledge options, and shipping timeline in advance, helping you make an informed purchase decision and enabling you to buy the U1 as soon as it goes live.

Important: Please make sure you have registered a Kickstarter account using the same email address you used to pay your deposit. If you do not have a Kickstarter account, clicking the U1 Kickstarter link will redirect you to the general Kickstarter page, which may cause delays and risk missing out on an Early Bird slot.

Why did you choose Kickstarter to launch your product?

We chose Kickstarter to connect with early supporters, offer exclusive early-bird pricing, which will be the best price available during the entire launch period, and begin planned production most efficiently.

If you are concerned about the risks of backing a Kickstarter campaign, please rest assured that Snapmaker has successfully launched and delivered two Kickstarter projects in the past. With that experience, we are confident in providing a smooth and reliable experience this time as well.

We fully respect your preference. If you would rather not join the campaign, you are welcome to subscribe to our newsletter and wait for the official online store launch to make your purchase.

The $100 cashback will be refunded after shipment. What amount will be declared for customs?

Yes, the $100 cashback (which includes your $30 deposit and a $70 bonus) will be refunded after the product ships. However, the declared customs value will be based on the full Kickstarter payment amount (excluding the deposit), before any refund. This is because customs requires the declared value to reflect the actual amount paid at purchase, regardless of any cashback issued later. The $100 refund is a promotional rebate processed after shipping and does not affect the declared amount, ensuring compliance with international customs regulations.

Please note that customs duties depend on the shipping warehouse.

  • If your shipping address is in the European Union, United States, Canada, United Kingdom, Australia, Japan, or Korea, we will ship the product from China to a local warehouse in your region, then deliver it to you. In these cases, Snapmaker will cover the additional tax costs, so you won’t have to pay extra taxes.

  • For users in Norway and Switzerland, orders will be shipped from our Germany warehouse. Please note that you are responsible for any applicable taxes or customs duties according to your local regulations.

  • For addresses outside these regions, orders will ship directly from China, and you will be responsible for any taxes or customs fees based on your local regulations. Tax rates vary by country.

What options will be available to keep the loaded filament dry?

For optimal performance, we recommend using the Snapmaker SnapDryer, which will be available for purchase as an add-on during the Kickstarter Campaign. While third-party dryers can theoretically be used, excessive filament resistance, such as from tight feeding paths, may cause automatic loading to fail. In such cases, manual loading might be necessary.

Will this use standard or proprietary nozzles and if so, how much will replacements cost?

The Snapmaker U1 comes equipped with 4 x 0.4 mm proprietary stainless hotends, along with one spare hotend.

The Heat Sink, Heat Break, Heater Block, and Nozzle are integrated into a single unit and assembled using an interference fit technique, which minimizes filament oozing and heat resistance. They cannot be replaced individually.

Replacements are expected to be available on our official online store during the preorder phase after the Kickstarter ends. Pricing has not been finalized yet, but we will share more details once available. Stay tuned.

Please provide further top cover details (dimensions and functions)?

Details about the Top Cover have not been publicly released yet. They will be confirmed and announced during the Kickstarter campaign.

Hard and soft materials like PC, PA, PA-CF, PA-GF and TPU can be feeded to the extruder the normal way like PLA?

We don’t recommend feeding materials like PC, PA, PA-CF, PA-GF, or TPU in the same way as PLA, as there’s a higher chance of feeding issues. If that happens, you can switch to manual feeding mode to load the filament successfully.

Why not make the hardened steel hotends is the standard shipped one?

Compared to hotends, the extruder gears wear out more easily, which affects extrusion accuracy and force. Considering cost and typical use cases, we use hardened steel for extruder gears and stainless steel for hotends. Stainless steel hotends are generally durable enough for most users printing with common filaments like PLA and PETG.

For professional users needing more durability, hardened steel hotends are available as optional upgrades.

Does the Snapmaker U1 support multi-color or multi-material printing beyond 4 colors?

Yes! Snapmaker U1 has 4 independent print heads, so you can print up to 4 colors or materials at once. If you want to print a model more than 4 colors or materials, you can try to suspend the machine and change the filaments manually. But it also needs to consider the model complexity and other factors.

Is the klipper that the machine has an open or closed source?

Snapmaker will open source Klipper on GitHub, in accordance with the Klipper GPLv3 license.

Can Orcaslicer be used as is or do l have to use a version modified by Snapmaker?

We recommend using Snapmaker Orca slicer with the Snapmaker U1 for the best printing experience. We have optimized and adapted several material profiles and settings directly within Snapmaker Orca to ensure smooth and high-quality prints. However, you can also choose Orca Slicer to generate G-code files based on your personal preference.

Will the heated bed be PID controlled? I know this is now an industry standard but some in the past have not been PID controlled leading to poor print adhesion results.

Yes, the heated bed of the Snapmaker U1 is PID controlled.

Will there be any data collection if owners opt out the cloud functions and if they do not what specific data will be collected from owners.

If you opt out of using a cloud account but don’t enable LAN mode, the device will still connect to Snapmaker’s cloud server. This is mainly to receive binding information and basic status updates like the device’s serial number. No data is shared with any user, since there is no owner assigned in this case.

To completely stop the machine from connecting to Snapmaker servers, you can enable LAN mode. In LAN mode, the device won’t transmit any data to Snapmaker’s cloud.

However, if the machine is still connected to the internet, there may still be some external communication such as syncing network time. To fully disconnect from the internet, you’ll need to turn off Wi-Fi on the machine.

Will each tool head be able to be recalibrated to account for motion system wear over time so that printing consistency to the tolerance can be maintained?

Each toolhead can be recalibrated for XYZ offset. This helps maintain accuracy over time, even if there’s motion system wear.

Learn more about Snapmaker U1:

Do you plan some extension cables for filament entry boxes? It will be useful for direct connection to filament dryers/boxes. Similar, do you plan some communication protocol for RFID filament recognition in external boxes?

Thank you.

Deposit Holders | How do I claim the $100 cashback for my U1 Kickstarter order?

Your purchase email will serve as proof for the $100 cashback, so no further action is required. Please make sure the email used for your deposit is the same as the one used for your Kickstarter order. The $100 cashback will be applied to your Kickstarter order after the U1 ships.

Deposit Holders | What should I do if my Kickstarter email is different from my deposit email?

If your Kickstarter email address is different from your deposit email address, please contact our customer service team at info@snapmaker.com using your deposit email and include your Kickstarter email. Our team will assist you in updating your information. There is no immediate rush to update your email; just ensure you notify customer service before your batch is shipped so that the cashback can be applied correctly and priority shipping can be arranged.

Due to the current high volume of emails, our customer service team is working as quickly as possible. Once your email has been successfully updated, you can expect a confirmation reply within 3 days.

Add-on | What should I do if I forgot or fail to add an add-on to my U1 Kickstarter order?

Option 1: You can adjust your pledge or add-ons by visiting the U1 project page → clicking “Manage your pledge” → selecting “Change your pledge” on the next page → clicking “Continue your Payment” → and then clicking the Add-ons option in the top left corner → allowing you to switch to a different reward tier and add any add-on rewards you’d like → clicking “Confirm changes”. For detailed instructions, please refer to: https://www.youtube.com/watch?v=mk1dDWVjj60 :warning:Note:

  1. Even if you click Continue your Payment at this stage, no charges will be applied.

  2. Modifying or adding add-ons during the Kickstarter campaign will not affect your Backer Number. Your Backer Number is assigned based on the order in which your initial pledge was successfully submitted, and it remains the same regardless of any later changes to add-ons or reward tiers.

Option 2: We will send you a survey before shipping to confirm your delivery address. During this process, you can still add any desired add-ons to your order. The price of any add-ons purchased through the survey will be the same as the current add-on prices.

Add-on | What are the benefits of add-ons?

PEI Steel Sheet (Textured): The U1 comes with one included. You can choose to purchase additional sheets based on your needs.

0.4mm Hardened Steel Hot End Bundle: Ideal for printing stronger, more durable parts.

Top Cover: Features active air purification and passive chamber heating, capable of maintaining a chamber temperature of up to 50 °C, and it also includes a built-in temperature sensor.

SnapDryer Bundle: Allows you to dry and store filaments in one device, helping to reduce moisture absorption and keep your filaments in optimal condition.

Shipment | I noticed that the Top Cover is scheduled to ship in March. If I add it to my order, will it affect the shipping time of my U1?

All add-ons, except for the Top Cover, will follow the same shipping schedule as the U1. The Top Cover is expected to ship in March and will be dispatched separately. You will receive a notification once your order has been shipped.

Product Related | Is there a U1 slicer profile we can preview?

The Snapmaker Orca Beta displayed on our official website is the stable version and currently does not support previewing the U1 slicer profile. If you would like to try Snapmaker Orca with the U1 profile, you will need to download the development version, called the Snapmaker Orca Nightly Build, available on GitHub. Please note that nightly builds are still in development and may contain bugs. This version is a work in progress and is not recommended for all users. The stable version of Snapmaker Orca will be released for all users when the U1 is delivered to our Kickstarter backers. Here is the download link for you: Release Nightly build · Snapmaker/OrcaSlicer · GitHub

Service | What are the working hours of the Snapmaker Service Team?

Thank you for your patience and understanding. Our Service Team is available from 9:00 AM to 7:00 PM CST, Monday through Friday.

For your reference, here are the equivalent time zones:

  • Pacific Daylight Time (PDT): 6:00 PM – 4:00 AM (previous day to same day)

  • Central European Summer Time (CEST): 3:00 AM – 1:00 PM (same day)

:light_bulb: Don’t worry! If you contact us outside our service hours, we’ll reply as soon as we’re back online.

U1 Product FAQ: https://support.snapmaker.com/hc/en-us/articles/33344279396759-FAQ-for-Snapmaker-U1-3D-Printer

Deposit FAQ: https://support.snapmaker.com/hc/en-us/articles/33474728269207-Snapmaker-U1-Deposit-FAQ
Kickstarter Order Tips: https://support.snapmaker.com/hc/en-us/articles/34201806496663-U1-Kickstarter-Order-Tips

Hi everyone,
Here’s the latest round of Snapmaker U1 FAQs. We’ve compiled answers to common questions about power consumption, filament waste, multi-color printing, and maintenance to help you better understand the U1 and its features.

Product Related | How much power does the U1 consume?

During multi-color printing, while one printhead is actively printing, the other three printheads remain in their parked positions at a standby temperature of around 70°C. To ensure seamless color changes without waiting, each printhead is preheated to its target temperature just before it begins printing. Once the print is complete, all hotends are turned off.

In addition to the main printer(with one toolhead), the three extra toolheads consume approximately 10–30 W in standby in total, depending on printing conditions. Over a 33-hour print, assuming 30 W total for the three toolheads, this amounts to roughly 1 kWh of additional energy usage compared with other printers.

However, the U1 completes multi-color prints more quickly than traditional multi-material systems, reducing overall printing time. Multiple real-world tests, conducted by both users and our internal team, consistently show that the U1 is significantly more energy-efficient. For example, printing a model on the U1 consumed just 0.44 kWh, while printing the same model on other printers consumed 2.1 kWh.

For detailed testing results, please refer to the table in the screenshot below.

Product Related | How does the U1 reduce filament waste?

On automatic filament system machines, waste is generated because a single nozzle must purge old filament every time it switches colors. After the old filament is flushed out, additional purging is needed to ensure that no residue contaminates the new color areas of the print. Since multi-color models often require hundreds or even thousands of filament changes, this process leads to a large amount of wasted filament.

In contrast, the U1 assigns each filament to its own dedicated nozzle. Changing colors is simply a matter of switching nozzles, eliminating the need for purging. Apart from the small amount of filament used for the wiping tower, no extra waste is produced. As a result, the U1 significantly reduces filament consumption compared to automatic filament system machines when printing multi-color models.

For details on potential savings, please refer to: https://www.snapmaker.com/en-US/snapmaker-u1/calculator

Product Related | How can color bleed occur with a multi-head printer, and how does the U1 handle it?

Color bleed typically occurs when residual filament from one nozzle contaminates another, especially in filament changer systems where a single nozzle handles multiple filaments. In those systems, the nozzle must be thoroughly purged whenever switching colors to avoid cross-contamination. This purging process can produce significant waste and increase the chance of color bleeding.

The Snapmaker U1 works differently. It uses a toolchanger system, assigning each filament its own dedicated nozzle. Since each nozzle only prints with its assigned filament, there is no need to flush out old material, which greatly reduces both waste and the risk of color bleed.

The U1 still uses a small prime tower, which clears minor amounts of degraded filament that may sit in a heated nozzle during standby. This ensures clean starts after switching heads and prevents oozing or poor layer bonding, further minimizing color bleed.

In short, while a tiny amount of filament is still used for the prime tower, the U1 drastically reduces waste and color contamination compared to traditional multi-filament systems, delivering clean and precise multi-material prints.

Product Related | Why does the U1 use carbon rods instead of steel shafts?

Carbon fiber rods are selected for their ideal combination of lightweight design and high rigidity, enabling the toolhead to move smoothly and accurately at high speeds. This ensures stable, reliable, and high-quality printing, even during rapid movements.

During manufacturing, we carefully control the tolerance between the carbon rods and oil-free bushings, ensuring precise alignment and reducing vibration. This not only preserves accuracy but also helps keep operational noise under control.

We will continue to actively consider user feedback and explore the potential for offering steel shaft options in the future.

Product Related | What is the thickness of the heated bed?

The heated bed has an overall thickness of 6.5 mm, consisting of a 1.5 mm base plus 5 mm reinforcing ribs. With this structure, the bed mesh variation is generally controlled within 0.4 mm, ensuring stability and reliable print quality.

Order Related | If I change my pledge tier, will it affect my backer number or shipping timeline?

No, your backer number will stay the same. However, the shipping timeline will follow the delivery schedule of your final pledge tier.

Service | What are the maintenance and replacement costs for the U1?

The U1 is designed for low-maintenance operation. Consumables such as hotends and filament tubes are easy to replace and reasonably priced, helping to keep operating costs low. After the Kickstarter campaign ends, replacement parts will also be available through the official store.

Fore more information, please visit:

1 Like

@Sherry, for the next one can you please add to “What is the maximum rated power for 120V and 240V users?” It’s a slightly different question to actual power used.

Hi @Wombley! Here’s the information for maximum rated power:

Max Power: 1150W at 220V, 400W at 110V
Max Current: 6A at 220V, 4A at 110V

1 Like

Thanks! It’s coming up a lot. :blush: This would be great to have on the Snapmaker U1 specs page if it’s not added already.

1 Like

This is surprising for me. Would it mean the machine will heat up much slower when driven on 110V?

247printing did a video showing power and heating times, and it’s indeed fast on 220 V (when you’re used to 110 V, ha).

Testing one on 110 V, I haven’t quantified heating times to be honest. Maybe Snapmaker can share specs.

But it also hasn’t stood out to me as being slower heating than any other printer I’ve used in North America. Still pretty quick.

Hey U1 backers!

We’ve put together some key FAQs about the U1, including pogo pin durability, camera specs, SnapDryer tips, and Kickstarter order info. Take a look if you want a quick guide on maintenance, power levels, or managing your backing.

Product Related | How durable are the pogo pins, and what maintenance is needed?

Snapmaker uses customized pogo pins with enhanced plating and wear resistance. They are designed to be rated for 1,000,000 toolhead swaps under normal use.

  • The U1 automatically tracks the number of swaps, which you can check on the touchscreen anytime.

  • Every 100,000 swaps, you’ll receive a reminder to clean the gold contacts on both sides to prevent dirt buildup and ensure stable connectivity.

  • If error codes appear, the pogo pins can be replaced by swapping the PCBA on the toolhead or Toolhead Swapper. Replacing a single PCBA takes less than 5 minutes.

After the Kickstarter campaign, replacement PCBAs will be available in our official store, along with detailed instructions. These parts will be offered at a reasonable price.

Example: If you print about 7 multi-color models per week, and each model requires ~600 tool changes:

  • The expected pogo pins maintenance: roughly every 6 months (100,000 ÷ 600 ÷ 7 ÷ 4).

  • The expected PCBA replacement: after about 5 years of usage (1,000,000 ÷ 600 ÷ 7 ÷ 4).

Product Related | What is the maximum power and current of U1?

Max Input Power: 1150 W (220–240 V~), 400 W (100–120 V~)

Max Input Current: 6 A (220–240 V~), 4 A (100–120 V~)

Product Related | What is the resolution and frame rate of the camera?

The camera features a 2MP (2-megapixel) resolution and a frame rate of around 1 Hz, using industry-standard specifications that are sufficient to meet typical usage needs.

Add-on | Information about SnapDryer

The U1 SnapDryer is a collaborative brand product with Polymaker & FabNotion, specifically optimized for compatibility with Snapmaker Printers. While its core functionality remains consistent, it incorporates several refinements, such as the addition of a Filament Tube, to improve overall usability. Each SnapDryer Bundle includes 1 Dryer Dock and 4 SnapDryer Boxes.

The SnapDryer is placed next to the U1, and below is the photo of four SnapDryer Boxes placed next to the U1, shared by U1 test pilot @Danny Adams.

Please note that RFID recognition is not supported when printing directly from the SnapDryer. You will need to manually enter the filament type and color on the screen. Regarding the option to connect a filament tube from the SnapDryer box directly to the feeder inlet, our R&D team is currently evaluating this and will provide an update once confirmed. If this solution cannot be implemented, we will provide an STL file so users can print a cover for the filament exposed to the air.

Since the internal temperature distribution of the SnapDryer during operation is influenced by multiple factors, temperature alone is not a reliable indicator of drying performance. Instead, the drying capacity is expressed in terms of power levels, with higher levels representing stronger drying capabilities.

The correlation between power levels and the Dry Dock outlet temperature is as follows:

  • Power Level 1 → ~50 °C

  • Power Level 2 → ~60 °C

  • Power Level 3 → ~70 °C

Order Related | If I backed the U1 project using my Apple ID, what should I be aware of?

  • If your Kickstarter email can receive emails from outside Kickstarter, you don’t need to do anything—just make sure it matches the email you used for your deposit.

  • If your Kickstarter email is an Apple relay address (xxxxx@privaterelay.appleid.com) and can only receive email from Kickstarter, you will need to update it to your actual email so you can get shipping notifications and deposit refunds. Please contact Kickstarter Support to update your Kickstarter email. Once updated, please email our customer service team at info@snapmaker.com to update your deposit email address.

Order Related | Why is my Backer Number showing as 0?

If your Backer Number is 0, this indicates that your pledge was not successfully recorded. To resolve this, please contact Kickstarter Support for assistance in correcting your backing.

Deposit Holders | Please check your inbox for an email with the subject line “Action Required: Complete Your U1 Backing on Kickstarter.”

You received this email because the email address used for your deposit does not match the one linked to your Kickstarter order. To ensure you receive the $100 refund after the U1 ships, please send an email from your deposit email address to info@snapmaker.com and include your Kickstarter order email address. Our customer service team will assist you in updating your deposit email to ensure it matches your Kickstarter order email within 1-2 business days.

1 Like

Might Snapmaker please clarify if this is flow or PA calibration, or both?

Hi Wombley! The automatic calibration only covers Press Advance Calibration. For official Snapmaker filaments, the flow ratio is preset in the slicing software. For third-party filaments, it needs to be adjusted manually.

1 Like

If it is a preset value it is not really a calibration, is it? :wink:

1 Like

Hi Thomas,
Thanks for pointing that out! I’ve updated the reply to make it clearer and reduce any potential misunderstanding. :blush:

All good, I was just splitting hairs.

How does one figure out that number? Is there a print test I could use, like a temperature tower just with different speeds instead of temperatures?