Howdy, folks. I purchased a SM 2.0 for my classroom, and am currently in the process of learning how to use it so I can teach my students about rapid prototyping.
Currently, I’m using Luban on a W10 machine. I’m using the latest firmware build (upgraded it, this week). I have am organizing my sample builds, starting with temperature variants, and these are my results so far:
As you can see, I’ve got a lot of very solid strings going. One of the first things I did was change the default retraction speed (after the first print model was a tangled mess), but I was wondering what I should start modifying from here, to get a better result?
I’m certainly no expert on getting beautiful prints with the SM2, but I have found that reducing speed and temperature greatly reduce stringing. 190 is generally the temp, and speed 35-45. Though even with those, I get some hiccups. Really need to get back to debugging the extrusion on my SM2 when I get the time.
untergeek recently posted a link to a retraction calibration tool. It will generate a tower with various retraction parameters in a single print. There are 3 different parameters you can change (temp, retraction speed, or fan speed), but I would recommend only changing one at a time.
There’s also some pre-sliced temperature towers in the 3D Print Guide, section 4.1, along with other suggested test objects.
As for your actual question… I don’t know either. My retraction test looks a lot like your test.
What filament do you use?
I would suggest to set your retraction distance to 1mm @ 60mm/s.
Less distance prevents backed filament in the nozzle.
I would start with a temp tower.
I have read about the sm filament of the 2.0 several times, from time to time the quality is poor…
I’m certainly no expert on getting beautiful prints with the SM2, but I have found that reducing speed and temperature greatly reduce stringing. 190 is generally the temp, and speed 35-45. Though even with those, I get some hiccups. Really need to get back to debugging the extrusion on my SM2 when I get the time.
190 is the bottom range of the PLA filament I’m using. I’ve been going from there to 205, which is the default SM2 setting.
untergeek recently posted a link to a retraction calibration tool. It will generate a tower with various retraction parameters in a single print. There are 3 different parameters you can change (temp, retraction speed, or fan speed), but I would recommend only changing one at a time.
I just looked at that site. I’ll have a go with that and see what I get out of it. I have a lot of ‘test’ builds, but I didn’t realize you could modify the temp and retraction rates ‘on the fly,’ as it were, inside the GCode.
What filament do you use?
I would suggest to set your retraction distance to 1mm @ 60mm/s.
Less distance prevents backed filament in the nozzle.
I would start with a temp tower.
I have read about the sm filament of the 2.0 several times, from time to time the quality is poor…
I’m using the default spool of PLA that came with the machine. I’ll definitely back off my 3mm retraction distance. As for the PLA, I got a single good print of several objects at once, but after I updated the firmware, everything went higgledy piggledy, again. I’m guessing due to the extraction error correction in the latest build, which is why I’m starting from scratch.
Luban won’t let you do that, which is why it’s a separate tool.
Fundamentally, GCode is a series of commands to “move this motor this distance”. If you can do something once it, you can do it multiple times. For example, the Temp Tower in xchris’ 3D Print Guide were manually editted to have the temperature change added at the correct location. Which is why the GCode is available for download, rather than instructions for how to slice and hand edit the files.
You can use the default settings in Snapmaker Luban. And the work speed should be low so that the dwelling time is long enough to retract the filament.
Clewis, I used untergeek’s tower, and along with a 30 minute job cleaning the bed after the print because the initial layer was so thin it would not come up, this is what came out:
I’m not sure I’m reading it correctly though. Following the large loops up and around, and looking for the best print area, I seem to need a full 6mm retraction, and (counting the loops up, starting with the default 10mm, and going up by 10 per increment), it needs to retract at 200mm/s. That can’t be right, can it?
I think I might need to try another test (but with something else, because I don’t want to have to scrape my bed for another half hour).
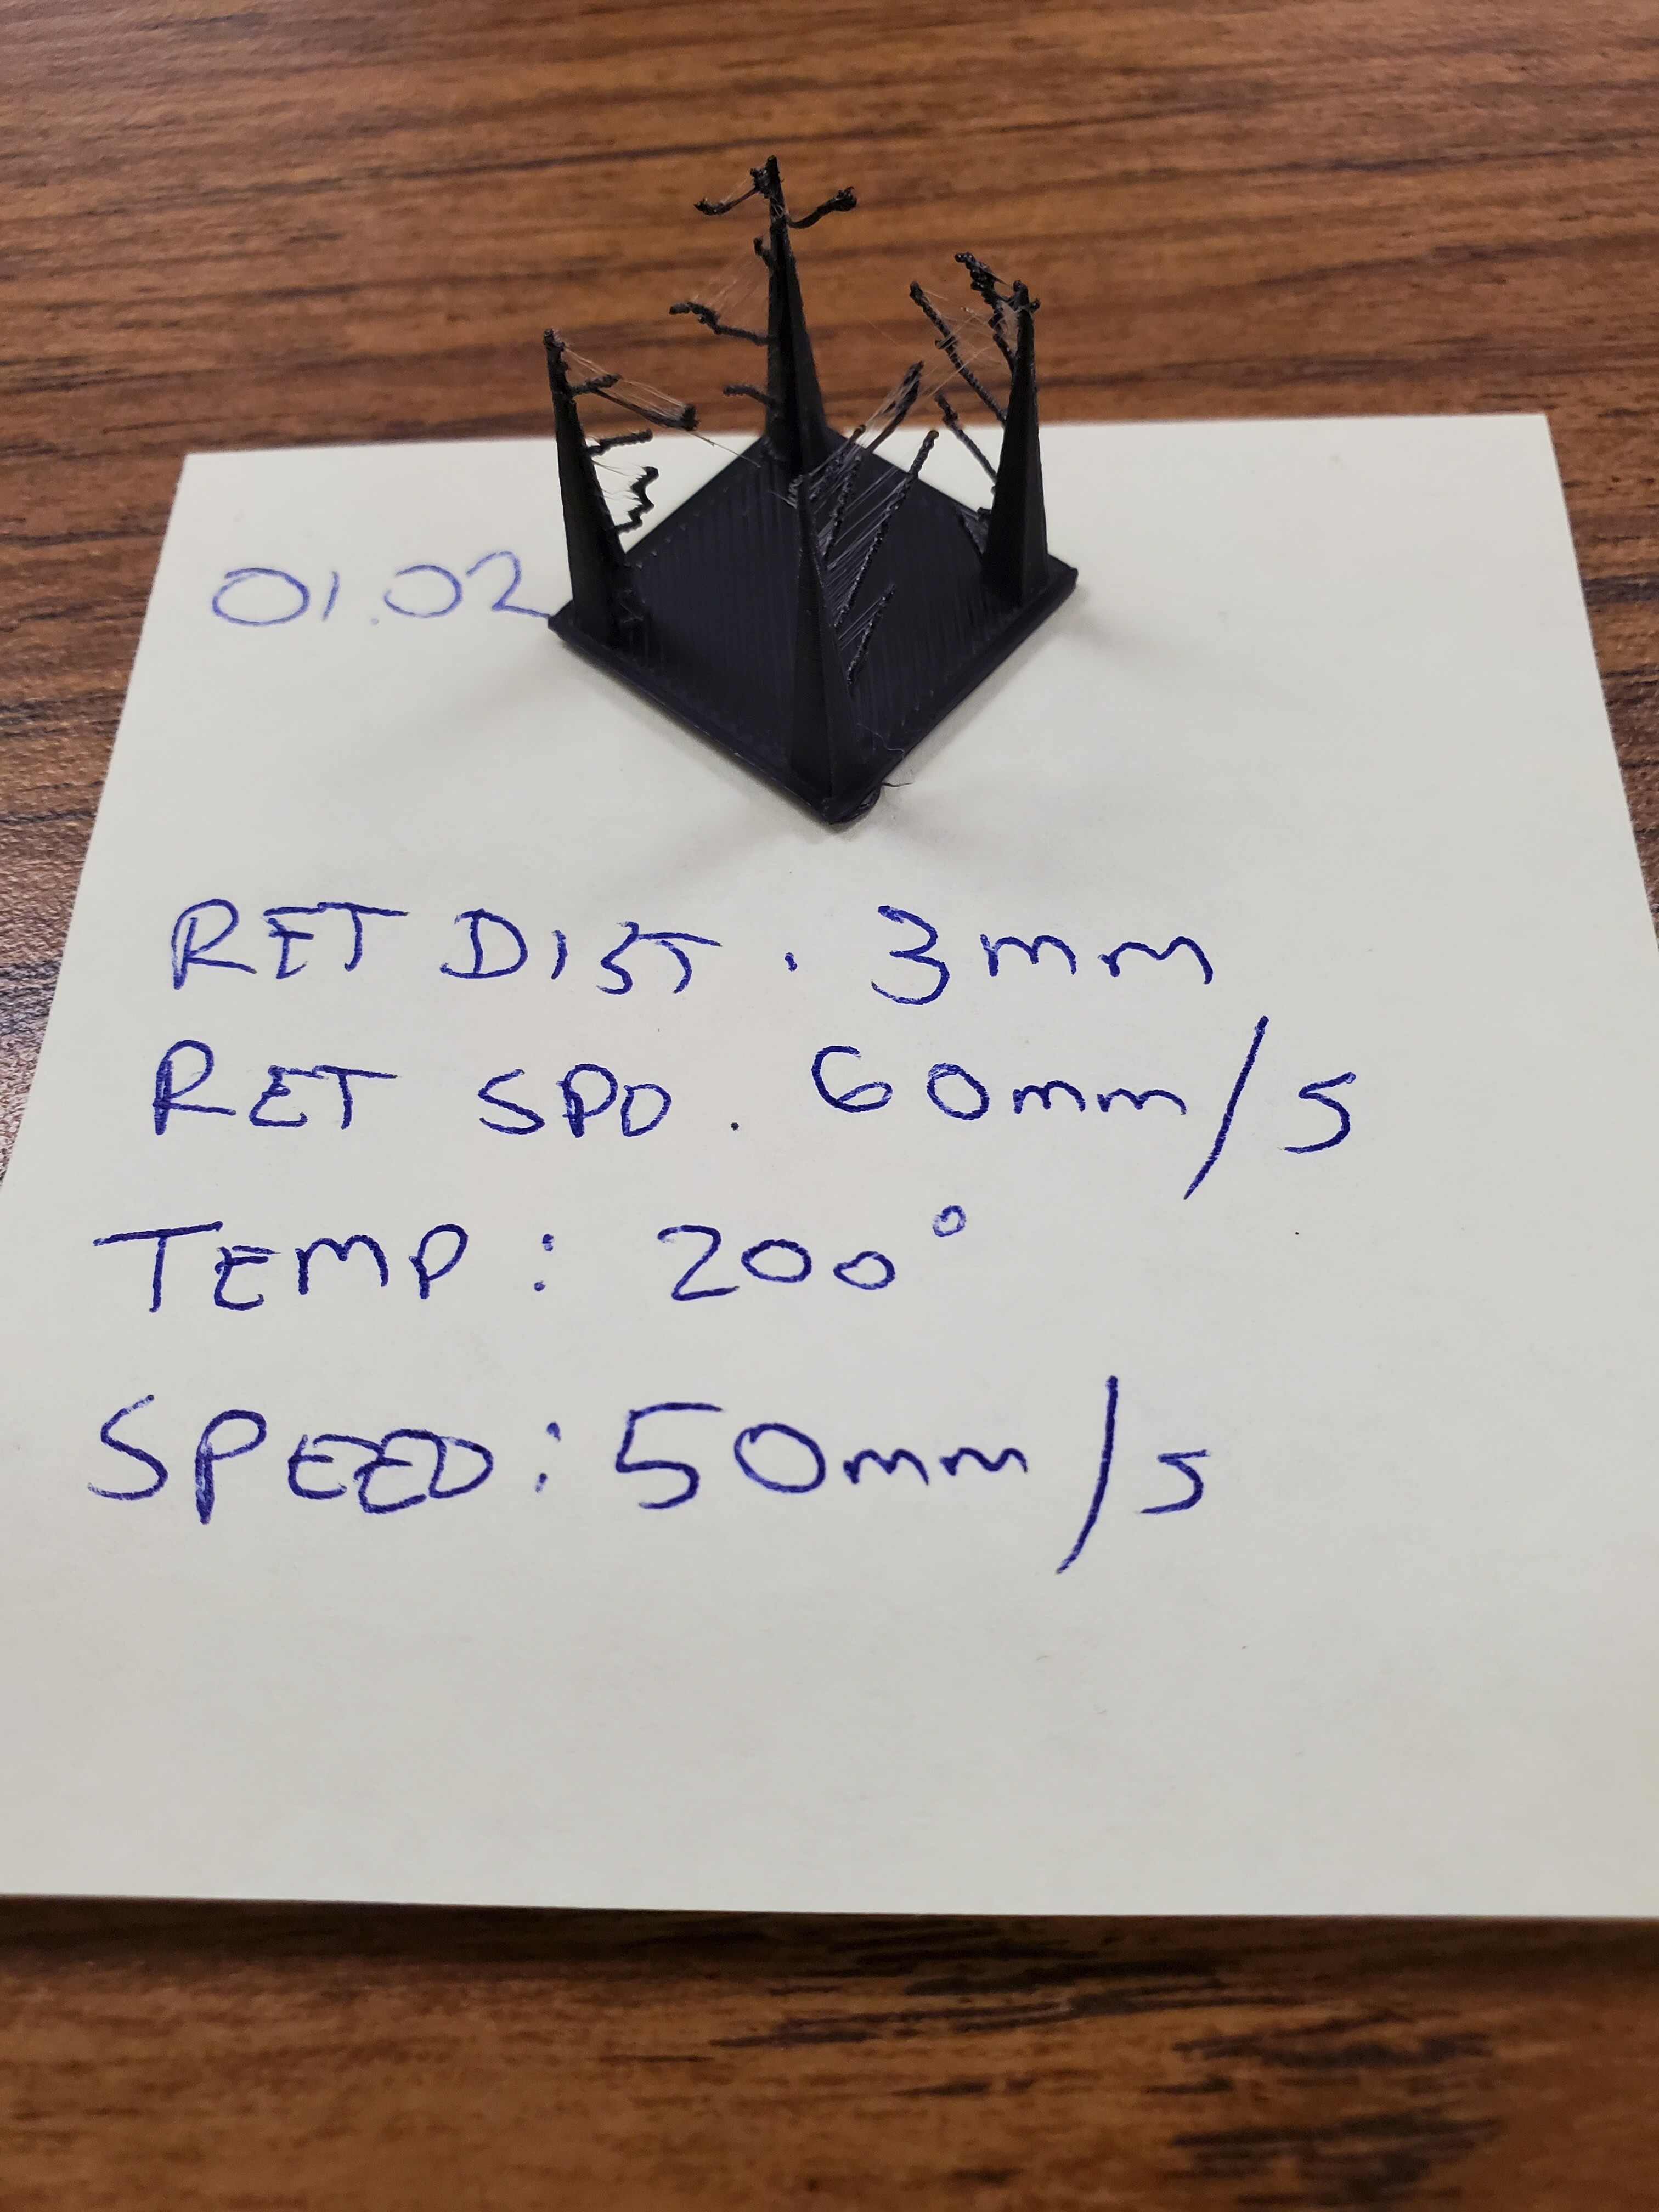
I’ve been sharing the test results with the students, and we’ve been talking about them in relationship to what we known about the process. We’re also printing out a small 15mm miniature, for comparison purposes, with each tower we’ve printed (see below). What test would you recommend for just retraction issues?
Here are the GCode Files for the various tests I’ve been running. Test_01_01 and Test 03_01 are retraction test towers, and the 01_02 and 03_02 are small game figures. I’ve run them both at 190, 195, 200, and 205 degree, using:
60mm/s travel speed
1mm Retraction distance
60mm/s Retraction speed.
The best result I’ve gotten at this point, using the Snapmaker PLA included with the machine is below. As you can see, I’ve moved from solid threads to a few smaller threads and lots of fine webbing, so I guess that’s a bit of improvement:
I thought it was dry here in Denver, but I bought a hygrometer and found out the RH was up in the 80s and 90s in the last couple weeks! I’m running a Sunlu dryer box at 55C (for ABS) on top of the enclosure, feeding through PTFE tube to a Thordsen inline dryer at 90C, and from there through a hole in the top of the enclosure, right over the middle of the X rail, to the printhead in PTFE tube. The roll now turns with no jerking on the X rail, and I can definitely see the difference between dried filament and not dried!
I’m did some tests of this one this morning. I ran them at 190, 195, 200, and 205, with the Snapmaker PLA (unfortunately, that’s all I have, at the moment, having shot my budget on the machine and enclosure). I’ve set the retraction parameters for:
1mm Retraction
60mm/s Retraction Speed
0 Extra Restart
40mm Prime Speed
0.5 Z-Hop
All the resulting temps had ‘hairy legs,’ to some degree, but really, there was little real difference between the various temperature ranges. Pretty much all of them came out looking like this:
So it’s clear from this particular test (thanks, Brent) that retraction isn’t really my issue. So I’m kind of stuck at why I can’t get a relatively clean print on my other models (like the ones below) using the same retraction settings. Is there something else in this GCode that I’m missing?
Thanks for the feedback. I ran the test, and the results where counter intuitive to me. I wasn’t sure how useful it was, but it seemed to be useful. I’ll stop linking back to it.
I’ve kept it between 190 and 205. Nothing higher. Typically I do 4 print runs of the same gcode at 190, 195, 200, and 205 to get a good idea of which temperature is working best. And I am using Luban, but with a custom copy of the Normal Print setting, modified for 1mm/60mms retraction and 0.5 Z-hop. The layer depth is set to .15mm after an initial layer height of .3mm.
Again, I’m using Luban, but that is mainly because it came with the machine and I haven’t the budget for a new program, and the bureaucratic hassle of getting a new piece of software added to the computers in a public school is a nightmare (it took me almost two years to get them to add Adobe Creative Cloud rather than continue using Creative Suite 6). So let’s assume I’m stuck with that for the moment.
I agree. I started to print out a set of miniatures (I plan to use these for my Game Design class), widely spaced apart at 205 degrees, but immediately got some serious webbing issues that were not present in the previous retraction test prints:
I tried to adjust the nozzle temperature down to 195 during the process, to try and correct for that, but the nozzle never cooled down to more than 204, so on the fly adjustments don’t really work.
The sad thing is, before I updated the firmware to make up for the extraction error issue, I got one good print out of the machine (this was a few weeks ago):
As you can see, no spikes, everything printed with a clean separation, and minimal webbing between the antlers (which I would expect). Once I updated, however, everything started getting spikey, and the best I’ve been able to do since then is to dial it back it to the point where it looks like I have a machine full of spiders.
I’m looking at other colors of filament as we speak.
As an aside, I am totally new to this process, as I have said, and the folks on this forum have been fantastic. Much obliged to all of you for helping me through this…
It’s prudent to be mindful of assumptions being made.
Unless you’ve verified the thermistor is reporting the temperature accurately, that’s an assumption. The exact number is not important, and a temp tower (like the one from Teaching Tech) is necessary to find out optimal temps for your machine.
On my machine 205 is the minimum acceptable temperature for the layers to fuse while printing. On yours it appears the model is sagging from the heat. Indeed, this has wider considerations where some models may need different cooling or different nozzle temperatures to have better layer adhesion and strength or less sagging or better bridging, etc.
From the perspective of ‘continuous improvement’ your examples of ‘good prints’ seems to have several aspects that can be improved. I’d be interested in which model the bottom middle print is - some of those surface pocks seem plausibly in the model, but if not would be indicative of serious slicer or firmware issues.
Regarding the stringing - have you tried replacing the hotend? Rarely, but sometimes, a burr or machining defect in the nozzle can result in unusually bad stringing.
I’m trying to knock out issues one at a time, while trying to understand the principles behind the various settings. Once I get the stringing reduced or eliminated, I’ll definitely look at those.
That would be a last resort (out of budget for the year), but if nothing else works, I can try that.
I updated the firmware when 12.0 came out. That’s when my prints started getting hairy. As for the module, both sides have a slit/vent. It’s also very dirty under there, with some sort of splashback/splatter on the area around the nozzle. How do you clean that?
Z-Hop has been configured to 0.5mm on the previous prints.
That is helpful! Right now, I’m running the printer from my machine only, so one is all I need, and one free bit of software is much easier for me to swing.