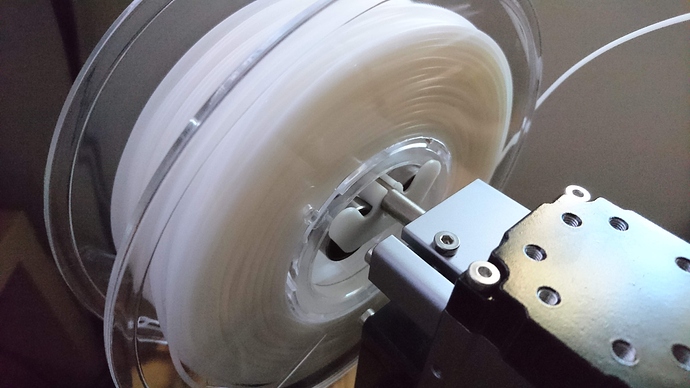
For a smoother spool feed. Leave it on your spool rod when changing filament spools. 4 x 608z bearings required (leftover from fidget spinner craze).
How clever is that, well done.
Out of curiosity what CAD application do you use to design components?
Have a great Easter
Doug
Very Nice. Already added it to SnapLinks!
Thanks @doug.
I’ve been using Tinkercad online to design these components. Eventually I want to use Fusion 360, but I like the simplicity of Tinkercad’s ability to boolean primitive shapes together to design the components. Being online is a plus because I’m running an older Mac Mini from 2012 and I’m not sure what kind of performance it will have with Fusion 360.
Hi @kelvin8r
Thanks for the response. Being new to all of this, I looked around and started with Fusion 360… it is a learning curve however perseverance is getting me there. I keep trying new bits of functionality and slowly getting there. In this item I started with a base plate from a supplier and added the superstructure. Slowly but surely I am learning
Doug
I have print one of this spools guides and I strongly recommend it. The spool rotates very smooth.
I printed a pair of these. The 608 bearings are available on Amazon. 10 for $5. This works REALLY well on my snapmaker.
One thing I’ve discovered is that the guides like to “walk” along the rod, eventually causing the spool to fall off the bearings. To remedy this, I cut a section of the tubing that normally goes on the factory mount long enough to act as a spacer between the outer guide and the thumbscrew. No more walking.
That’s a great fix. Thanks for the feedback. I never thought about the PLA “loosening” over time. I actually printed a pair of these in PETG as a test. I’ll see if it fares better than the PLA.
I have enough tubing left over to make more spacers for different width spools. 
I may have to see if I can come up with an adjustable spacer Thing.
@kelvin8r this is so cool!!!
Wow, just wow.
I made this as my very first print on my brand new Snapmaker. Came out pretty near perfect, as far as I can tell. I don’t know if it was just beginner’s luck or not, but I am very impressed with the Snapmaker so far.
I basically:
- Assembled the unit.
- Calibrated the bed with the included card.
- Loaded the filament, got it on the first try!
- Generated the gcode from Snapmakerjs.
- Copied gcode to USB and launched it!
I used the Normal profile, modified for 2mm thickness, 20% infill and 60/50 heated bed as recommended by @kelvin8r. I printed the first set with brim because I was worried about bed adhesion, but for the second set I went for it without it and it stuck fine.
The only issue I had was that the fit with the 608 bearings was extremely tight, so much so that I could not initially get them all of the way on. My wife’s trusty hairdryer came to the rescue and after a few seconds of hot air, the bearings slid right on. I placed the the spool on the completed guides and it rolled “like butta”.
Kudos to @kelvin8r on a great part design and a big round of applause to Snapmaker for a great out-of-the-box experience.
Cheers,
Mike
P.S. Apologies for the blurry just-completed print pic.
Glad it worked out for you. You’re off to a great start of a new hobby. Welcome to the Snapmaker family.


