I have done four 3d prints with Snapmaker 2.0, and gotten distinctly different adhesion results with each, even though the setup was identical.
The first print was a case for an arduino processor, and though the adhesion was decent, the first layer turned out VERY rough. I expected that first layer to be smooth, but I could see the individual strands of filament in the print.
The second print was all of the sixteen black pieces of a spiral chess set from thingverse. some of the pieces did not adhere at all, and the print head dragged them into adjacent pieces, making it necessary to trash the entire job.
The third and fourth jobs involved the printing of a pawn from the above mentioned chess set, first in “Normal Quality” and then in high quality. This time, before printing, I cleaned the print sheet with isopropyl anchor as I had seen recommended in some posts. On both of these jobs, the adhesion was so strong, that the print sheet suffered some damage when I removed the pieces.
In addition, at the very top of each spiral opening in the chess pieces, the print sagged at the point that the print layer was horizontal.
How can these problems be avoided in future prints? How can I get consistent performance without destroying the print sheet?
I print my first layer with about 15mm/s and a minimum layer height of 0.2mm. Be sure your machine bed is pretty good leveled and adjust the rest with the z-offset from the touchscreen.
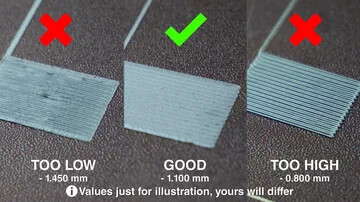
Without pictures it’s hard to say for certain, but that sounds like Z is too high.
Your second print also sounds too high if it’s not stuck to the plate.
3rd and 4th I don’t have anything to say about that, I have heard of other people with that issue but I don’t recall ever seeing a definitive solution. Normally people say raise Z, but if your other prints are too high that’s probably not the issue.
I’d support @xchrisd’s suggestion of double checking bed level. It might be worth manually moving the head to Z=0 (with a cold nozzle so nothing melts) and moving around in X and Y where the print will be and checking with the card. If there are significant variations maybe re-run bed levelling with a 5x5 grid. If that doesn’t fix it you may have to print a raft under each print.
Thanks for the reply. Of the first print which adhered well but which had a non smooth first layer, it looks very like the third image in the pic you sent.
It only gets worse. Trying yet another print of another chess set, the filament decided not to stop feeding and only created partial first layers of few of the pieces of the job. It also turns out that the print stew now seems impossible to make clean now. This is thoroughly frustrating. So far, of five jobs, only the first is marginally successful/usable, and that not very satisfactory. The third and fourth could actually be used but the print quality is poor. I don’t know if you only a member of the community or part of the snapmaker team, so I am only venting here. Do you have any ideas, or should I be seeking support through the support pages?
Could you upload a few pictures of your first layer? This could help with finding out what’s going on.
For horizontal parts that would be in the air you need to activate supports.