Hi guys,
my Snapmaker Orignal arrived today! What a great machine!
I’ve assembled the Snapmaker and forn now I leave the Enclousure v1.1 in its box so I can make same test also on the noise…
First of all I’ve upgraded the firmware so now I’m running the last v2.11 and I’ve calibrated the plane with the given paper.
I’ve downloaded the 3DBenchy.stl and I’ve generated the gcode using “Reccomended - Fast Print” settings on Snapmakerjs SW.
In the first run the boat get detached from the plane after about 10min… I’ve thougth it could be caused by a wrong calibration so I re-calibrate the plane so that now the paper is more “taken” so the nozzle is closer to the plane.
The second run seemed to be ok but after about 40min the fu… boat get detached again!
Now I think I can’t make the nozzle more close to the plane so maybe the problem is somewhere else.
1, You can choose the adhesion methods as raft.
2, You can have a higher heated bed temp value.
3, Please make sure that you have done a good calibration process and that needs some practices.
In addition, if you are using the enclosure. You need to make sure that the cable of the enclosure is in the port 4. And turn on the door detection in the firmware and software as declared in the following articles.
Hey @Bullone maybe you try a slower first layer and get the heat of the bed up or do it with better quality option, they would go slower.
First layer adhesion is pretty important.
As @xchrisd mentioned, I usually don’t need a raft if I raise the first layer’s nozzle to 210ºC and the bed to 60ºC, then let it go back to the default for the rest of the layers. It also helps if I reduce drafts in the room by closing the window and turn off the ceiling fan for the first couple layers, but that shouldn’t matter once you put it inside the enclosure.
When I do my calibration, I like to print a quick test. I’ll usually run the inner and outer walls, then turn it off, and examine the lines. If they look thin and squished, raise that corner by 0.05mm. If they look narrow and tall, or don’t stick to the bed at all, lower the head 0.05mm. Repeat until happy, then let it run to completion. If there are parts that get pushed off the bed (because the nozzle is too close), try raising the nearest corner 0.05mm again. Play around until you’re happy with how that prints, then go for something more complex. It takes a while, but I’m much happier with my print quality and bed adhesion after doing it.
I have a problem with dust too (no enclosure). If you haven’t printed in a while, it doesn’t hurt to wipe the bed down with rubbing alcohol using a lint free cloth. Or if I can’t find my stuff, I’ll print the calibration test again. Nothing cleans the print bed quite like a successful print.
Hi guys, thanks for respone!
Yesterday after cleaning the bed with alcohol I’ve tried to decrease the Initial Layer Print Speed to 10mm/s and also increase the Initial Layer Line Width to 130% but at about 70/75% it get detached again! grrrrrrrrrr…
I’m using the Recommended Fast Print option till now but is it possible to make the 3DBenchy with this “fast” settings or I should move to Mormal Quality?
Have you ever made the 3DBenchy with the Snapmaker Original in Fast Print option?
If you print the first layer really slow, then you have maybe a leveling problem.
Try leveling the bed again, maybe use a raft or slower print settings.
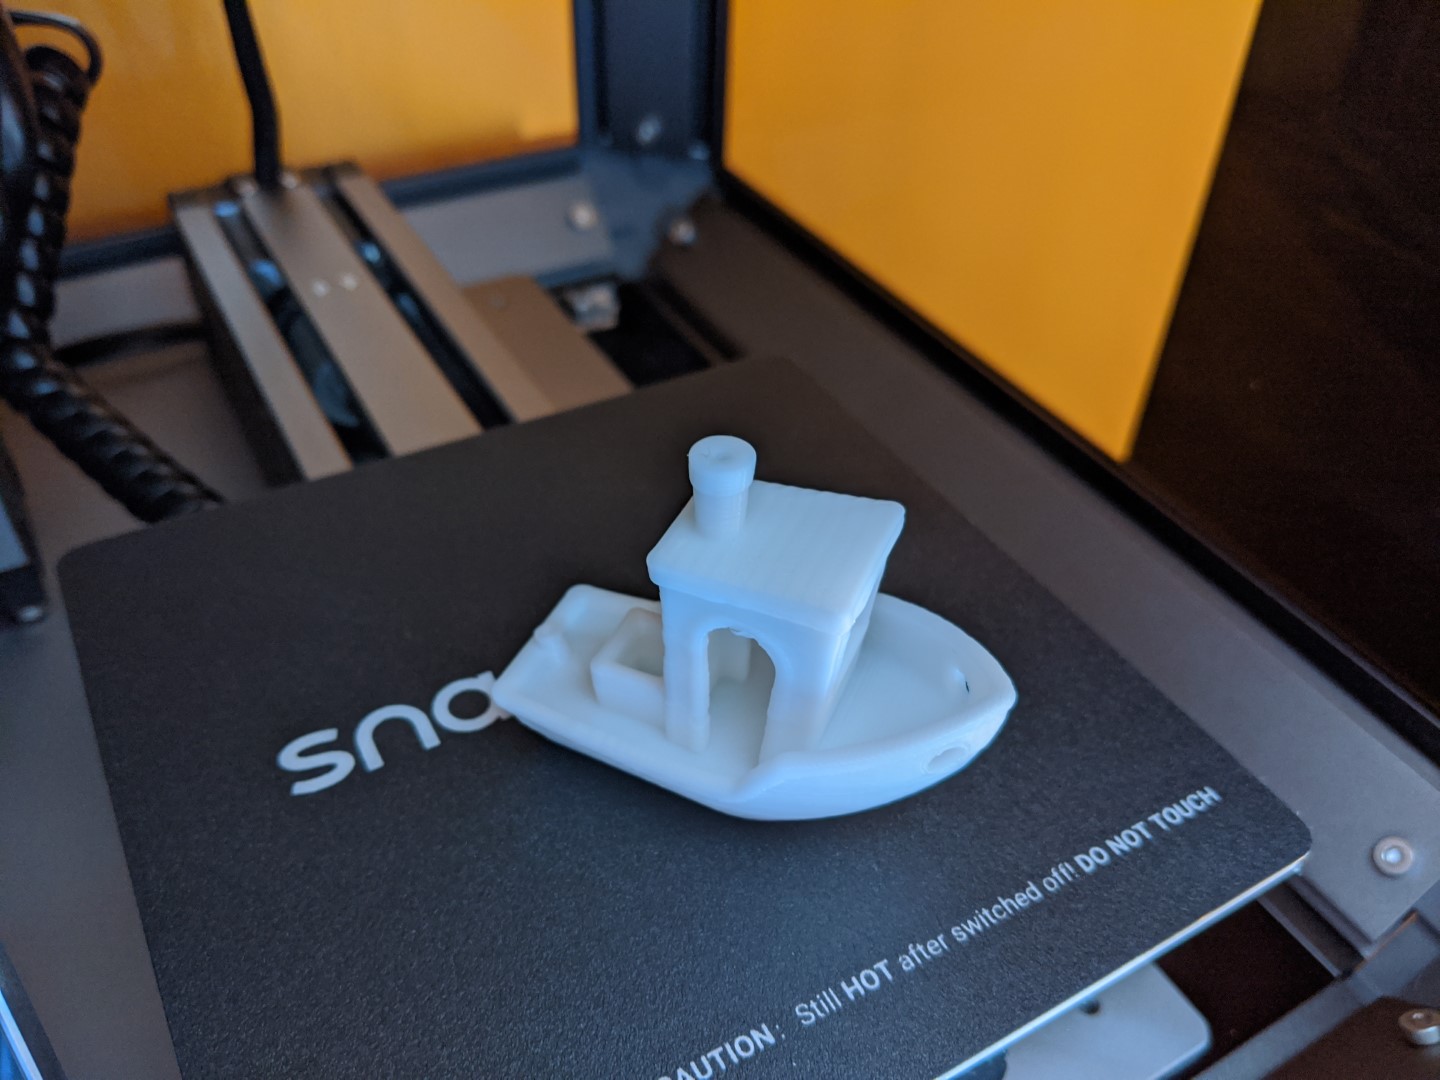
Looks not bad but not perfect yet.
What printing temperature did you use?- I would decrease the temp by 5-10°C because of the bridge and the bit thinner wall at the house.
I used all the Reccomended Fast Print settings so if I’m not wrong:
Printing Temperature 198C
Printing Temperature Initial Layer 200C
Printing Temperature Filan Layer 198C
Should I increase all of them?
I’m thinking to add the Cooling Shroud, what do you think it will help me also on this not perfect surface?
Thi kind of object needs all this fine tune because it is very stressing for the printer or when I’ll find the right settings I’ll have to use it for all my feature works?
What about Reccomended Normal and High Quality settings?
I’ve used the white PLA filament I found inside the Snapmaker box and today arrived these 2 guys:
Hope these new filaments are fine.
Now I’m just printing the first file of the Cooling Shroud (Cooling_Shroud-14.stl) with the Reccomended Normal Quality with no custom settings. The base of the object seems large and the speed il lower than the Fast Print so I hope I’ll not get problem. I’m using the new black filament…
Oh great that’s the link I’m looking for the enclosure!
I’ve never attached the PC to the Snapmaker (I 'm using the USB Stick) so maybe the controller has not yet configured to manage the input from the enclosure?
If I connect the cable of the enclosure to the controller port 4 I can’t print correctly! The Snapmaker seems crazy and started printing in a very high position, then I retry and after the first line it moves to the borderline and so on…


