Advice for the New Guy?

Hi there, first I’d like to say I’m new to 3d printing in general. Was interested in the Snapmaker 1, but when I heard 2 was coming out I decided to jump on that. I’m now the owner of an A250 with the enclosure as well.

As I said, I’m new to this. I’ve done my test vase which took obscenely long compared to the book’s estimated time. The result wasn’t bad at all. I got impatient and immediately decided to try my hand at printing miniatures. That was a disaster in itself, turns out supports are a big thing. After that, I tried several different options to get miniatures to work right. When that didn’t turn out I tried printing these little towers to see how I could get the best quality. I’ve tried various things including a different slicer, trying different layer heights, wall thicknesses, infill densities, speeds, retraction speed and length, praying, various percentile speeds, adding more air to the enclosure.

I found the best settings I could get and decided to print something a wee bit bigger than a miniature and opted for a tie fighter I found online. It didn’t come out that great. What I thought were great settings left some issues:


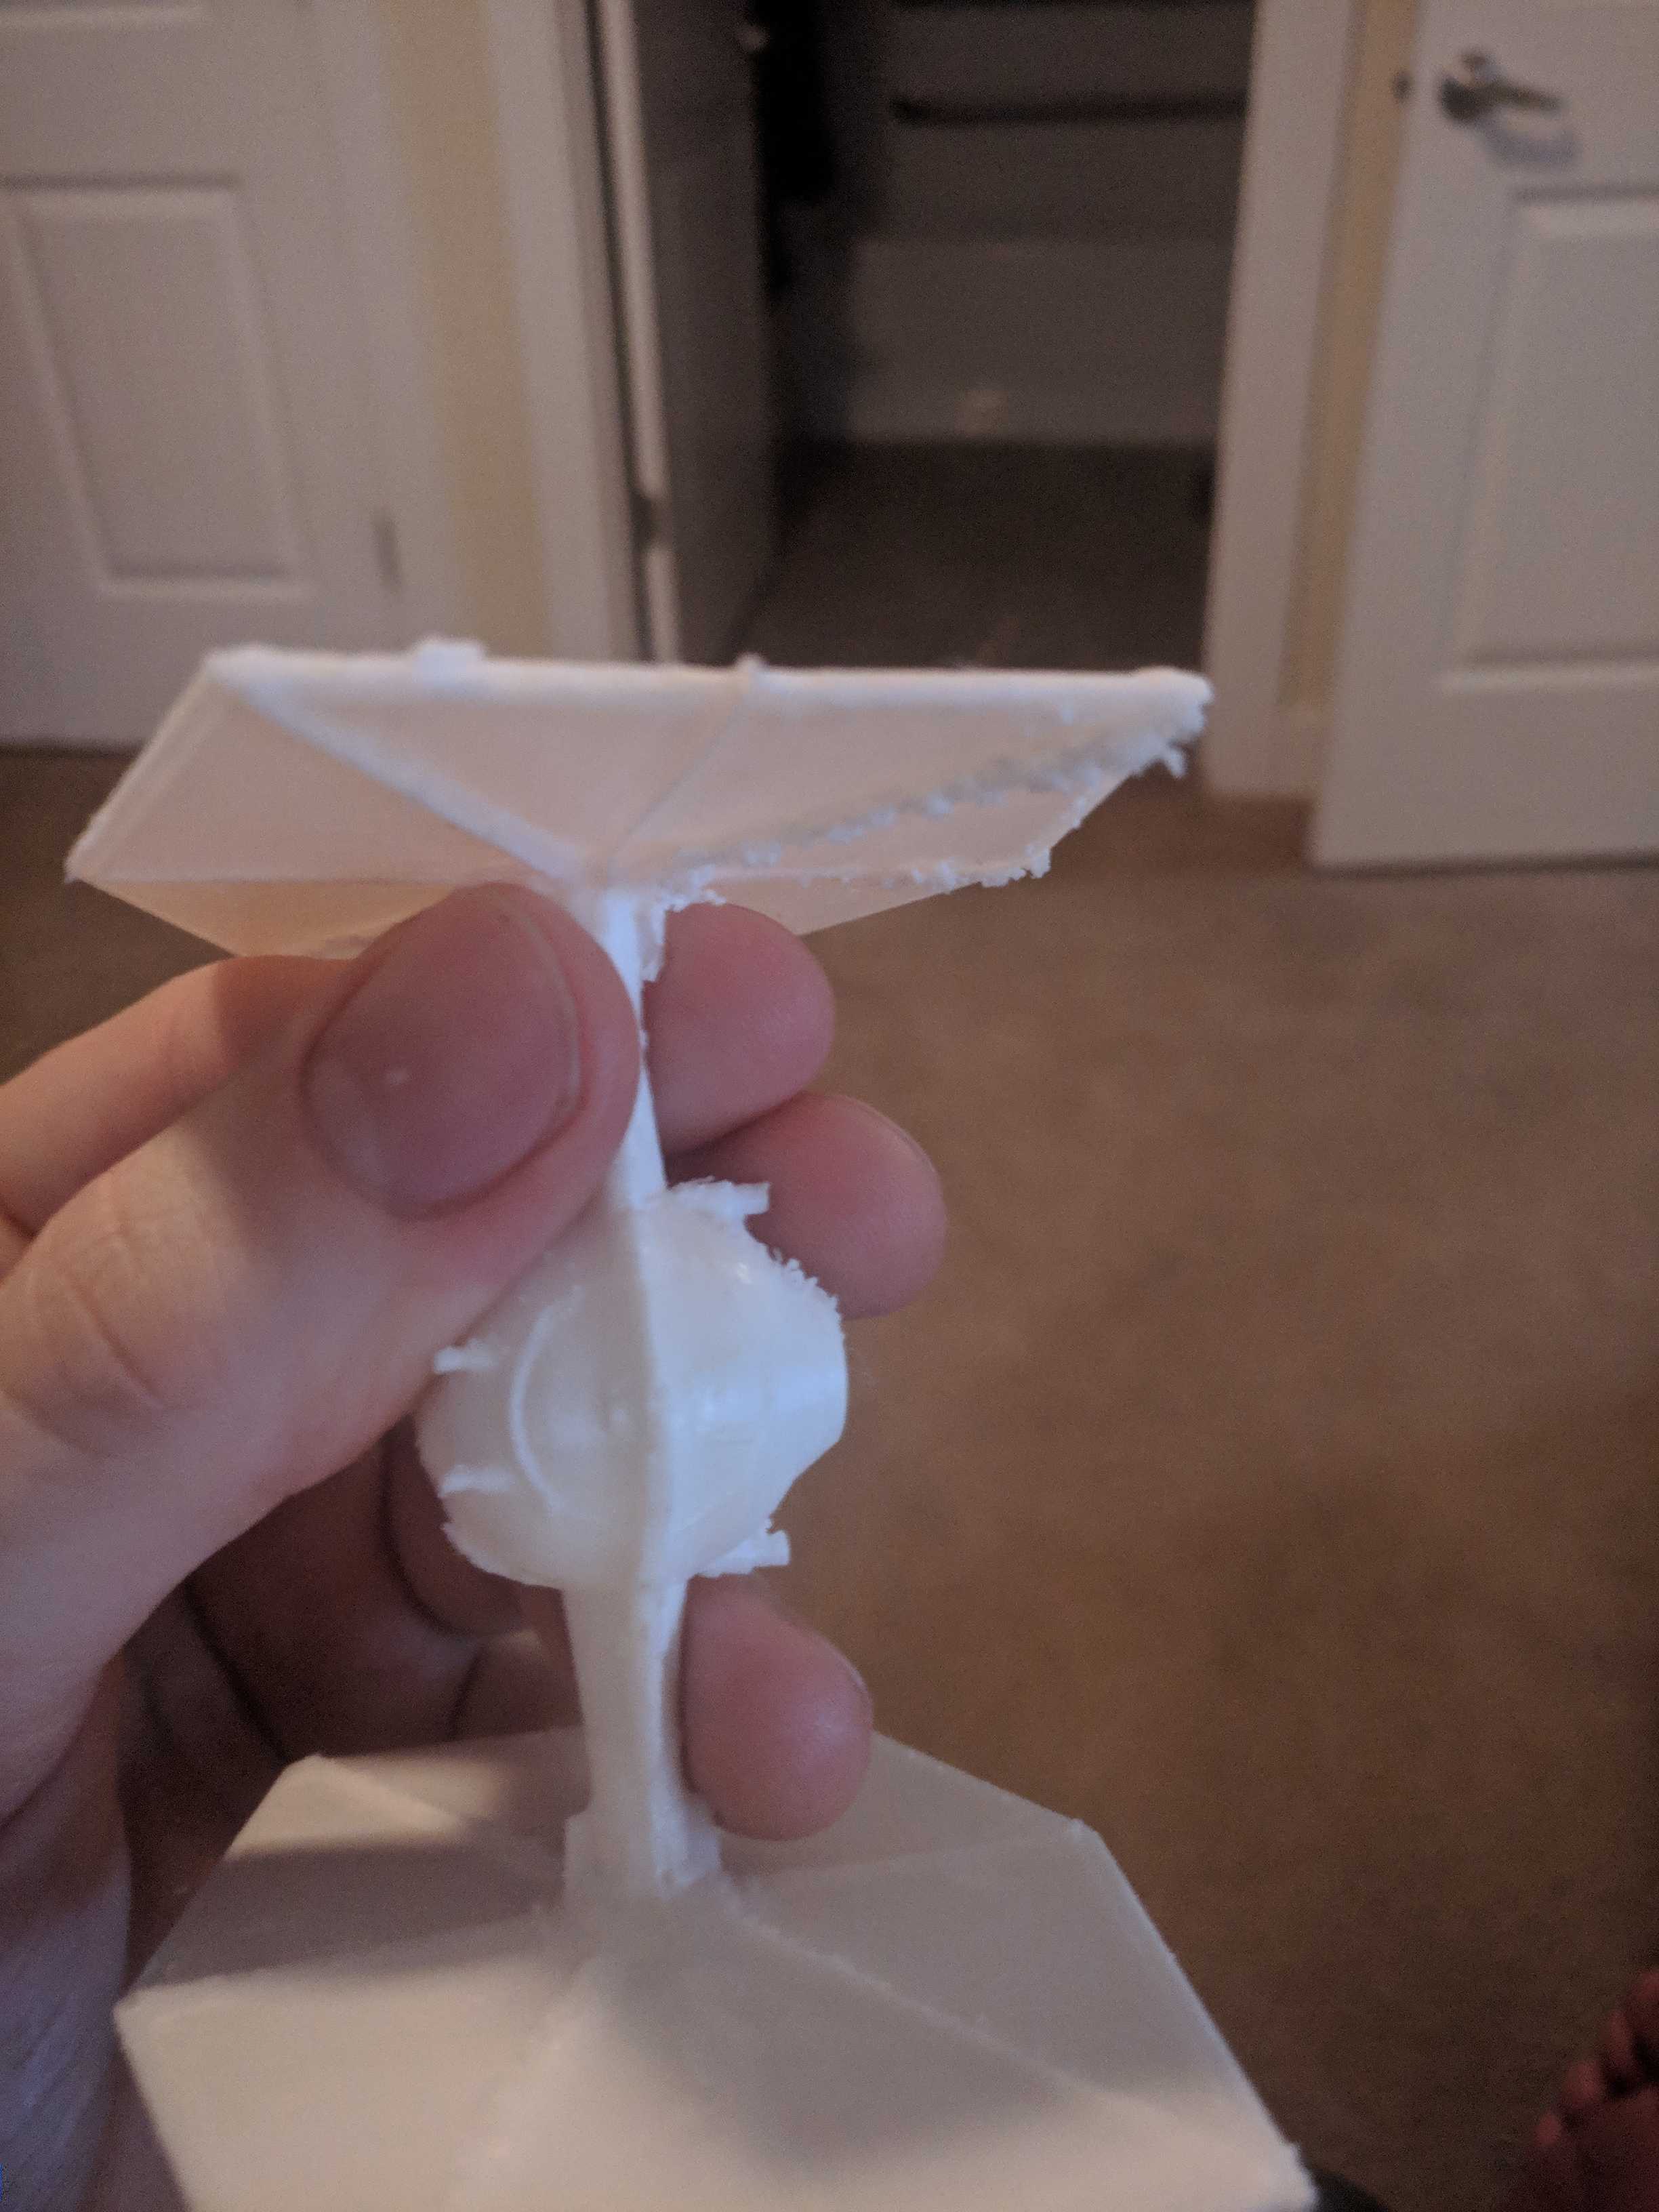
I’m getting elephant’s feet, which unless I modify the actual 3D image I don’t know how to correct besides manually grinding them down. The panels are too thin to modify anyway, and setting the z-axis higher means the print won’t adhere to the bed.

I’m getting zits (I think that’s why they are called?) which are relatively annoying. I know I can grind those down too but I’m afraid of ruining the detail of the print if I do. I’ve messed with default, higher and lower retraction speeds to combat this but to no avail.

I’m getting this odd tearing effect mainly across the solar panels. It’s not there on the other side. Best I can get is the filament is maybe snagging on something?

Lastly and these are again with the panels. they are not straight at the top or the bottom. This is the image with the dog in it. On this…I’m stuck. I’m not sure what to do or why it’s causing it.

The print settings I’ve changed are what I posted below. These are from my own notes when I’d try one setting after another:

  • Printing Temperature: 195 degrees
  • Layer Height: 0.04, 0.16 mm
  • Thickness 1.2, 1.2, 1.2 mm
  • Infill Density: 30%
  • Speed: 18, 20, 8, 12, 20, 80, 24 mm/s
  • Retraction: 2 mm, 20 mm/s, Retract at Layer Change
  • Print speed: 40%

Sorry to bombard the community with this. Half the posts I have difficulty understanding, mainly about modifying the gCode (like when printing the bridge/temp towers I keep hearing about). So I’ve not really touched it, considering I’m also worried about breaking something.

Cheers!

1 Like

Have you calibrated your e steps? That is very important to get good prints.

1 Like

E Steps could cause the elephant feet and and the bumps/zits. Or the bumps could be caused by not having enough support, so you get a bit of spaghetti. Luban has a setting to control how much filament is extruded on the first layer, to help with bed adhesion. Once you get your Esteps dialed in, use the “Initial Layer Line Width” to dial in your elephant feet.

The tearing effect is usually caused by filament feed issues. There are several posts here and projects on thingiverse for filament feed and routing issues.

The final image looks like a cooling issue, since it managed to get almost to the end before it shows up, although that looks like it should be big enough to avoid it. It’s common that when something small prints very quickly, the filament can’t cool down between layers, but it’s usually seen on small towers. Were you present when that printed? If you’re watching, you can usually see the previous layers flexing because they’re still soft.

2 Likes

The calibration of the e-steps is where you measure 120 mm of filament and tell it to extrude 100 mm and measure the result right? If so it looks to be set to 100 mm with maybe 1 mm off, though it’s hard to tell with that measurement. I just did that last night.

2 Likes

Thank you for replying. I’m been really stumped about this and I appreciate your response and whatever future help the community can give on perfecting these prints!

I believe the calibration is okay. I measured 120 mm of filament, marked it, and extruded 100 mm. It extruded 100 mm, though it may have been 99 mm, though it’s hard to tell with the tapered heated end of that filament. So I think that’s okay.

I don’t think this project needs any support to be honest. The tie fighter is cut in half and glued together. There’s absolutely no overhangs, so I’m not sure what I could use to support it.

I have not tried the Initial Layer Line Width setting before. So I’ll definitely try that!

When I checked my filament holding bar, the cap was slightly unscrewed, so I wonder if it was catching on that. I also put a bit of oil on the bar itself to help with it unspooling. I noticed since I put the enclosure on the filament has been a bit tight on the feed. So thank you, I’ll check out more posts with the feed and whatever projects are on thingiverse and see if that helps.

And I’m sorry if it wasn’t clear, but the top of the TIE Fighter panel is actually close to where it started. The line the goes vertically through the wing is where the project was cut in half, so it’s actually the start of the project, not the end. I’m pretty sure though the filament was still soft. Since it’s the start of the print, it’s on the heated bed and the bed was still rather warm.

Just so you know to measure the e steps; measure and mark 120mm from where the filament enters the extruder. Extrude 100 then measure from the extruder to the mark again and see if 20mm is left. You should have the filament loaded and primed in the machine during the entire test.

2 Likes

Yep! I did that wrong. I’ll redo that test here.

Following your advice, my settings seemed way off. I had to do it a few times to make sure it was alright. It’s hard to measure the filament inside the enclosure. But after I got comfortable it looks like my extruder was nearly 10% off. My new e-settings is 235.17 after all is said and done.

Wow. I’m trying not to assume it’s the settings. But I’m printing the wall thickness cube now. It already looks phenomenally different and far more even with the initial layer. We’ll see how the cube looks once it’s done printing!

Thank you Atom. This was already amazing advice. I’ll give the tie fighter another go after I’m done calibrating it!

3 Likes

So I did the extruder calibration. It seems to have helped tremendously with a lot of the issues. I wasn’t able to do the wall test though, since I couldn’t really change the filament size, and honestly I was getting an average of 1.6 mm for the filament instead of the 1.75 mm. I ended up ignoring that. I also went back to the default settings for the most part. These are the new prints:

There’s far more detail in them! Still having a bit of stringing issues, but it’s no where near as bad as before. The elephant’s feet is damn near gone after I used your suggestion, so thank you again for that. There’s still some striations where I guess the filament got caught on something, but again, it’s not bad. The biggest issues I have is it seems like the print came off of the heating bed on the lower panels.

Besides getting the filament to roll smoother, is this pretty close to ideal from what I can expect from my prints? I’m fairly happy with it, but if I can push the prints further to perfection I’ll keep tweaking.

Thanks!

You can get better, you should be able to eliminate the banding and stringing. But your getting there. Retraction settings should help with both of those issues along with calibrating k value but that is a bit tricky. What retraction settings are you currently using (retraction distance and speed)?

1 Like

So the warping was a bit worse than I thought. I couldn’t glue the wings together and they would have to be filled if I wanted to salvage this. But I’m interested in getting to know this better.

I turned off the heated bed after the initial layer thinking it wouldn’t do much, but apparently that might help with the panels curling up. This is my own guess, so let me know if I’m right or not, but would slowing down the print on the initial layers help? When it does the panels, it has a sharp 180 degree turn from going on the inside of the panel to the out. I’m assuming that turn is causing the plastic to pull from the print bed once it cools. I also have my filament set to 195 degree temperature since a lower temp seemed to help with details, but I may raise that to 200. Either of my ideas sound right on the warping?

My retraction and speed are the default values, so 5 mm retraction distance and 60 mm/s retraction speed. I’ve read somewhere that retraction speed shouldn’t be too fast with PLA and it’s more sensitive to distance than ABS, but when I started messing with it I didn’t see much change in upping and lowering these values. What would you recommend?

As far as the k-value goes…I’m not sure what that is. When I looked it up, this site said it was the parameters for how the machines deals with the pressure build up when extruding at high speeds. Why is it tricky to calibrate?

You should leave the heat bed heated throughout the print, by default luban cools it down after the first layer but i find that odd, I like to set mine at 55 and leave it there for the whole print (for pla).
Printing at 195 should be perfect for pla
I recommend a retraction setting of 2mm at 45mm/s
Here is information on k value and how to calibrate it.

Let me know if this helps and if you have any more questions
-Atom

2 Likes

Above and beyond, thank you. I tried doing the Marlin test on my printer. Filled it out as best I could. Yet despite selecting the origin at center tab it still doesn’t. The Gcode looks like it’s going into the negative. I could probably manually change it, but I think I’ll take the recommended setting for now until I get comfortable with it.

I also updated my retraction settings to what you have and I’m giving it another go whirl. Probably be a bit. I’m not comfortable leaving it running while I’m at work. But I’m interested to see how it turns out!

Out of curiosity, what wall settings and initial layer settings do you have? I’m guessing the smaller the wall settings the finer the detail but thinner the wall? I’m ultimately trying to see if I can print some miniatures with this, so I want to see how fine of detail it can go.

there are a number of different “wall” settings in cura, there is one for wall line width, that should generally be left at the same size as the nozzle size (0.4mm standard) and that is how thick a single line is. then there are a bunch of settings to determine how many individual wall lines you want on your print. other than that wall line width, none have a major effect on detail, but do have a major impact on strength and print time.if you want the best detail and only plan on printing small prints, i would recommend buying a smaller nozzle so that you can turn that down. know when you do that you may have to re-tune the printer to get good quality prints. if you want to learn more about how the setting in cura affect your print i strongly reccomend getting the “settings guid” plugin. by going to the market place and downloading it, it should be at the top of the list but you can search for it in case its not. here is a snip:


this plugin will help explain all the settings in cura and can do so far better then i can.

you can get some really good detail out of most 3d printers, the SM 2.0 included. but it will take quite a bit of effort, and tinkering. not trying to scare you but its just the way it is. in the future if you have the opportunity to get a SLA printer, that would be best for miniatures as they can produce much more detailed prints then any FDM/FFF printer. there has been some discussion on making a SLA add-on for the SM, so you can hope for that too (but i’m not sure i would hold my breath).

last of all, my biggest recommendation is just keep printing, the more you make and play the more you’ll get how the whole system works and the better prints you will get. i look forward to hearing how the next tie fighter comes out, and as always if you run into any more problems we are here to help.

happy making
-Atom

3 Likes

I remember trying to mess with Cura. I couldn’t get it to connect to my printer though. I could make the settings that my printer had, though I’m not sure how to send prints to it, unless you just had to save the gcode file and move it to your printer via USB, though I’m not sure if that’s possible.

I’m absolutely fine with tinkering and putting effort into the 3d printer. I want to get good at it. I want to understand it. When I decided to get a 3d printer, I had no idea that there were different types of printers that would be good for different types of things. Honestly, if I could get something like the MakersMuse’s tolerance and clearance file to print and actually work I’d be happy with that. But the stringing may still be an issue. Speaking of…

The TIE Fighter finished.

The details is really quite nice. With the exception of a few gaps on the wing panel, and the holes on the top of the cockpit and engine it’s really damn smooth. I think making my walls a bit thicker may help with the engine and cockpit, so I’ll try that next. Part of the wing came off the bed too, but I think I need to do a raft as opposed to a skirt and maybe that’ll help. I’m still encountering stringing issues though and the ‘zits’, though I think they are one and the same since they don’t look like blobs really.

There’s a temperature test tower I read about: https://blog.ktz.me/printing-temp-tower-to-get-better-3d-prints/ May end up running that if I can figure out the gcode.

So, a few questions for clarity here. Am I right about Cura in how to set it up with the SnapMaker and transfer the files to print? Would it be worthwhile to do the temp tower? Lastly, I’m wondering if some of the defects like the holes in the top of the cockpit the engine or the small gaps in the wing panels are a result of the PLA being out in the open air an absorbing moisture. I read that you can pop it in the over to dry it, but I’m not too keen on cooking plastic, is that an issue some people have encountered?

As always, thank you Atom. Look forward to hearing from you.

1 Like

Glad to hear your prints are improving. You are correct, to use cura you need to save the gcode to a flash drive, then plug the flash drive into the printer and print from it. In my opinion it is actually easier then printing via wifi with Luban.
Temp towers can be useful, I don’t use them personally, but that’s mostly out of laziness. Generally you only need one per filament (all SM black filament should need the same temp, but other black pla or other color SM filament might work better at a different temp.)
The holes and gaps are not likely the result of the filament (though the stringing and zits may be) its more likely a result of k value, or retraction (my earlier settings where just recommendations that work for me others have set retraction as low as 1mm and as high as 5, speeds range from 20 to 60). They could also be a cooling issue. Sometimes when layers get small then they print too quickly and the previously printed layer does not have time to cool before the next layer is printed. There is a setting in cura to fix this problem.

I forget have you already put thermal paste in the thermistor hole? It will help keep the hot end at the set temp and could help with the zits, holes, and stringing.

1 Like

Temp. Tower, section 4. FINETUNE YOUR SOFTWARE SETTINGS TEST-SECTION

I would suggest to calibrate your k-factor (linear advance), the most people in the forum use a value between 0,08 and 0,1 (if you do the test from the following link, you have to edit the gcode, the "K"´s have to be small “k”, because of firmware!!)

1 Like

Atom, I’m working on the retraction right now. I set the distance to 0 and speed to 10, then I plan to up the distance until I hit a sweet spot, then work on the speed at that sweet spot in roughly the same manner. It’s funny though…my second print (distance 1, speed 10) actually seemed to work really really well. There’s one wisp, no zits or strings whatsoever. I’m continuing to print higher until I see it degrade though.

As for the k value. I set mine to 0.08. I couldn’t get the gcode on the marlin website to print properly. It seems like the x coordinates go into the negative, and apart from manually changing that (which I’m still hesitant to do) I can’t seem to get it to work. It prints a single line on the corner edge of the machine and hardly moves. So I just took the recommended value for now.

I have not put any paste in any sort of hole. I didn’t realize that was a thing! Would the thermal paste you put on CPUs work? I have that laying around somewhere. I’m going to have to take a look at my machines once it’s done printing to figure out where that hole is, but I’ll definitely give it a go whirl.

1 Like

Thank you for the guide! I did not know about the k value on the website issue. If I can get it working, I’ll keep in mind to manually change the casing on that.

Do you know why whenever I generate the code it goes into the negative positioning value in gcode? From what I’ve seen, Snapmaker doesn’t go into negative coordinates on the machine, yet this gcode is telling it to go into negative x values. The result is the machine prints on the corner edge and doesn’t advance from the edge. Besides the origin checkbox, I’m not seeing any options to mess with the coordinates. Is this something I’ll have to mess with manually too? Or am I not seeing an option on this form?

You have to enter the size of your build plate, after generating you could preview your code in Luban or any other slicer to double check.

1 Like

@iAlreadyLost

Yes thats exactly the kind of paste, here is a thread pointing out what your looking for:
Whats wrong with this picture - printre hot ends

1 Like