Hey there, this is in relation to my previous post, but it turns out my discovery of the solution was wrong when I went to print another piece. I’m having the top part of these rounded prints coming out dull and rough when it should be smooth and shiny. I’m using a metallic PLA which, overall, prints really nice save for these top parts. I’ve tried messing with a bunch of settings but I can’t seem to get an inkling of what’s wrong, then I noticed this in Cura’s preview.
The green areas are the points where the print suffers. It just seems like when it gets to that portion the spacing with the shell gets wider and wider and just shows the inner wall below. I’ve tried several things to remedy this, including: ironing, changing the wall thickness, giving it more top layer skins, changing the amount of top layers/top layer thickness, changing the pattern. None of this seems to change the actual preview.
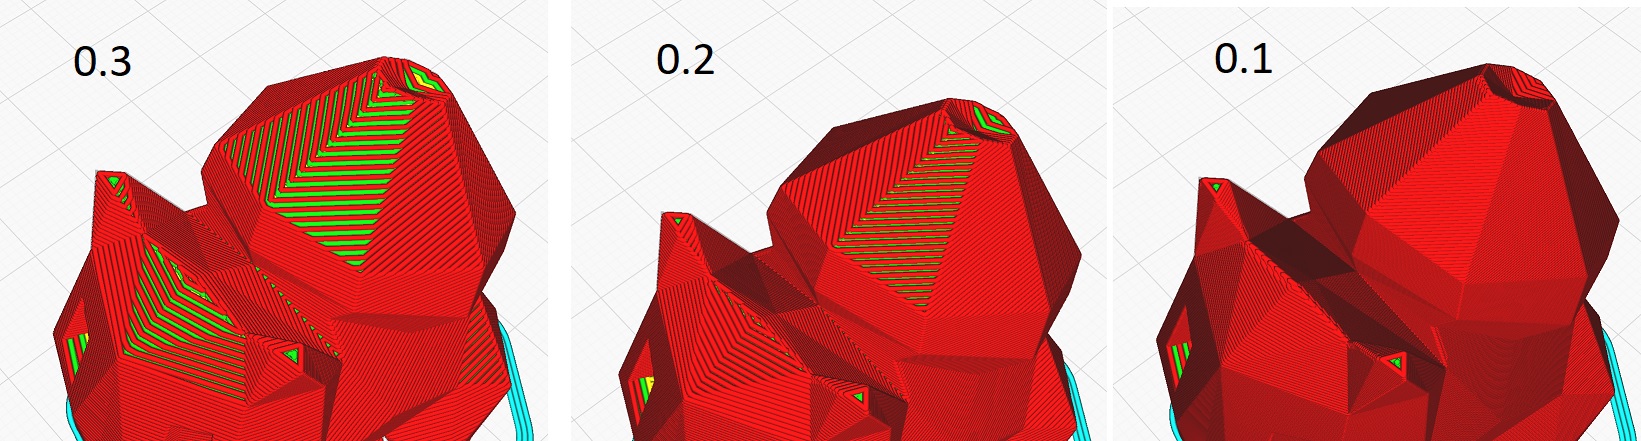
Had a similar problem recently. Found that when a surface has a very low angle then the layer height has quite a big impact on the surface finish.
Tried to slice a low poly model with different layer heights:
Maybe you can give some information on your setting and maybe a link to the model then we can tinker around with it in order to see if we can reproduce your problems.
Edit:
This was the model i was using:
Maybe you can give it a try in order to see if get the same problem.
@brvdboss the model I’m trying to print is the shield for Link in Legend of Zelda. The model is about 6.5mm thick. I can change the orientation, though when I did it the model broke away from the plate. I’m trying it at a steep angle now and see if that helps.
@Andomaster huh…interesting. My layer height is 0.12mm currently. I’m trying different layer heights right now to see if I notice a difference. And…there is. That seems to be the key. Although don’t think I can print this at 0.03mm to get the effect I want–at least it shows me what setting is I may have to change. I’d send the model link but it’s paid model and I don’t want to run the risk of breaking any rules about sharing something you need to buy. I’ve got a half globe thing here that I’ve replicated the same error.
Download the hemisphere version, then set the Z scale to 30% (leave x and y at 100%) and you get the same issues (if not worse) then what I’m experiencing.
I’m a little curious then. What’s the point of setting the amount of top layers if it’s only going to ignore them and just put one layer on regardless, then make the layer so interspersed it’s not even worthwhile?
A few things you could try depending on your current settings:
Layer width: I experienced Cura defaulting this to 0.4 for a 0.4 nozzle. Usually you want to get around 20%+ of your nozzle diameter, so for a standard nozzle it should be around 0.48. This way the unconnected top layer lines should cover a bigger area reducing the need for lower layer heights.
Very thin layers could be problematic especially for the first layers depending on leveling accuracy. Once I read about a Cura feature called “adaptive layers”. This helps to vary layer height depending on the models details without sacrificing too much printing speed.
Model orientation: when printing a shield I guess it’s possible to place the model perpendicular to the build plate. This way you change the detail limiting factor from layer height to x-/y-accuracy (while increasing printing time).
What you’re seeing is more or less to be expected. When your slicer is generating the gcode it creates a path that fits inside your shape. With a very small slope, going up one layer will result in a proportionally large flat area. So it will always look, by lack of better wording, “layered”. You could argue that the slicer should take this into account, but it has conflicting requirements with wall thickness etc.
One way to improve this a little bit is by increasing the top thickness of your print. At least with Luban this works. Because if the slope becomes small enough you create these horizontal terraces and by increasing the top thickness, these become a bit more robust. They will still be dull and rough, but at least stronger and you won’t as easily get gaps like in the Bulbasaur examples.
For a smoother finish you want to avoid small slopes on the horizontal layers. If you flip your model 90degrees so it becomes a small slope in a vertical plane. Then the shift sideways for the next layer becomes a lot smaller.
That’s why rotating the model before printing can help in that regard. Which obviously isn’t possible for all models and geometries.
Sorry it’s taken so long to reply. I’ve had some issues with the nozzle grabbing the print and moving the magnetic plate, causing a layer shift. I’m thinking ironing is the culprit since there was a little bit of a top layer on my print and there’s where the issue happened.
@Andomaster I set my layer width a bit higher to what you recommended. I noticed a slight improvement with the top layer, but not by much. After this print I’m going to hang up printing the model so much and use that calibration cube and the hemisphere I shared with you guys. I figure if I can get that down then it should help the rest of my prints.
As for the adaptive layers…that’s an incredibly useful tool! I had to play with the values a bit, as default values added 7 hours of printing time to an estimated print time of 2 hours and 30 minutes.
I ended up changing the orientation when I printed the shield and got some good detail on the face of it. the back of the shield is chewed up with the support though, but it’s something I can live it. Just wish I could figure that one out since it seems to be a fine balance between having a supportive model that doesn’t fail (and is sometimes chewed up) and something that looks textured when it should be smooth.
@brvdboss yeah…I’m starting to accept that. I’ve never really had much of an issue with the regular black and white PLA I bought from snapmaker, but the PLA I’m using is this metallic bronze/rose colored that looks absolutely stunning. The only issue is, when printing, both the support side and the top layers loose their metallic sheen. The support due to all the micro bits that make it less smooth, and the top layer due to voodoo. Increasing the top layers/thicknesses doesn’t seem to help, ironing does a bit, same with the increasing the nozzle width, but neither of those bring it to the same sheen you see printed on the walls. I end up being stuck with rotating the model in such a way that the support side isn’t seen and I’m minimizing the top layer.
Oh, and I’ve tried sanding too, but I can never get it up to same luster.
At least I’m figuring out more and more about this though, so I definitely thank you two for helping me understand!