Here some photos, what do you think?


Greetings
Stefan
Keep alive and kicking
Yes this screenshot helps TONS. The Snapmaker website tells you to enter positive numbers into X min and Y min where only negatives are possible so I was extremely confused 
thank yo so much!
thanks.
It is very useful for me. (Y)

This works for me to print 6 items at a time. tick the box that says avoid printed parts when travelling. I have not tested very high parts but works for me on lower parts, Also tick print 1 at a time, when you multiply them out you will see a grey box near each print for reference of the whole head location so you can keep other parts away from it, that’s my take.
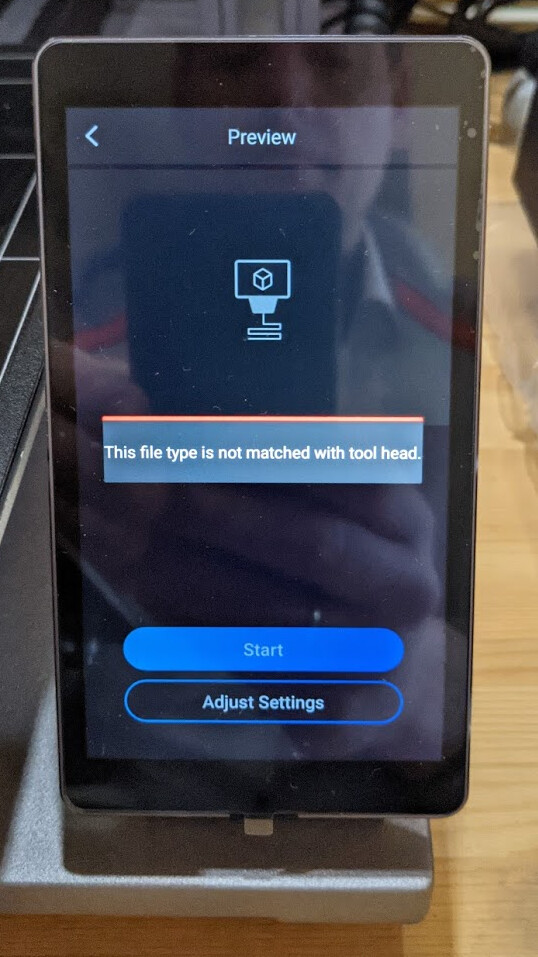
using the settings mentioned here, but unfortunately getting an error when sending the files from Cura to SN #2 350. Sending though wifi from Cura I get this error:
these are the settings I use or the machine in Cura
Saving the g-code and then importing to SN and then sending through Wifi to the SN works fine…
File types are generally implemented using the file extension. I don’t know what cura sends as the file name, but that’s a great place to start.
Snapmaker have created a print profiles repository and the first configuration added is for Cura.
I’ve not tried it, or even looked at it, might be pants
Check your gantry hight (should be 330, it is 30 on your screenshot)
indeed. thanks. will change that. though I have seen many different Gantry hights here on the forum. Not some much how high the gantry goes, but the size of the gantry itself. any idea what this metric refers to?
Have a look at this and or search the forum about gantry height ![]()
so had a look online, and indeed the Gantry height is 26, not 330 as you mention. The Gantry height is the clearance between the bottom of the nozzle and the bottom of the horizontal extruder rail. See point of xchrisd here above
I’m glad my pictures are getting used as reference. I had to dig through curas pages to find out what everything was and then I added the pictures for visual learners likeyself.
I used the setting in this picture for my offsets with gantry height 26 as well as the Start Gcode that @mikkyo posted also copied here. Not having any problems.
M140 S{material_bed_temperature} ;Start heating bed
M190 S{material_bed_temperature} ;Wait for bed to reach temp before proceeding
M104 S{material_print_temperature} ;Start heating extruder
G28 ;home
G90 ;absolute positioning
G1 X-10 Y-10 F3000
G1 Z0 F1800
M109 S{material_print_temperature} ;Wait for extruder to reach temp before proceeding
G92 E0
G1 E20 F200
G92 E0
Did you mean you’re sending from Luban? One can slice in Cura, save the g-code file, open the g-code file in Luban, and send via wifi to printer from Luban. If that’s not what you meant, then I’m curious what you are doing instead. ??
sending through Cura, and it actually works. Don’t open Luban at all anymore.
Thanks, good to know.
Questions related:
Do you still lose filament runout sensor and power recovery because of not using Luban?
Did you solve your file issue? I saw mentions about gantry height, but could not tell if that was your solution or simply related talk.
gantry height was indeed solved:
Not tested runout sensor and power recovery yet.
File issue is now solved with the new route of sending to SM with Cura in the above
With your starting gcode, the snapmaker won’t be honoring your initial layer temperatures. This is not your fault, snapmaker provided this information. i’m on a mission to help people get that right though.
After screwing around with multiple profiles I came up with the right answer to this.
feel free to adjust whatever you want
;M104=print temp, M140 = bed temp, 109 = print temp wait, 190 = bed temp wait

M104 S{material_print_temperature_layer_0} ;Start heating extruder

M140 S{material_bed_temperature_layer_0} ;Start heating bed

G28 ;home

G90 ;absolute positioning

G1 X-10 Y-10 F3000

G1 Z0 F1800

M190 S{material_bed_temperature_layer_0} ;Wait for bed to reach temp before proceeding

M109 S{material_print_temperature_layer_0} ;Wait for extruder to reach temp before proceeding

G92 E0

G1 E1 F200 ;extrude 1mm @ 200mm/s feedrate (prime)

G92 E0MooseJuice, the only change I see in your suggested code is reversing the order of the M104 and M140 codes, as well as the order of the M190 and M109 codes…is that what causes the problem?
GMH
Also
M140 S{material_bed_temperature} ;Start heating bed
vs
M140 S{material_bed_temperature_layer_0} ;Start heating bed
both bed and nozzle
