Constant extruder skips/clog warnings

Exact same issues - I have been manually re-engaging the print after every layer. Clicking, filament error, stop, resume, repeat.

By far the worst experience I’ve had with a printer, if there is no acknowledgement and a fix on this within a few days I will be returning for a full refund. Real let down.

I am harshly regretting not just getting a Bambu.

Englisch:
Hello, everyone
I can understand your upset, but I can’t understand wanting to return the J1.
It won’t be long and there will be a neat solution to the problem.
I already have some ideas that I have yet to try, but there will be a solution.
Think you’re better off with a Bambu Lab?
Look at their problems.
There isn’t a single manufacturer under 10K that doesn’t have issues, it just doesn’t exist.
Even the industrial devices have a few quirks, but then you get the support that you paid for beforehand.
Just the feeling that you bought the other 3D printer better will also happen to you with another printer.
Take a deep breath and use your wits to find a solution.

German:
Hallo zusammen
ich kann verstehen das Ihr verärgert seit, aber ich kann nicht verstehen den J1 zurückgeben zu wollen.
Es wird nicht lange dauern und es wird eine ordentliche Lösung für das Problem geben.
Ich habe da schon einige Ideen, die ich noch ausprobieren muss, aber es wird eine Lösung geben.
Ihr denkt, dass Ihr mit einem Bambu Lab besser dran seit?
Seht euch mal deren Probleme an.
Es gibt keinen einzigen Hersteller unter 10K, bei dem es keine Probleme gibt, so etwas gibt es einfach nicht.
Selbst die Industriegeräte haben vereinzelt Macken, allerdings kommt dann der Support raus, den man vorher mitbezahlt hat.
Einfach nur das Gefühl, doch besser des anderen 3D Drucker gekauft zu haben, wird euch auch bei einem anderen Drucker auch passieren.
Tief durchatmen und mit Verstand eine Lösung suchen.

4 Likes

I have a Bambu lab printer.
I have an Ender 3v2. The Ender is 1/3 the cost of the J1, so I could have 3 of them for the price of this non-working, layer shifting, constantly clicking machine.

Both of these other printers work just fine. I have 200+ hours on the Bambu with all successful prints.

This thing doesn’t.

Don’t tell me what I should or shouldn’t expect when I have experience with the other printers.

I am having the same problem. I even took nozzle apart and cleaned them. work for a few layers and then back to the same clicking sound. I am running at 30% speed and still have trouble. the printer is useless the way it is. The problem seems to be that there is no tension adjustment for the extruder gears. Any one know how to increase the tension between the two extruder gears?

when you wait months on a machine, spend over $1k on that machine, then when you get the machine you litterally can’t make 1 layer successfully even though you have 2 other snapmaker models that are flawless from the box then the company takes a month off from customer support, mind you not sales, yeah you may wanna return that machine. i’m loyal to Snapmaker, hell i’m even an affiliate and i think whats going on with so many people’s machines is wild. terrible timing for a new product release right before the whole customer support team takes a month off.

I have the same issue with the right extruder. Definitely not a clog. Turning up the temp or slowing the printer down is the only way I know around it.

And before someone suggests it again:

In the Cura .5 profile for this printer-

I changed retraction to 1.5 mm
I changed temps to 220 on this filament I am using.
I changed begin printing at temp 210
The retraction speed is set to 25 mm/s as the slicer already had set

It’s 50/50 if this works.
The last time I completed a print and I thought it was fixed but I can still see under extrusion, and it ALSO layer shifted.

This printer needs to go back so I feel better, I’m done working with it or on it.

And yes, the support team, while I understand is on Chinese new years, does not make me feel better about it.

I want nothing more to do with this machine and I’m tired.

German:
Ich habe heute mal das Gehäuse vom Extruder geöffnet.
Da ich schon gesehen habe, dass es einfach nur eine Federspannung gibt, die nicht verändert bzw. angepasst werden kann, dachte ich, dass ich einfach mal versuche, die Feder zu unterfüttern.
Das habe ich jetzt getan.
Ich habe einfach passende Zahnscheiben 2x je Feder unterfüttert, es sind zusammen ca. 1,3 mm mehr Druck.
Im Moment druckt er, anfangs noch mit Sprüngen, dann habe ich die Geschwindigkeit zurückgenommen 50% und die Temperatur auf 250°C gestellt.

Jetzt drucke ich wieder 100%, also mit 105 mm/s bei 250°C PETG von eSun.
Bis jetzt keine Sprünge mehr.

Englisch:
Today I opened the housing of the extruder.
Since I’ve already seen that there’s just one spring tension that can’t be changed or adjusted, I thought I’d just try padding the spring.
I have done that now.
I simply lined matching toothed discs 2x per spring, there is a total of approx. 1.3 mm more pressure.
At the moment it is printing, initially with jumps, then I reduced the speed by 50% and set the temperature to 250°C.

Now I’m printing 100% again, i.e. with 105 mm/s at 250°C PETG from eSun.
So far no more jumps.

Bilder vom Extruderaufbau:

Pictures of the extruder setup:


4 Likes

German:

Es gibt noch drei Möglichkeiten, um das Problem eventuell lösen zu können.

  1. Die Feder muss gegen eine stärkere Variante getauscht werden.
  2. Anstelle der einfachen Federvariante eine Rändelschraube mit einsetzen, damit man mit der Schraube den Druck auf das jeweilige Material erhöhen kann.
  3. andere Vorschubrädchen " Drivegear" einsetzen, die etwas schärfer sind.

Was anderes fällt mir persönlich nicht mehr ein.
Man müsste tatsächlich die einfachste Variante, Punkt 3, zuerst umsetzen.
Dann die Feder, du muss unbedingt härter sein, damit es was bringt.

Die Variante 2. ist am sinnvollsten, denn somit kann man den Druck auf das jeweilige Material anpassen.
Nur würde diese Variante auch die aufwändigste, da man dafür das Extruder-Gehäuse anpassen muss.

Englisch:

There are three other ways to possibly solve the problem.

  1. The spring must be exchanged for a stronger version.
  2. Instead of the simple spring variant, use a knurled screw so that the screw can be used to increase the pressure on the respective material.
  3. Use other “Drivegear” feed wheels that are a little sharper.

I personally can’t think of anything else.
You would actually have to implement the simplest variant, point 3, first.
Then the spring, you absolutely have to be harder for it to do anything.

Variant 2 makes the most sense, because it allows you to adjust the pressure to the respective material.
However, this variant would also be the most complex, since you have to adapt the extruder housing for it.

1 Like

Derzeitiger PETG Druck.

Current PETG 3d print.


German:

Eventuell habe ich noch eine Störungsquelle gefunden.
Da PETG etwas fester ist, als PLA könnte ich mir vorstellen, dass es eventuell damit zu tun haben könnte.

Wir haben die Reibung zwischen PTFE Schlauch und Filament, außerhalb des Extruders.
Dazu kommt der Druck des Filament-Sensors, also die Reibung, Rädchen Filament und zusätzlich die Reibung zwischen Extruder-Gehäuse und Filament.

Die Federspannung des Filament-Sensors ist enorm und eigentlich unnötig.
Da reich ein leichter druck.

Ich werde das morgen mal ausprobieren, mal sehen, eventuell reicht das schon.

Englisch:

I may have found another source of trouble.
Since PETG is a bit stronger than PLA, I would imagine that it might have something to do with it.

We have the friction between PTFE tube and filament, outside of the extruder.
In addition, there is the pressure of the filament sensor, i.e. the friction, the filament wheel and also the friction between the extruder housing and the filament.

The spring tension of the filament sensor is enormous and actually unnecessary.
A light pressure is enough.

I’ll try that tomorrow, we’ll see, maybe that’s enough.

1 Like

Hello i3Sven - Thanks for all your work . Can you tell me the size of the washer you used for the compression of the spring. I would like to give it a try but I want to use wave washers as they act like a spring themselves.

I also think there is an issue with pulling a a full reel of filament (1Kg ) through all the tubing. Needs to have the design updated to reduce friction on the reel.

German:
Es sind M3 Unterlegscheiben, also mit einem Innendurchmesser von ca.3,2 mm, Wellenscheiben sind nicht nötig, es gehen auch maximal 2 Scheiben rein.

Englisch:
They are M3 washers, i.e. with an inner diameter of approx. 3.2 mm, wave washers are not necessary, a maximum of 2 washers can be used.

The washers shown in the picture are DIN6797 A toothed lock washers!

Eine Frage: könntest Du Durchmesser und Drahtstärke der Feder mal ausmessen und idealerweise die gestauchte Länge, in die der Extruder die Feder in Arbeitsstellung drückt? Mir fällt hier gegenüber einem üblichen Aufbau auf, daß die Feder sehr kurz ist. Es würde mich mal interessieren, wie sich die Anpreßkraft im Verhältnis zu meinem Bondtech verhält und wie stark sie unter Annahme von einer Toleranz des Anpreßwegs von ungefähr ±0,3mm über alle beteiligten Teile gerechnet schwankt, wenn man zusätzlich die Fertigungstoleranzen der Feder einrechnet…


Could you measure the diameter and wire thickness of the spring and ideally the compressed length into which the extruder presses the spring in the working position? This spring is very short compared to the usual construction. I would like to know how high the contact pressure is in relation to my Bondtech and how much it varies assuming a tolerance of the contact pressure of about ±0.3mm over all the parts involved, if you also take the manufacturing tolerances of the spring into account…

Hi, so habe ich gerade gemessen.
10,20 mm entspannt, Drahtdurchmesser 1,00 mm, ich schätze, die Feder wird im eingebauten Zustand ohne Filament maximal 1 mm gedrückt, kann ich leider nicht messen, mit Filament dann dementsprechend mehr.
Der Außendurchmesser der Feder beträgt 6,09 mm.

Filamentsensor:
Am Filamentsensor, ist mit der Feder noch eine Unterlegscheibe untergelegt.
Die habe ich entfernt, da die feder schon allein den druck aufbaut.
Der Sensor scheint nicht auf Druck, sondern auf Umdrehungen zu reagieren, was ich sehr interessant finde.
Ein Unterbrecher hätte auch gereicht, denke ich.
Aber daran können wir sehen, dass sich da jemand wirklich Gedanken gemacht hat.

___________________________________________________________________________________Hi, I just measured.
10.20 mm relaxed, wire diameter 1.00 mm, I estimate that the spring is pressed a maximum of 1 mm when installed without filament, unfortunately I can’t measure it, with filament then correspondingly more.
The outer diameter of the spring is 6.09 mm.

Filament sensor:
On the filament sensor, there is a washer underneath the spring.
I removed them because the spring alone builds up the pressure.
The sensor doesn’t seem to react to pressure but to rotations, which I find very interesting.
A breaker would have been enough, I think.
But we can see that someone really thought about it.


2 Likes

Achtung:
Seit bitte vorsichtig, wenn Ihr den Deckel vom Extruder wieder anbaut.
Die Schrauben halten nur im Kunststoff, dreht mit wenig Druck, die schrauben erst Rückwerts, bis die Schraube in ihrer vorherigen Gewindeführung sitzt, erst dann die Schraube vorsichtig eindrehen.

caution:
Please be careful when you put the extruder cover back on.
The screws only hold in the plastic, turn with little pressure, the screws first turn backwards until the screw sits in its previous thread guide, only then carefully screw in the screw.

1 Like

Heute hatte ich bei meinem Versuchsdruck mit 200 mm/s mit PETG keinerlei Extruder-Sprünge!


Today I had no extruder jumps during my test print at 200 mm/s with PETG!

— for english, please scroll down—

Herzlichen Glückwunsch!!

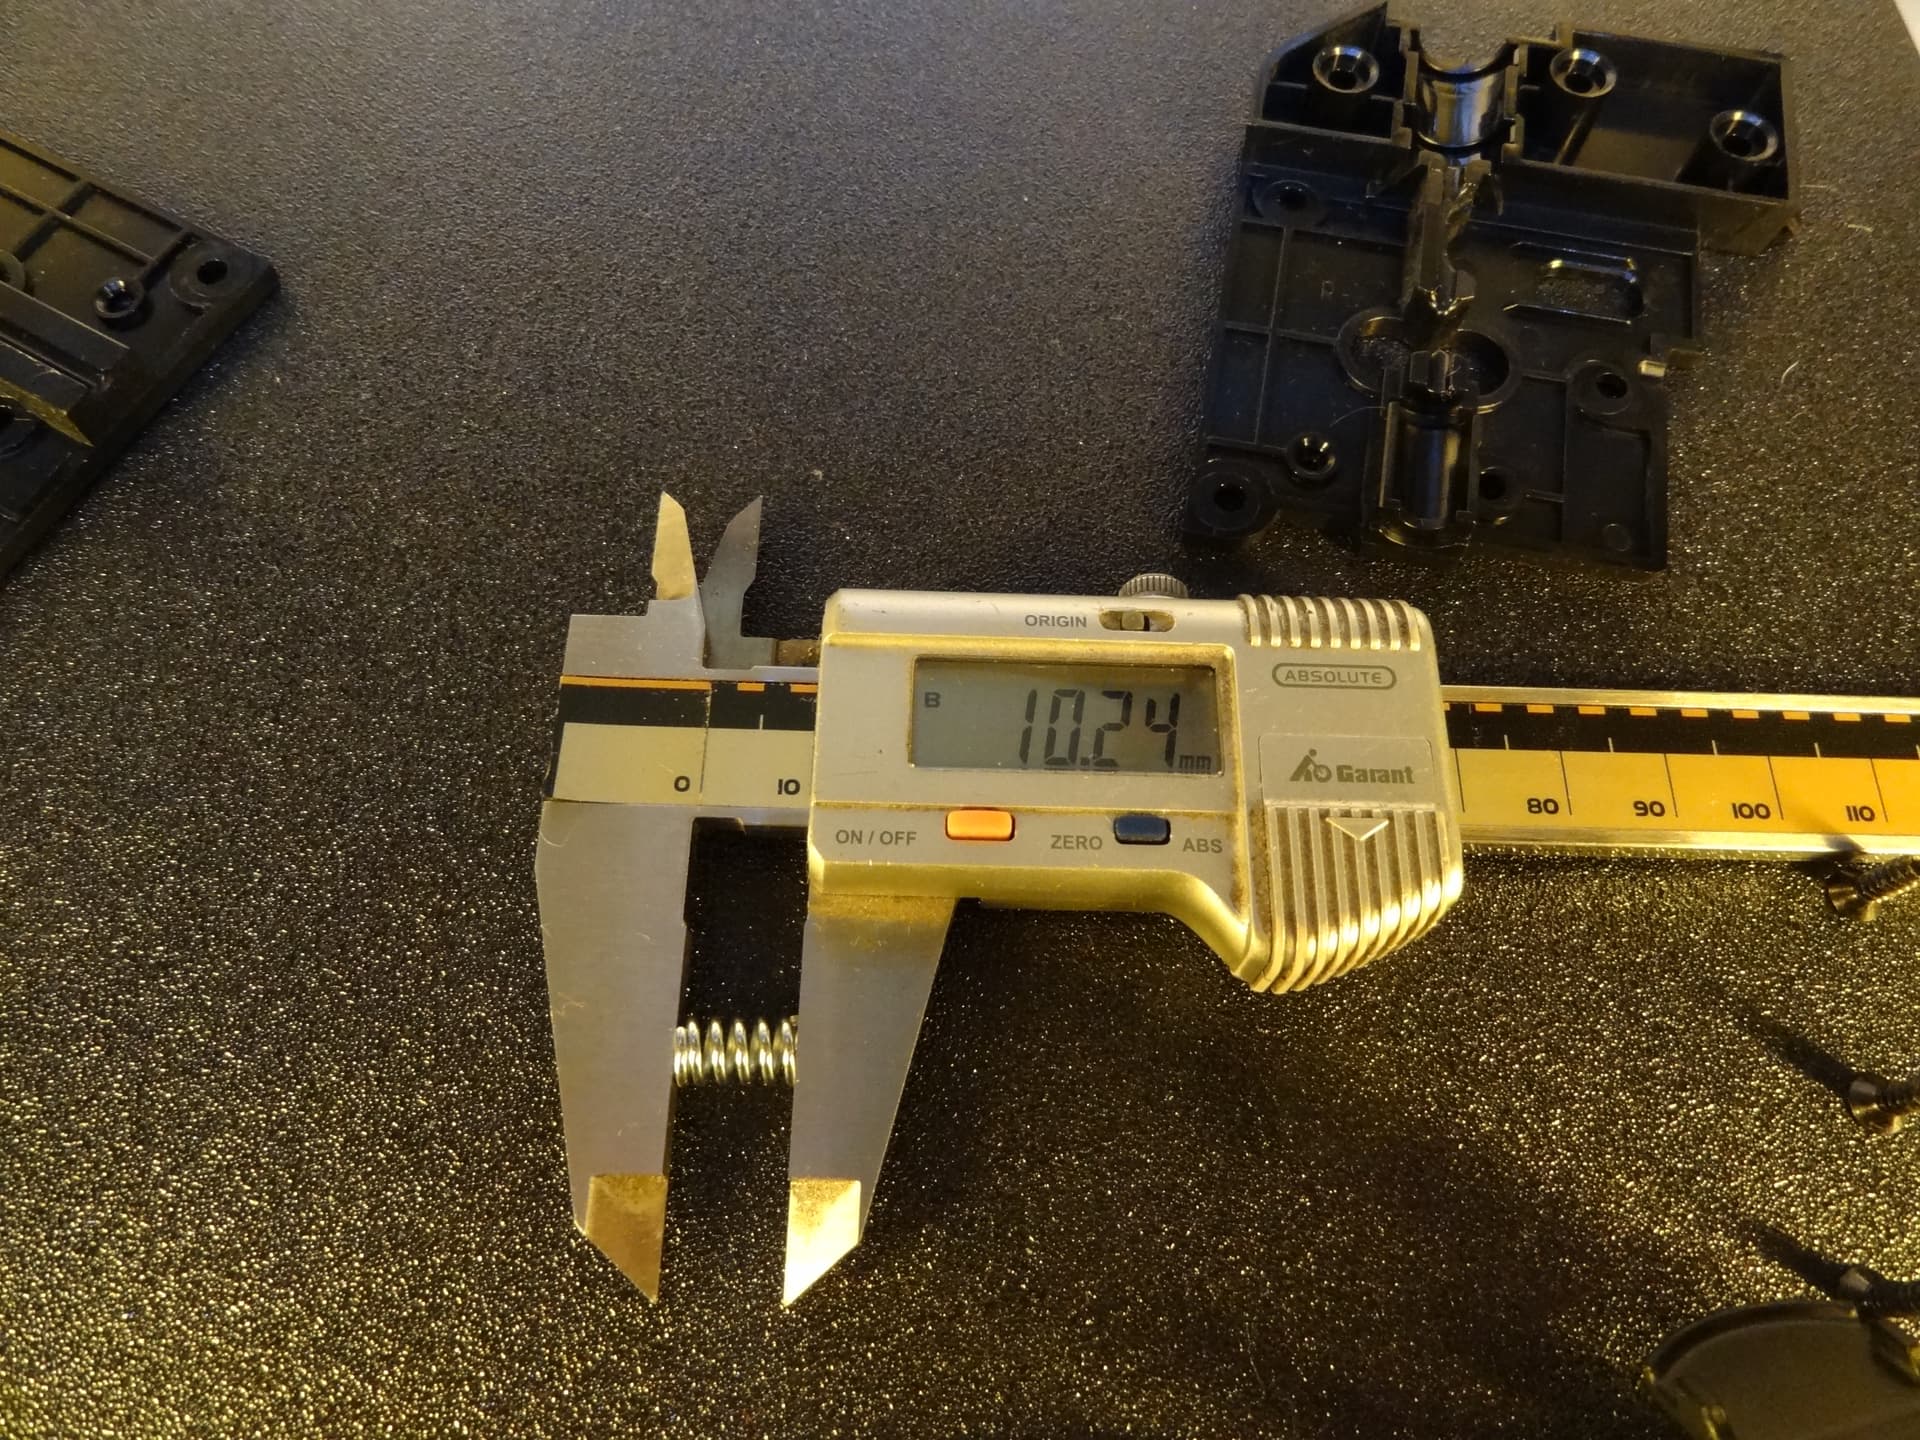
Zur Federkennlinie: Aus dem Bild oben sehe ich 5,75 Windungen, davon zwei angelegt, und keine geschliffenen Enden. Damit ergibt sich mit dem Federntool von Febrotec unter der Annahme der Standardgüte 2:

  • Nennfederweg statisch: 2,4 mm
  • Federkraft bei 1±0,3mm Federweg inkl. Fertigungstoleranzen der Feder: 21,8±12,9 N
  • Federkraft bei 2±0,3mm Federweg inkl. Fertigungstoleranzen der Feder: 43,2±13 N
    Da die Feder zum Anpreßrad ungefähr ein Hebelverhältniss von 1,5 hat, ist der Anpreßdruck des Extruderrads unter diesen Annahmen bei 32,7±19,3 N für 1mm Anpreßweg bzw. bei 64,7±19,5 N für 2mm Anpreßweg. Ordentliche Toleranzen…

Zum Vergleich dazu der Bondtech-Extruder meines aktuellen Druckers (Hebelverhältnis 1,66, Drahtstärke der Feder 1mm mit Außendurchmesser 6mm, Länge 11mm und 7 Windungen, davon 2 angelegt und plangeschliffen):
eingestellt auf 3mm Federweg (Nennfederweg statisch 3,31 mm - die plangeschliffenen Enden machen hier eine Menge aus) kommt der auf eine Federkraft von 48,9±6,4 N und damit auf eine Kraft auf das Filament von 81,2±10,7 N.

Wenn der Kunststoff die zusätzliche Kraft aushält, könnte es sich also lohnen, die Federn zumindest für ungünstige Toleranzfälle gegen welche von Bondtech auszutauschen… damit bekommt man für die beiden oben für den J1-Extruder angenommenen Federlängen von 9,2mm und 8,2mm (1 bzw. 2mm Nennfederweg der Originalfeder, wieder mit ±0,3mm Federwegtoleranz durch den Extruder) dann 48,7±16 N sowie 83,3±18,1 N Anpreßkraft.


Congratulations!!

About the spring curve: From the picture above I see 5.75 coils, two of which are closed, and no ground ends. Thus, using Febrotec’s spring tool and assuming standard quality 2, I get the following results:

  • Nominal spring deflection static: 2.4 mm
  • Spring force at 1±0,3mm travel incl. manufacturing tolerances of the spring: 21,8±12,9 N
  • Spring force at 2±0,3mm travel incl. manufacturing tolerances of the spring: 43,2±13 N

Since the spring has a lever ratio of about 1.5 to the contact wheel, the contact pressure of the extruder wheel under these assumptions is 32.7±19.3 N for 1mm contact travel and 64.7±19.5 N for 2mm contact travel. These are some tolerances…

As a comparison, the Bondtech extruder of my current printer (lever ratio 1.66, wire thickness of the spring 1mm with outer diameter 6mm, length 11mm and 7 coils, 2 of which are closed and ground flat):

adjusted to 3mm spring travel (nominal spring travel static 3.31mm - the flat-ground ends make a lot of difference here) I get a spring force of 48.9±6.4N and thus a force on the filament of 81.2±10.7N.

If the plastic can withstand the additional force, it might be worthwhile to replace the springs with Bondtech springs, at least in case of unlucky tolerance combinations… this would give you 48.7±16 N for the two spring lengths of 9.2mm and 8.2mm assumed above for the J1 extruder (1 and 2mm nominal spring travel of the original spring, again with ±0.3mm spring travel tolerance due to the extruder) as well as 83.3±18.1 N contact force.

Heute Drucke ich wieder seit ca. 3 Stunden und ja, ich habe auch wieder Extruder-Sprünge.
Aber nur bei extrem schnellen Druck der Stützen und mach mal in der Füllung.

Also, entweder ist die Druckgeschwindigkeit für das Material zu hoch oder die Feder drückt, nicht stark genug.
Komisch ist nur, dass es erst bei ca. 70 % Druckfortschritt auftritt.

English:
Today I’ve been printing again for about 3 hours and yes, I have extruder jumps again.
But only with extremely fast pressure of the supports and sometimes in the filling.

So, either the printing speed is too high for the material or the spring is not pushing hard enough.
The only strange thing is that it only occurs at around 70% of the printing progress.

@everyone
Here is the related video

Ändern sich vor der relevanten Stelle die Lüftergeschwindigkeiten oder fängt sich eventuell der Kühlluftstrom im Bauteil und wird auf die Düse gelenkt? Ich habe mit meinem Drucker auch heute schon das Problem, daß bei starker Kühlung und hohem (naja, relativ zu dem, was er halt hinbekommt - im Gegensatz zum J1 schläft der durch die Gegend…) Materialdurchsatz der Extruder anfängt durchzurutschen, obwohl der Temperatursensor im Hotend davon nichts mitbekommt.


Do the fan speeds change prior to the relevant point or does the cooling air flow get caught in the component and therefore gets directed to the nozzle? I already have the problem with my printer that the extruder starts to slip with cooling set high and a (relatively to what the machine is capable of…) high material throughput, although the temperature sensor in the hot end does not notice this.