Hello all.
I purchased the snapmaker 2.0 3d printer yesterday and I cannot get past the bed leveling. As you know it moves in a circular pattern around 9 data points. When I begin the calibration it moves as expected. Finding its home position, through the internal limit switches, then proceeds to point 1. Points 1 through 4 behave as expected.The print head moves very close to the build plate, recognizes its presence then moves to the next step. However at point 5 the print head tries to push into the build plate quite forcefully causing damage to the print plate.
I have checked the cabling many times and followed some basic troubleshooting, to no avail. I have also updated the firmware. Has anybody seen this behavior before?
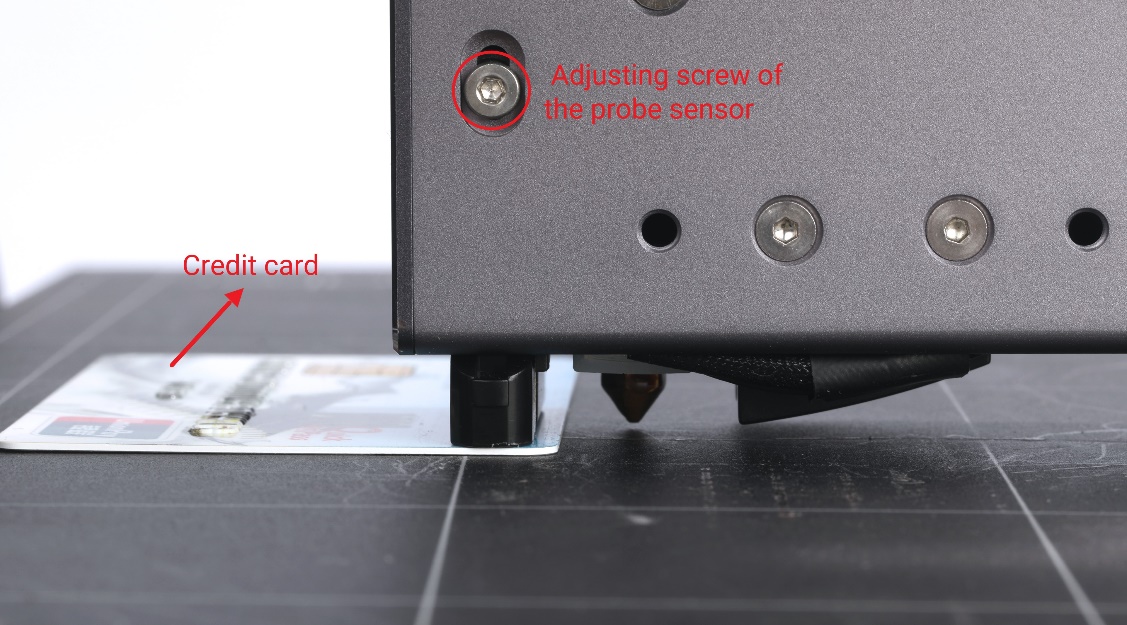
Sounds like maybe the sensor is right at the edge of detection and when it’s near the center, it doesn’t quite hit so it pushes into the bed. You can try adjusting the sensor down a hair, there’s a hex screw on the back in a little adjustment slot. The sensor should be about 1mm higher than the nozzle, more than this and the sensor wont register before the nozzle digs in.

This is a snapmaker provided image, but it’s incorrect. They’re showing the sensor about the same as the nozzle. The proper way is to loosen the screw, place a card, or something ~1mm thick under the sensor, then very gently jog the head down until the nozzle just touches the bed. Tighten the screw again and try calibrating again.
EDIT: They have an entire FAQ page about it here:
Probably what @Skreelink said.
Or you may have a mistake in assembly.
Y-rails hanging off end. They should be centered on platform.
Bed frame upside down. Should be nuts down.
Wrong screws for heated bed. Should be flat end so they’re flush.
-S
Thank you sir! because of the way it is mounted, the physical adjust is not visible when the head is installed. This worked perfectly. I cant get it to where it is described as its lower most position is about 2mm higher than the nozzled but it was enough to let it complete its cycle.
Yes that absolutely could have been an issue. Im pretty good with assembly and checked that several times. Turns out to have been the sensor distance needing a physical adjust. Thanks for helping.
Glad to hear you got it working.
The problem lies with the Hall effect sensor thats mounted on the print head. Undo the screw and push to the lowest end of slot, then re tighten.
I have with my Snapmaker A350.
This could suddenly no longer print properly.
The print nozzle left deep marks on the print bed.
I then calibrated the printer several times automatically and manually. Both attempts brought no improvement. Therefore, I cannot use the printer.
Now, for the first time, I tried to use the laser and I was able to calibrate the height. The laser works but does not leave any marks on wood and paper. The engraving is not recognized because it is not burned in by the laser. The camera calibration also fails.
A reset did not bring any improvement.
Can it be due to deformations of the X, Y and Z axis?
Can the controller cause such errors?
Do you have any ideas to fix the error?
Thanks in advance
Bernd