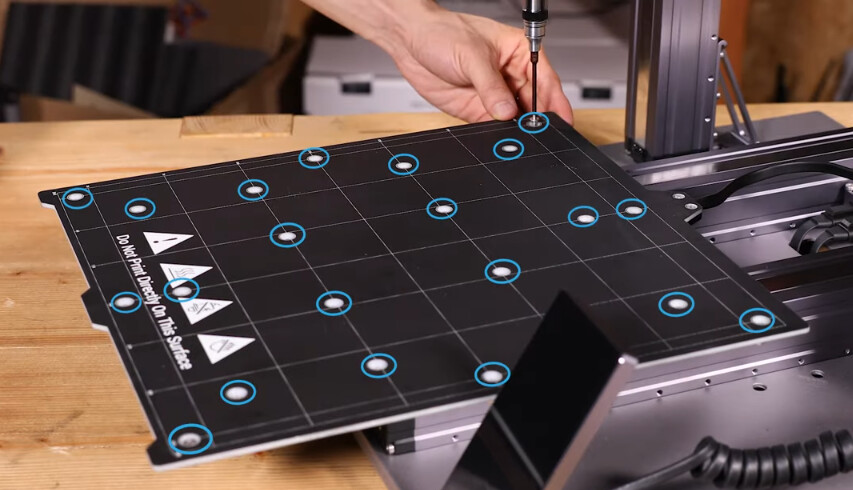
I adjust the screws mounted to the inserts as instructed in the assembly manual - so the compensation is done by unscrewing those M4x10 screws marked blue on the picture. I try to make those that are on the locations of the bed that are usually sunk to stick up above the surface slightly.
Probably no the perfect method but at least I can get the printouts that were impossible with regular automatic calibration before screw adjustments.
One more hint - I noticed less problems with 3x3 calibraton than with 5x5 which is a bit counter-intuitive.
Just for interest, I have just received a new platform for the A350 it does have a machined top, it is missing the nutserts so can’t test it at the moment, edited as the information has changed.
The 3D printing plate (that says “Dot not print directly on this surface” never used nuts. It has recessed holes and uses the beveled screws (unlikely every other part of the machine). And those holes have always been threaded (as far as I’ve seen online and with my own machine).
Sorry if I confused people, not the platform but the cradle underneath it.
Yes but the new cradle has been machined so it is flat, I just worked out the replacement has the nutserts missing, so it has 6mm threaded holes for the 4 mm screws, won’t be able to test it now.
No, you are correct, that is referred to as the platform in the assembly manual. The heated bed or laser plate or waste board screws to the platform.
The terminology choice was… Interesting. I also think it requires clarification so I’ve been calling it the webbed undercarriage.
Supposedly I have a replacement webbed undercarriage cradle platform mount base in the mail but I haven’t received tracking for it, I’m really intrigued if it’ll be the new style
Actually it is called the platform. 
Yes so the only difference is the machined top, and a very small arrow on one corner of the casting. I mark mine front anyway with a pencil so I always get it around the same way as I m shimming it with copper tape.
I heard a rumor it’s tapped holes and not threaded inserts.
My gut reaction is the threaded inserts were better because they were replaceable initially.
However that turned out to be moot since it’s a custom machined part apparently that is not available for purchase.
Guess it doesn’t matter. Although the threads will be aluminum instead of steel? so I plan on torquing it less.
Does it really feel more sturdy, less flex at the corners? Looking at the redesign it looks good but there will always be a weak point in the linear modules since they have such a small lever arm inside to resist rotation front to back.
It is inserts, I may have started the rumour by accident as the new bed actually has the inserts missing. Waiting on support now.
Sorry
Chris
hahaha…
only this product i tell ya.
Has anyone else tried this way?
I had made a post in github about some leveling concerns, and received a relatively thorough response about the future of bed leveling. At least, in terms of - they are working on it.

This was in response to my message:
We were talking about this on the forum
As we know, bed leveling depends on the temperature of the bed. we appreciate the efforts in redesigning the aluminum web to be more robust, but doesn’t help the 7600 units in the field.
The calibration routine disables the heater, which we believe is to prevent the current flow from affecting the sensing range of the prox sensor. while it would probably be fine if it was consistently on or off, the bed will turn on and off while heated to maintain a temperature within a hysteresis.
Lets modify the calibration routine to wait until temperature is reached, move to position, disable bed, probe, enable bed, move to position, disable bed, probe… etc
One of our best members was talking about making this mod himself but thought i’d put it out there. its a wise workaround the issue.
Also, I have found that starting a calibration and then setting the temperature via luban will result in luban’s temperature readings to freeze at what was shown and do the calibration, but it would seem that they are actually turning off because they are cooling down rapidly by the time it finishes. i am not able to get a response to my request to set the temperature during this scenario, but this was during a custom 11 x 11 calibration grid. by the time calibration was completed and the ability to adjust temps returned, the temp had dropped by 10 or 15 degrees (i forget now its been a hot minute)
The fact the bed is pre-heated makes a large impact on the bed’s topography and does take a little time to revert back to its cold shape after the fact, so pre-heating is a valid method for improving calibration. realistically though, the same could be said about it taking some moments in order to distort when the temperature rises too.
its almost as if a heated calibration option would need to have a time delay built into it to accommodate for the time it takes for the warpage to happen as well. as such, this should be an optional process. i think the time it would take to fully deform depends greatly on many individual variables, so it would probably need to be a substantial figure to cover all the bases. maintain temp for 20 minutes?
i guess if we are going to have an option for it, may as well allow a user definable value for this delay. “advanced settings”
I do get pretty good results from my calibration method with a cold bed. Yes a hot bed will alter things a little bit, but to play devils advocate, Im not sure it really affects things that much and be easily compensated for by a hgher flow rate or larger line width or even a raft. I have many other printers that are customised from factory with duet wifis and BL Touch… and on every one of those (with mains powered heated beds) cold bed mesh level works fine.
So I just wonder whether bed changes with heat is a fools errand / rabbit hole?
Absolutely not,
Matter of factly snapmaker confirms this is a significant difference and is adding a pre-heat to the firmware.
The plane of my print bed changes tremendously from the heat.
The aluminum frame that the heated bed is mounted to is distorting.
My bed will not function unless i use the very center if i do a cold calibration and then a heated print. it will fail.
The SM build sheet is not helping, when the sheet is hot I have noticed that I can push around air bubbles between the top layer and the steel
Adding the glass bed plus FiFix thing to calibrate with was the best move I made to date in terms of having success on the printer.
I must be lucky with my bed then i guess. You seen the pictures of the case i was printing in PLA on my bed post. Printer 10 off now over 3 days with differing temparatures in the garage and all have stuck perfectly over 220 x 220mm on the bed.
Perhaps QC problem on bed manufacture and mine happens to be good and not warp between cold and 75deg C
Keep in mind they have been making minor improvements to manufacturing over the course of release.
Hi all,
I’ve done my first somewhat larger print (yet did only relatively small prints), and I also experienced problems with first layer adhesion, and I could clearly track them down to the additional deformation during heating up of the bed. However, the deformation looks “good natured”, i.e. the bulge in the bed’s middle just got more pronounced. I heated the bed up and did a calibration run with the still warm bed, and the results improved immediatly. So I am really looking forward to Snapmaker allowing to run a calibration on a hot bed.
I was wondering: They claim that the accurracy of the level probe gets worse with a warm bed. I’d not be surprised if it is not the heat, but the electromagnetic field the heater emits when heating up. So I’d suggest that they try this: Heat up the bed, move to first calibration point, switch of heater, calibrate, switch on heater again, move to next point, switch off heater, calibrate, switch on heater, repeat until calibration done.
Cheers
Hauke
This is precisely what we have come to the conclusion on too
However, i had just gotten a response about this
They said the malformation of the bed from heat is greater than the sensor interference and are working on implementing a pre-heat in calibration with a time delay
but they did not say if they were going to do the heater on and off thing
it wouldn’t matter if the heater was 100% on or 100% off, but the fact that it would be changing states during a probe is what will affect that. it’s hard to say how much without testing. i know that using a ferrous metal against a non ferrous sensor will result in nearly double sensing range, so i would imagine the current must do SOMETHING to it.
Perhaps they are not willing to tackle that yet, or maybe they will and just didnt say as such.
additionally, one of our members Brent has been talking about doing this firmware change himself along with some other things he came up with (better grayscale on the laser, various bug fixes)