Build-up on the nozzle when printing with PETG

Thank you @widjit. I will get a nozzle ordered. I’m assuming the M6 x 6mm threads are appropriate to fit the SM hot end?

I was also thinking about it more last night, would it help any to add additional cooling? Maybe a fan on the tabletop blowing over the print surface?

I use very little cooling with PETG. The only time I use cooling is if I’m bridging. And yes the M6 x 6mm fits. https://www.matterhackers.com/store/l/e3d-v6-nozzle-x-175-040/sk/M8JEFGXW this is the one I’m currently using it’s a little pricey but lasts forever.

You don’t need to buy a $45 nozzle to print PETG. If you have a good brand of PETG and your settings are dialed in any brass nozzle will work fine. They will where out over time so whether a hardened nozzle is worth it is up to you.

The statement that PLA is garbage is ridiculous. Different types of filaments are useful for different things. It all depends on what you’re trying to print and what the end use is. Even among PLA there are many types and formulas.

-S

3 Likes

I just realized I didn’t ask about bed temperatures yet. What bed temp would you suggest for PETG? I’ve read in some places that a heated bed is not even required for this material. Any truth to that?

I just started with my 350A and searched for some PETG info in the forum. I just thought I share my printer settings with you. I used the red PETG filament SnapMaker offered and used the standard nozzle woth following settings:
image


Had a small problem with the layer adhesion. The part lifted of at one point but still is functional.
Still needs some improvement but I think its close.

I hope this helps you out.

1 Like

This time I printed a simple L-Shape bookstand with the red PETG Filament from Snapmaker. With better results in adhesion. With this settings:

Summary


I used no Z-Offset and just calibrated the bed the usual way.
There where still issues with the so called “elephant-foot” but I think that could be fixed with a print bed.

I’m willing to try this 28 dollar nozzle if you can confirm its the right one:

Amazon.com: Genuine E3D Nozzle X - V6-1.75mm x 0.40mm (V6-NOZZLE-4TC-175-400): Industrial & Scientific

I’d love to see this nozzle that claims to not get clogged, help with first layer adhesion and clean off with a paper towel.

I am using some cheap junk nozzles and they seem OK for the most part, but this is interesting to me and I’d like to try it.

I know from other research that it should be a mk8 nozzle m6 thread 15 mm long, this nozzle meets those specifications? Or can I make an adjustment if the nozzle length is different or what?

Please…
Calibrate your extruder (E-steps) with the new filament.
My PETG prints best at about 225°C.
With 0,20 mm layer heigth you can print at max. 50-60 mm/s.

The standard nozzles are just fine to print this material. But you will notice that you have to change the hotend more often than with PLA because of the higher temperatures ans the different material. The nozzle is not the problem but the PTFE tube inside the metal inlet tube. The tube cloggs up the hotend from time to time.
I bought a roll of 3/2 mm PTFE tube (OD/ID) to save money (by saving the metal parts of the hotend and just replace the tube).

For me a Z-hop with retraction helped a lot with the stringing problem.

I just check and remove possible build-up on the first and second layer.

1 Like

I have one of those nozzles on right now, I did a couple of little prints with it and it seems good. It cleaned off as advertised, but I didn’t have a ton of build-up from the prints only time will tell. As long as your nozzle isn’t much longer it should be ok, you will adjust the true length when you set your offset in the calibration.

and @rojaljelly my nozzle that came with mine wouldn’t even print PLA. I don’t know if it was just a lemon nozzle, but they had tried it out because it had a different color when I first heated it up and loaded it. I do agree that the PTFE tubing and not be a true all metal hot end is a weak spot. As far as changing out nozzles more I would disagree, a quality nozzle will last a really long time ( my nozzle X on my volcano that I print almost exclusively PTEG-CF I have over 400 hrs. on and its still going great.)

They say you don’t need to heat the bed but I always use the bed at at least 60c for everything, even PLA. For PETG I usually use 70c. Are you using a skirt or brim? something like that I would just use skirt to get a really good prime and make sure everything is flowing good before it starts my part. If I’m printing something with minimal bed contact then I will use a brim with 4 or 5 lines. I dont know what that setting is on Luben as I only use Simplfy3d but if its like Cura it will say skirt, brim or raft. I do use Rafts but that is only when I’m printing something Like PC or Nylon.

Hello friends! Sorry for the wordy post but there was a lot that went into me researching this issue. For me, it seems I found a solution, at least for this filament…

I had to walk away from this issue for a while because it was driving me nuts. Recently I began researching it again. With the help from several articles on all3dp.com, countless YouTube videos, and a very useful Thingiverse tool, I seem to have solved this particular issue (as well as troublesome first layer issues). My research revealed that there are many factors that affect the first-layer adheasion including nozzle temp, bed temp, cooling fans, and print speed. Also, materials from different manufacturers (and even different batches from the same manufacturer) may require different settings. For this issue, I was focusing on PETG and I’m using Cura as a slicer.

This article on all3dp was particularly useful. The Perfect PETG Print Settings | All3DP. It gave me some starting parameters to which I applied manufacturer suggestions to and I set out to solve this issue. For this particular filament, the manufacturer suggested printing temps between 230 and 250 and bed temps between 80 and 90. Note: Cura automatically adjusts the first layer print speeds to 50% of the set speed. All of these were actually printed at 25 mm/sec even though the overall setting was for 50 mm/sec.

Using this bed level test from Thingiverse (Bed Leveling Calibration Test Object (Parametric) by pgreenland - Thingiverse) I got started. The following images show the result of each test with the printing parameters shown in the photo. Cooling fans were off for all of these tests and the SM printing surface was coated with a thin layer of Elmers “Disappearing Purple” glue stick.


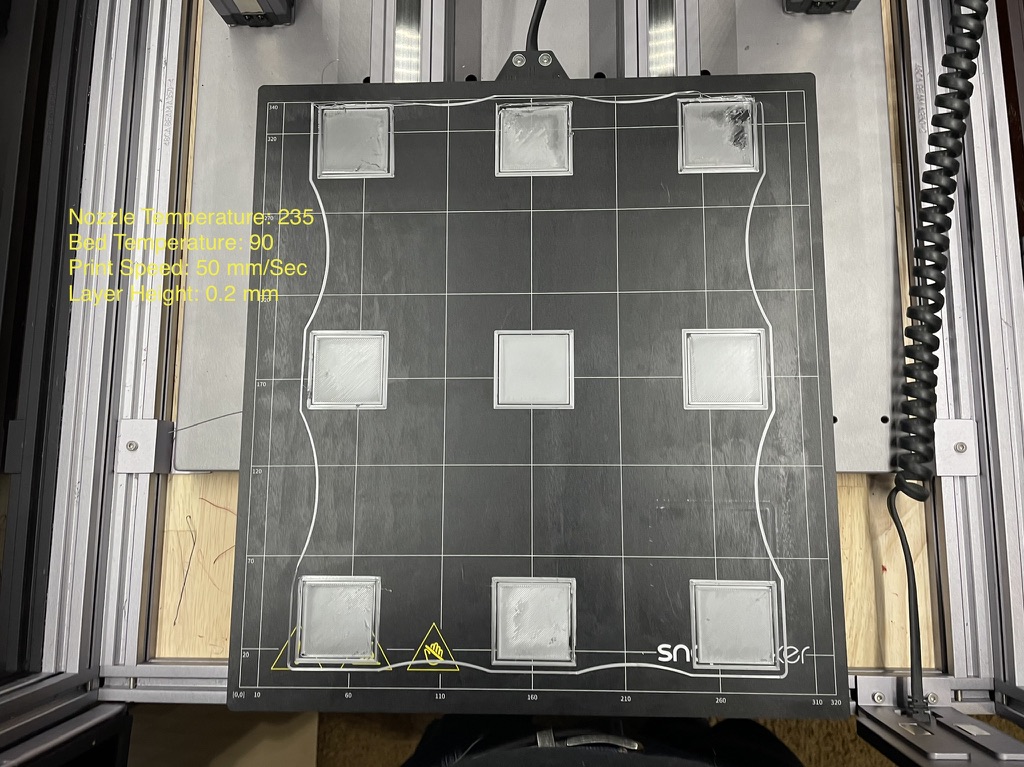
These tests showed me several things. First, small changes in bed temperature can make a big difference in layer adhesion. I changed these in 5-degree increments but could probably get more precise. Second, my printing surface and/or heated bed and/or bed frame on this machine is not flat. Or, the printer controller is not doing a very good job of adjusting to the inconsistencies in bed level. After performing these tests I noticed that the nozzle had actually damaged the print surface in the area shown in the upper-right of the photos.

Taking what I learned here I started a new print. A simple enclosure I’m working on that is 61mm-sq. It worked. For the first time, I got a nearly flawless first layer. And… through the almost 3-hour print, I had little to no buildup of material on the nozzle.

This was all done with the SM hot end and nozzle with one modification. I used a syringe with a blunt needle on it to inject thermal compound into the hole the temperature sensor for the hot end is seated into. I did this based on another thread I saw on these forums to ensure accurate thermal readings. I don’t know if it made a difference or not, all I know is that the combination of these settings seems to have resolved this particular issue.

Also, I did complete the extruder calibration as suggested earlier in this thread. Using the 100mm test mine was off by about 14mm and was under extruding. This is the process I followed: Extruder Calibration a must - #33 by Termin8tor

Thank you all for the input here!

2 Likes

Very interesting and thanks for the write up. I agree my bed is far from level and I have measured 15c difference between the middle of the bed near the corners.
One question, did you do a bed calibration between the tests as shown or did the all come from the same bed calibration and the same nozzle Z offset?

I did the 25 point bed calibration only once before I started the test prints. When doing the final adjustment to the nozzle height I adjusted it so there was just noticeable friction, not all the way to where the card would bend when pushing towards the nozzle. Throughout the test prints I did not repeat the bed calibration nor did I adjust the Z height any.

I’m having trouble finding PTFE tube in those dimensions. Would you mind sharing where you got it?

Also, I noticed that the stock MK8 nozzle also has this PTFE tube going into it from the heatbreak/throat (metal inlet tube) - it has a wider ID than MK8 nozzles I can find. Do you know where MK8 nozzles of that type can be found?

I feel like those might work better since the filament gets heated at the tip. Just a guess really and wanted to experiment.

Seems widely available:

https://www.amazon.com/uxcell-Tubing-Printer-RepRap-16-4ft/dp/B07F64KQR1

I had not seen that last one. The Amazon one says “Heat resistant up to 200℃” which of course would not be good to use in the heatbreak (the one on eBay appears to be the same one).

The last one does say up to 260C. I’ll check into that one.

UPDATE: A meter of it shipped to the US is €75.29. I guess I’ll keep hunting.

Thanks!

There’s only one kind of PTFE, they are all the same. Thermal ratings are not a black/white it’s ok or not thing. It’s a gradient.

PTFE is generally considered to begin to decompose as low as 260C. However, by some studies, it can begin as low as 200C.

If you are heating your filament to over 260C you need an all metal hotend without a PTFE liner. If you are concerned with trace decomposition at 200C+ then you should be using a fan and ventilating outside.

This also applies to nonstick cookware as well.

Edit: you saw nothing lmao

1 Like

I get what you’re saying. Well except the part about the “all metal filament” - just kidding I know what you meant to say there :wink:

If I decide I need temperatures above 260 I’ll get an all metal heatbreak.

Thanks

1 Like

An all-metal filament prototype with GMAW-based print head: JMMP | Free Full-Text | Applications of Open Source GMAW-Based Metal 3-D Printing

2 Likes