For me this seems too near to the bed, try a higher z offset and see what you get.
I tried it last night but it failed again at the same location.
Would be interesting how high the nozzle could go.
How does your bed look physical? If you lay a ruler on the bed, with and without printsheet?
Indeed you seem to be out of range, this causes multiple lines one on another which causes these doubled lines at the back corners.

Have a look at this so you can understand how the machine interprets the code positions outside it’s workspace:
I have the same peeling ridges problem even with a smaller model which I am using to test the issue, so it is not an out of range problem.
BTW, in the attached photo I started peeling the bad area, it wasn’t delaminated like this, but the ridges are there.

I also used a torque screwdriver to torque all bed screws and quick swap screws to 5 in-lb. While doing it I found some screws were over torqued and some started to come lose. So I was sure that this time it will work. Nope. The same issue, the same area
I checked with a ruler and a flashlight behind it and found that the center is a hair lower than the sides, i.e. like a very shallow bowl, but nothing seems to be outrageously off.
Maybe a stupid test but, is it the same with other filament (this seems silk)?
With what nozzle are you printing?
Are we looking at layers 1 and 2 here? Or is this later in the print?
The previous layer looks great, so I wouldn’t be looking for any level issues - the ABL should be taking care of that.
It looks like the latter layer is not bonding to the previous. I know this is obvious, but, this could be for anyone of these reasons:
- Previous layer too cool because bed not evenly heated or cooling down too early.
- Z height on latter layer too high (mechanical or slicer issue).
- Under-extrusion on latter layer not producing enough ‘squish’.
- Nozzle temp too low - filament is not hot enough to re-melt previous layer.
For now, forget this particular model and practice with a simple rectangle.
Yes, these are layers 1 and 2.
It might be a filament issue. I will try with a fresh filament and see if it makes a difference.
BTW, I switched filament, not a “fresh” one but one I just dried and tried small 50x50 mm rectangles and they seemed to be OK. Then I tried the large model and I got a ton of issues with some areas looking great and others not so much. This is why my next attempt will be with fresh, out of the vacuum bag filament and see how it works.
If this one fails, then I will try to tweak cooling .
I don’t think I have a under-extrusion issue but I will verify.
As for nozzle temperature, I got all the way to upper ceiling of the filament. I may try to go a bit higher.
I have another idea. I will use an IR thermometer (I don’t have a way to do thermal imaging) to check the temperature of the print bed to see if I have some cold spots in the problem areas.
What I will do some of the next days: I’ll do a full-area 2-layer print with my DX. I know that my print bed is awfully uneven, and what I want to check is my theory that Snapmaker’s homebrew bed levelling for the DX only compensates the first layer. I sincerely hope that I’m wrong there…
I think I can offer a potential explanation after running my own experiment. TL;DR version: You have some obstruction in your filament path which “pulls” on the extruder. Meaning, your filament spool not rolling smooth enough, some kinks in your filament that catch on the filament tube and bring up resistance, tangled spool windings or anything that offers resistance to the filament transport before it enters the toolhead. As the hotend can be pulled up against a springload, the nozzle may as a result of filament obstruction be pulled up and no longer press down the filament correctly, like having a too high Z-offset.
Here’s the long story with pictures. To verify my theory/anxiety that Snapmaker botched the bed level compensation with their self-made DX levelling routine, I ran a large print, nearly covering the full available area (DX + QSK + Bracing kit), but just two layers high, to check for delamination. Spoiler: I do not think they messed it up - my result is not too shabby after all - but just by happenstance I was able to reproduce your error!
So, first meet my bumpy print bed - first layer after 6x6 bed levelling:

And here’s the second (and final) layer finished:

For my test I used an nearly empty spool, and when it neared its end, the filament was a bit bent where it was fixed to the spool. I was not standing beside the machine when the first error happened, but my theory is that when this bent piece of filament entered the bowden tube, it offered a bit of resistance, which caused the nozzle to slightly lift. As a result the layer lines were printed too high and did not laminate.
When I came back to the machine I found it with filament runout detected (my first - yay!). I inserted new filament, and after pondering a bit about the error, I decided to actively obstruct filament movement by pinching it between my fingers and giving a bit of pullback. And lo and behold, I got delaminated layer lines. The stronger I pulled, the worse it got.
So, check your filament path and spool!
Wow, you did a lot of work. Your effort is much appreciated.
I will check my filament path. I will be starting with a fresh spool, not one that was sitting for a while and then went through the drier, just to eliminate the easiest variable first.
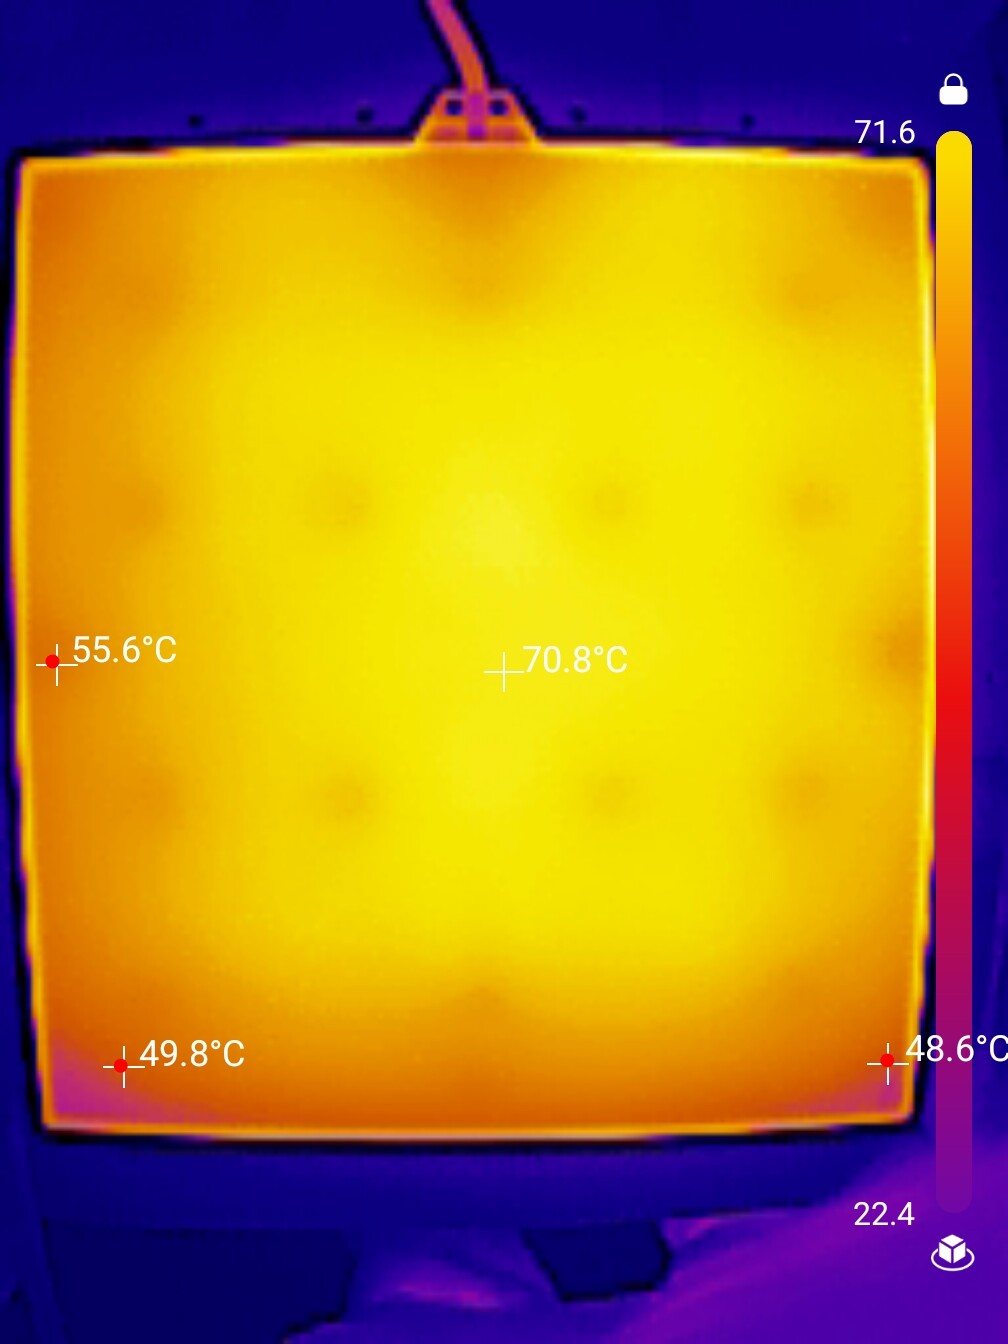
On Friday, I will be getting a loaner from a friend to attach to my phone and get a thermal image of the print bed with and without the print sheet. I want to see how well (or not) my bed is heating up.
I took a thermal photo of my printer’s print bed with the print sheet. I set the temperature to 70 C and let it warm for a while before taking this photo. Notice the difference between most of the bed and and the sides. In some areas the difference is more than 20 C. It may be OK for PLA but for other materials that have a tendency to warp it can be a problem. Looks like it is better to stay away from the sides and print smaller objects that fit in the “good” area.
I guess this is somehow to be expected - the edges of the bed cool down more as they are more exposed. With materials that tend to warp I do brims or will try mouse ears in the future - after all, other printers have the same unevenly heated beds, and people get successful prints…
How long did you actually let it sit heated? I seem to remember that people recommend half an hour at least to get everything good and warm.
like @Hauke said you need to make sure it is “settled” in temp. my a350 takes a looooong time to heat up and stabilize. my abs bed temp is 100c. it takes at least a half hour to get close to that temp. after its reached 100 (really 98) i wait another 30 minutes or more for stabilization. the bigger the printer size the more time is needed.
even so its a matter of degrees (pun intended). no matter how long i wait i will always show a hot center with cooling at the edges. i also have an enclosure which helps contain the bed heat.
This can be a real pain because you go to control > heated bed > set the temperature and sit there doing nothing for a long time. And once you finished printing, the bed cools down pretty quickly. Do you have to go through the whole process again for your next print even if it is only few minutes later?
It was at least 30 minutes but I had to keep my enclosure’s front open so I can take the thermal photos. I took them in 5 minute intervals to see how fast (slow!) it heats up.
agreed it is a pain. it is also the biggest inconvenience i have with the printer.
if you have an enclosure and if it is truly a few minutes then, no. just get the bed back to temp and print.
think of the metal platform that the sheet sits on as a thermal mass. it takes time to heat up and it takes time to cool.
There are these mains-driven silicone heated beds: https://www.aliexpress.com/w/wholesale-220v-heated-bed-3d-printer.html
They should work very nicely, but require a bit of tinkering, and you should know what you do, as it is mains voltage. For those frequently requiring hot beds, this still might be a way forward.