Laser engraving glass - tried several methods, here are the results

I just find it’s much easier to get an even coat than sharpie. And for me I think it gets the closest to the look and feel of sand etching.

Regular vinyl (aka pvc) should not be cut with laser. Releases hydrochloric acid and other toxins. Bad for your machine and worse for your lungs. There is pvc free vinyl available that is laser safe. Use a drag knife for pvc. Lots of discussion about this on this forum.

-S

3 Likes

I have used Armor Etch to make glasses and coasters. If you can make a vinyl stencil, this is the way for what I think you are trying to achieve.

Found this and thought about this topic

Laser Engraving Glass

mweolu also pointed me in the direction of Armour Etch - I’m hesitant to use it, since it basically produces hydoflouric acid, which is a nasty and somewhat dangerous substance. Still, I assume it gives the best results.

Hi

I have found a simple method that works for borosilicate glass that requires a permanent black marker and blue painters tape. The glasses I used are like this:

Here is what seems to work quite consistently:

  1. Use the marker to color the glass where you intend to engrave. It will wash off. Just go over it once evenly.
  2. Place blue painters tape over where you marked, press it evenly over the surface to improve contact between the tape and glass. I just used the sides of the thick “Grand&Toy” Permanent Marker.
  3. Use the marker to go over the tape where you intend to print. So you now have Glass+marker+tape+marker layers.
  4. Use the following settings:
    Vector Toolpath - Dot-filled engraving
    Movement Mode-Dot
    Fill Interval ~ 0.14 mm
    Dwell Time ~ 50 ms/dot
    Laser Power 100%
  5. Ensure the glass is about 5~8 mm or less from the laser. (my glasses are 56 mm high, so to give some room for minor errors in positioning, I stated the surface was 63 mm).
  6. Peel off tape and use a simple dishwasher scruber to get off the marker.

I created a number of glasses as gifts for my students. They worked out well!

2 Likes

Assuming 10 watt laser?

Yes I purchased the 3-1 kit with the 10 W laser.

Another image of the set up

Is the layering really necessary? I would think the tape would absorb too much of the energy?

Mark

I have my doubts about the initial black marker layer, but the black on the tape makes a very big difference in the tests I performed. I just stuck with what seems to work. That coupled with good contact between the surface and tape I think is also important.

The tape indeed absorbs heat and its that heat that results in a good etch on the glass. If it doesn’t heat up enough, the glass surface doesn’t heat up as much.

It isn’t ‘perfect’ but certainly good enough.

The color absorbs not the material which is why it has to be “painted” so those darker atoms vibrate faster creating the heat.

Actually, now playing a bit more, I can relate to that. as long as you do “brute force”, the slight uneven coverage of the sharpie does not matter, but if you try to fine tune laser power, an uneven coverage suddenly shows in the results. So I tried a bit with paint (tried tempera and acrylic, just because I had them available), which makes it easier to get a fully opaque cover. My conclusion is, it is not really important which cover you use, as long as it absorbs all laser power, and it does not need to be super evenly distributed, as long as it is fully opaque. Still, avoid thick globs of paint, these absorb laser too well and nothing reaches the glass-paint-transition-zone.

Using Lightburn’s offset fill method (which IMHO is already reason enough to purchase Lightburn), 10W at 400 mm/s and 40% I get nice results (perhaps 30% might have been enough). I do not succeed to achieve the silky effect I was aiming for, and I guess that’s because the glass shatters in too large flakes for that, but still, the result is pleasing and I guess I’m ready for the final project, i.e. engraving the spice jars.

You may ask: tempera or acrylic? I’ll go for acrylic, it smells better and after the process it kindof peels off easily, while tempera leaves marks sometimes. Acrylic also left a bit of sooty residue in places, but I found that a wire brush is good to remove these, and my fear that this would leave scratches on the glass did not come true.

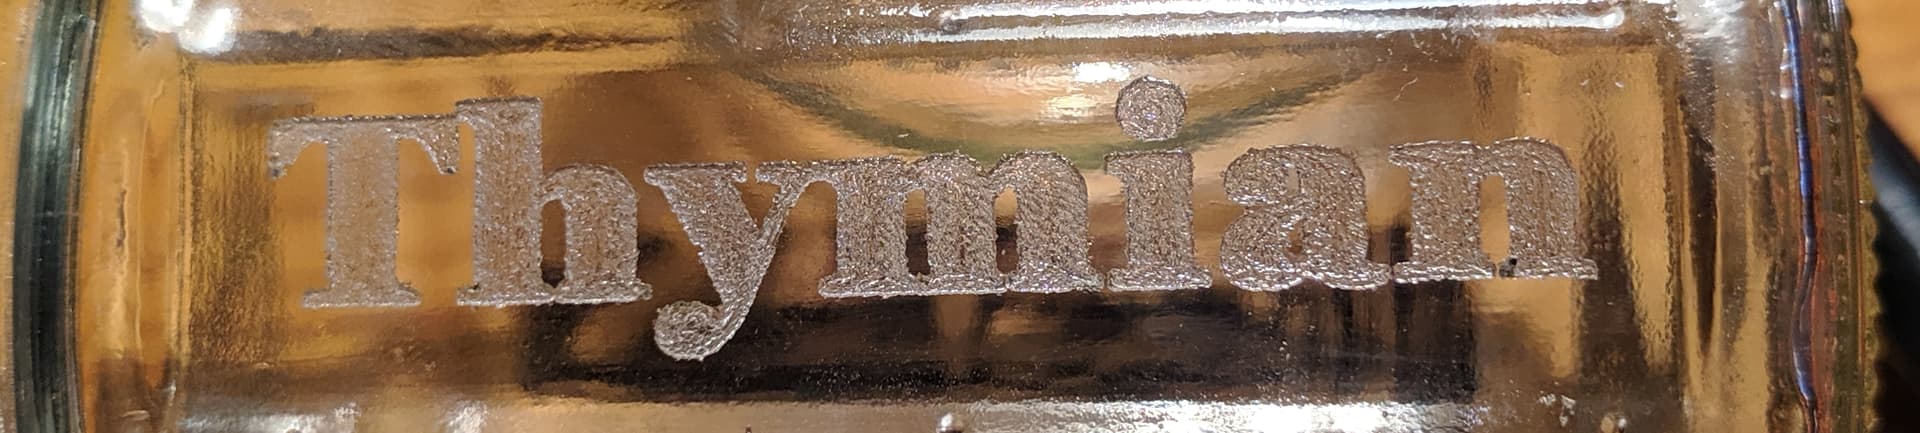
Here’s how it turned out (text is 5cm wide and nearly 1cm high):

Absolutely agree. The reason I chose spray-chalk is it can easily be removed - I think even hot water might do it.

Still haven’t forked out for Lightburn for any of my lasers (cripes, how did I end up with 3!). Pretty tough finding time to spend on learning the software - it’s neat to be able to use the lasers, but ultimately this is just marking stuff (the cutting I can do with other machines) and that is more a luxury than a need, when compared to other projects. Actually since getting a 3D printer that works (sorry Snapmaker, ya never did it for me), most of the projects I have taken on as favors for friends/neighbors involve reverse-engineering parts in CAD software and making nylon/petg/asa replacements. But maybe the laser will find its way into the mix at some point.

Photo engraved on full bottle of wine. Black tempra paint sprayed using air brush. Water clean up.
A350 10W, 1400mm/min 60%, Lightburn Stucki, Inverted image.
Homemade mostly junk box rotary attachment $50 in parts.


2 Likes

I see all these guidelines as for power and speed and I am grateful for that of course but I find it a bit confusing when it come to translating this to different laser power. Assuming we keep the speed and dwell time the same if someone say they are using 60% power on a 10w laser what would that look like on a 20w or a 40w. I assume that it is not directly proportional. Any guidance.

I’m trying to etch a picture on a used bottle of RUM so guidance would be appreciated.

I would suggest to start with less laser power if you have a unique item. - You could run the code again and again.

Over all the main difference in higher power laser apart the power is the bigger laser spot which could cause different heat transfer to the item than 10W laser for example. - In theory this would mean you need a tiny bit more power (than 10W if this is 100%) but in practice this is a not a notable difference.

Still, no 20/40w user here!

Did you ever post your guide? If so, can you provide a link?

40W Laser user here.

My attempts with this module on glass are still on “try&error” method.
800mm/min, 10% power - partially not visible
800mm/min, 20% power - cracked glass inside where the laser went through
Some other attempts with half diode mode delivered similar results (with different values)

The glasses are the typical brown vitamine jars you can buy everywhere.
I painted them with some sort of tempura color which is sold here for school kids.

Tomorrow i will change back to 10W, maybe the 40W module is simply not made for glass.

So far it works, but i think the 40W

1 Like

Did tests with both 10W and 40 W on Tumblers, Jars and Wine Bottles, Wine Glasses.
All except the Wine Glasses were success. Coating the glasses with Zink Coating Spray.

For Wine Glasses all of them cracked

For Bottles and Jars and Tumblers I used
10W
8000 mm/min 70%

40W
between 13000 mm/min 70%
and 20000 mm/min 100%

Sent you a PM with pdf

I thought the Artisan’s max. speed was 12,000mm/min?

On a slightly different question: Is there a calculation for Work
Speed (mm/min), when using Luban’s Fill•Dot method with inputs for Fill Interval (mm), Jog Speed (mm/min) and Dwell time (ms/dot)?