I’m going to be building an enclosure for the A350, largely with materials on-hand. I have a shelving unit next to the workbench that has a 30" w x 36" h x 29"+ d (the + because the enclosure can stick out) space and which will provide a solid base.
So far, I have only used the 3D-printing function of the SM2, so I am not sure what additional cosiderations should go into the design for the other functions.
Here are my thoughts so far:
access : the majority of the access will be through the front and the X-axis zero (left-hand) side. This is necessary due to walls on the rear and right-hand side of the shelving unit: the A350 will need to be removed form the enclosure for additional access. The front panel will be hinged, likely on the top.
laser safety: the enclosure walls will need to have laser shielding (e.g. [JTech 250nm to 520nm laser shielding])(250nm to 520nm Laser Shielding | J Tech Photonics, Inc.) windows in opaque walls. This might take the form of hinged overlay, or slide-in replaceable, panels
dust management: a shop-vac hose, and a fan intake opposite, will handle the CNC dust.
humidity : basically a sensor and an eva-pack.
temperature : insulation on at least two walls (the rear and the right, which are fixed as noted above) and the ceiling. A duct may be provided for a hot air gun, should the insulation (and pre-heating with a small space heater) prove insufficient.
A couple of points I am unclear on:
panel material: how much of a fire hazard is there with wood panels when using the laser or the CNC? Should the interior be non-wood, e.g. drywall or insulation?
filament feed : Filament has to be kept outside of the enclosure so it won’t melt, but also needs its own air-tight enclosure. This will likely be a box on top of the enclosure with some dessicant and the reels mounted on their side. Should the filament feed into the enclosure be through a slot cut above the X-axis module? Or will a single hole drilled for the filament work without binding the filament?
air leaks : how important is it to minimize air leaks for maintaining a 3-D printing temperature? The joints can all be filled with silicon sealant, any holes in the panels can have rubber gaskets, and hinged panels can have window seals. But at some point there are going to be diminishing returns.
Stuff in my enclosed.
A dust/fume collector that is attached to a Harbor Freight vacuum that I add a PWM speed adjuster. Just the right amount of suck with a minimum amount of noise.
A heat exchanger consisting of 2 radiator, 6 (quiet) fans, a water pump, and PS. Your concern is going to be removing the excess heat from the enclosure not keeping it in.
LED lighting because black filament on a black bed is really hard to see.
A WIFI camera so I don’t have to get up every 15 minutes to check my print.
Storage for hairspray, tools, and such.
3" thick rockwool batting on all the walls, ceiling, and floor for sound proofing. The floor has a 3/4" piece of plywood on top of the batting. And the door has fiber soundproof panels attached. I can have the unit running full blast at night while I sleep and I barely hear it. The (quite) cooling fans on the outside radiator is (mostly) the only thing I hear.
Lighting and camera I should have mentioned because yes, this will be an opaque structure.
This is in a basement workroom, so heat and noise are less of a concern. Ditto for storage - as mentioned, it’s on a shelving unit, and adjacent to an 8’ work bench with a full-length pegboard panel.
Not sure about the thermal issues. For many 3D printing materials, my understanding was that the purpose of the enclosure was to keep the temperature at a stable but warm temperature. For the CNC and the laser it makes sense to need cooling. I’ll plan for intake and exhaust fans to cover that. That means filters, though, and pretty soon we’re getting into too-complex-to-be-worth-the-bother territory.
Maybe vents at the top, with the shop vac at the bottom, so there’s airflow pulling the heat back down, and the dust should do the same - all assuming thermal loss during printing is not a concern.
Yes you want to maintain a stable environment. A completely sealed enclosure will get WAY too hot, will shut off, and your filament will start to melt on the spool. Trust me on this. The addition of the heat exchanger was necessary. Getting too cool will not be a problem.
Also, a vent (especially in a basement) will not allow you to control humidity. I store my filament in the enclosure because it acts like a big dehydrator. I do also have a dehydrator but I run my printer pretty much non stop so I can save on the power bill. Dehydrators suck a lot of power from the wall. My vacuum vents (filtered) right back into the enclosure. Otherwise the air it blows out will be coming from outside the enclosure and then I am no longer controlling the environment inside.
Hmm. Maybe I’ll just build it three-sided for now (back, right, and top) with a box + spindle for the filament on top. Kick the rest down the road until I have a need to spend that much time on the design and build. Right now I don’t even use the thing.
My house originally had an oil furnace. When it was removed the A/C return and an unfinished cabinet were installed. It was my gun cabinet for several year till I got a gun safe. Then it was basically a big junk drawer for a couple of years. Now it’s home to my A250.
I forgot to mention that there is a smoke detector in it too. Also a UPS for those pesky power outages. Both the machine and the heat exchanger will run for about a half an hour.
There is also some of that foam padding from Harbor Freight and some washing machine vibration dampers under the base. I’m 10 feet from it right now and can’t hear a thing.
I’ve only used the 3dp, so take my advice w/ a grain of salt.
My custom enclosure is aluminum extrusions, plywood, and plexiglass, and I’m not worried about fire hazards.
I wouldn’t think you’d have to worry about the laser being a fire hazard, unless you’re doing silly things like mounting your laser head sideways to paint some eggs (and then I’d wanna be remotely monitoring with a big ol’ e-stop button anyways).
As for the CNC, again, unless you’re doing something really wrong, the chances of you making a fire big enough or making something hot enough to be able to ignite wood around the SM are slim.
Leave more room in the back for the bed cable exit!
The position in the photo is not the final position - the enclosure will jut out from the actual shelves. It is just set up that way for balance. I have already taken into account the travel of the table and the length of the bed cable. for posterity, the measurements were 20 " for the base plus 5 1/2" of travel each end, for a total of 31". I cut the plywood base at 33".
It was my gun cabinet for several year till I got a gun safe. Then it was basically a big junk drawer for a couple of years. Now it’s home to my A250.
The workbench next to the shelf is where I do my gun cleaning and repair, so you can imagine how eager I am to free it up from the A350 that has been sitting there since it was knee-deep in snow outside
Your setup looks similar to mine, i.e. not a free standing enclosure like most others but part of an existing structure. Interesting to see, thanks. I’m building the main part of the enclosure (base + top) tonight, and will sort of feel things out from there.
the chances of you making a fire big enough or making something hot enough to be able to ignite wood around the SM are slim.
That was my thinking as well - I regularly bounce smoking hot steel chips off plywood walls in my machine shop with no trouble. I’d seen some concern about plywood enclosures when reading various writeups online, and was curious if those concerns were justified.
Any thoughts on insulation, guys? Should I bother, or is it just a waste of good foam?
EDIT: Actually, looking at my photo, I noticed something i didn’t see before: the hangers for the topmost removed shelf are right about where the top of the enclosure would be. So I can just build walls up to those, then have a slide-out top which doubles as filament storage.
I tried a few soundproofing materials before landing on rockwool. One of the benefits that I was unaware of when I got it is that fact that it is flame retardant to 2150F. A bag of 12 batts was $50 at Lowes. I used 5 in my enclosure. IF you’re near Sumter, SC. you can come get the other 7…
I’ve lit canvas bags on fire with the laser, but they’ve gone out pretty quickly.
Before I could even really react, and then only when I’ve been running tests to see what happens at various speeds and powers.
From what I’ve seen, both online anecdotally, and from personal experience the cnc seems to be most problematic. The combination of wood dust and the heat of the bit. I’ve had a few times where I’ve watched it start to smoke on deeper cuts. If you think about how you can start a fire with a stick and a bow to spin it and cause friction, the idea is the same. Most of the problems I’ve seen on youtube though are caused when the workpiece comes loose and the bit stays in one place. So maker sure your work is clamped down well.
The best solution to any fire worries seems to be one of those ‘fire balls’ that automatically break and extinguish.
-S
I plan to have a vacuum hooked up whenever I start CNC/laser (IIUC, vacuuming away the smoke could actually help w/ more precise ablation for the laser). Although, I guess high speed air + fire = bellows, so that could maybe be a problem.
One of the benefits that I was unaware of when I got it is that fact that it is flame retardant to 2150F
Rockwool is fantastic - I insulated the shop I built in the barn with it. One of the purported side effects is that mice won’t steal it for nesting, because it is so itchy. Well, not these mice - they’re building McMansions in the stuff.
The best solution to any fire worries seems to be one of those ‘fire balls’ that automatically break and extinguish.
That’s a very good idea.Kinda like a chimfex for the printer.
Although, I guess high speed air + fire = bellows, so that could maybe be a problem.
Hmm, I seem to recall reading about a regulator for the vacuum in one of these enclosure posts.
Last night I built the frame. i structured it so the bottom braces are on the outside of the frame, and the top braces are on the inside. This lets me swap panels in and out. I have some overside veneered plywood (visible in the pic I posted) that works well, though it is a bit thin for the space as I had intended to add insulation. A350 fits in it like a glove (I made a 19x20 nest out of 1x5s laid flat, chiseled out clearance for the cables as needed), and the wood gives me lots of options for mounting things.
I’ve had two ideas since knocking off work last night:
1/4" MDF panel with corrugated plastic on one side. These would be reversible, so the plastic is turned inwards when 3D printing. The idea is to prevent dust from CNC lingering around when printing. The ceiling would have to be covered in plastic at all times. Still mulling it over.
I have quite a few offcuts of foam insulation. It sounds like this is not needed (or, really, desired) when printing - so my plan of making removable panels with an insulated face for printing is mooted. I will probably just insulate the outside of the top of the printer to protect the filament enclosure from all the heat.
I might continue the slide-out theme for the front as well. There’s no need to have a door, really, and a sliding panel lets me swap out a clear acrylic front for a front with a small laser shield window.
Got as far as I could with material on-hand, so yesterday was purchasing day:
two sheets 18x24 Lexan (polycarbonate)
one airtight enclosure large enough for 3 rolls filament side-by side
one pack aluminum screen clips
four packs hanger bolts (1/4-20)
one 12" LED light fixture
one 12x12 laser shield from J-Tech
one Thordsen inline drier
2m PTFE tubing with PC4 fittings
I also chucked in some parts for unrelated upgrades: 24V 50x50x15mm cooling fan, JST-XH 2.4mm cables, all-metal throat for heating element.
The inline drier is by far the most expensive component (the Lexan and laser shielding being next), but I decided to add it as it seems critical for ensuring precision of the print, especially in what will soon become a very humid basement. This should finally settle the argument about whether it’s the filament, or some limitation of the machine itself.
The laser shielding will be mounted in a sheet of 24x24 1/2" MDF which will slide in the front of the enclosure to replace the (wood-framed) Lexan panel (the other Lexan anel will be replaced with windowless MDF). Hanger bots are for attaching the wood panels to the frame (so that all are removable; could have used brass inserts I have on-hand), and the screen clips are to hold the sliding panels (left side and front) in place.
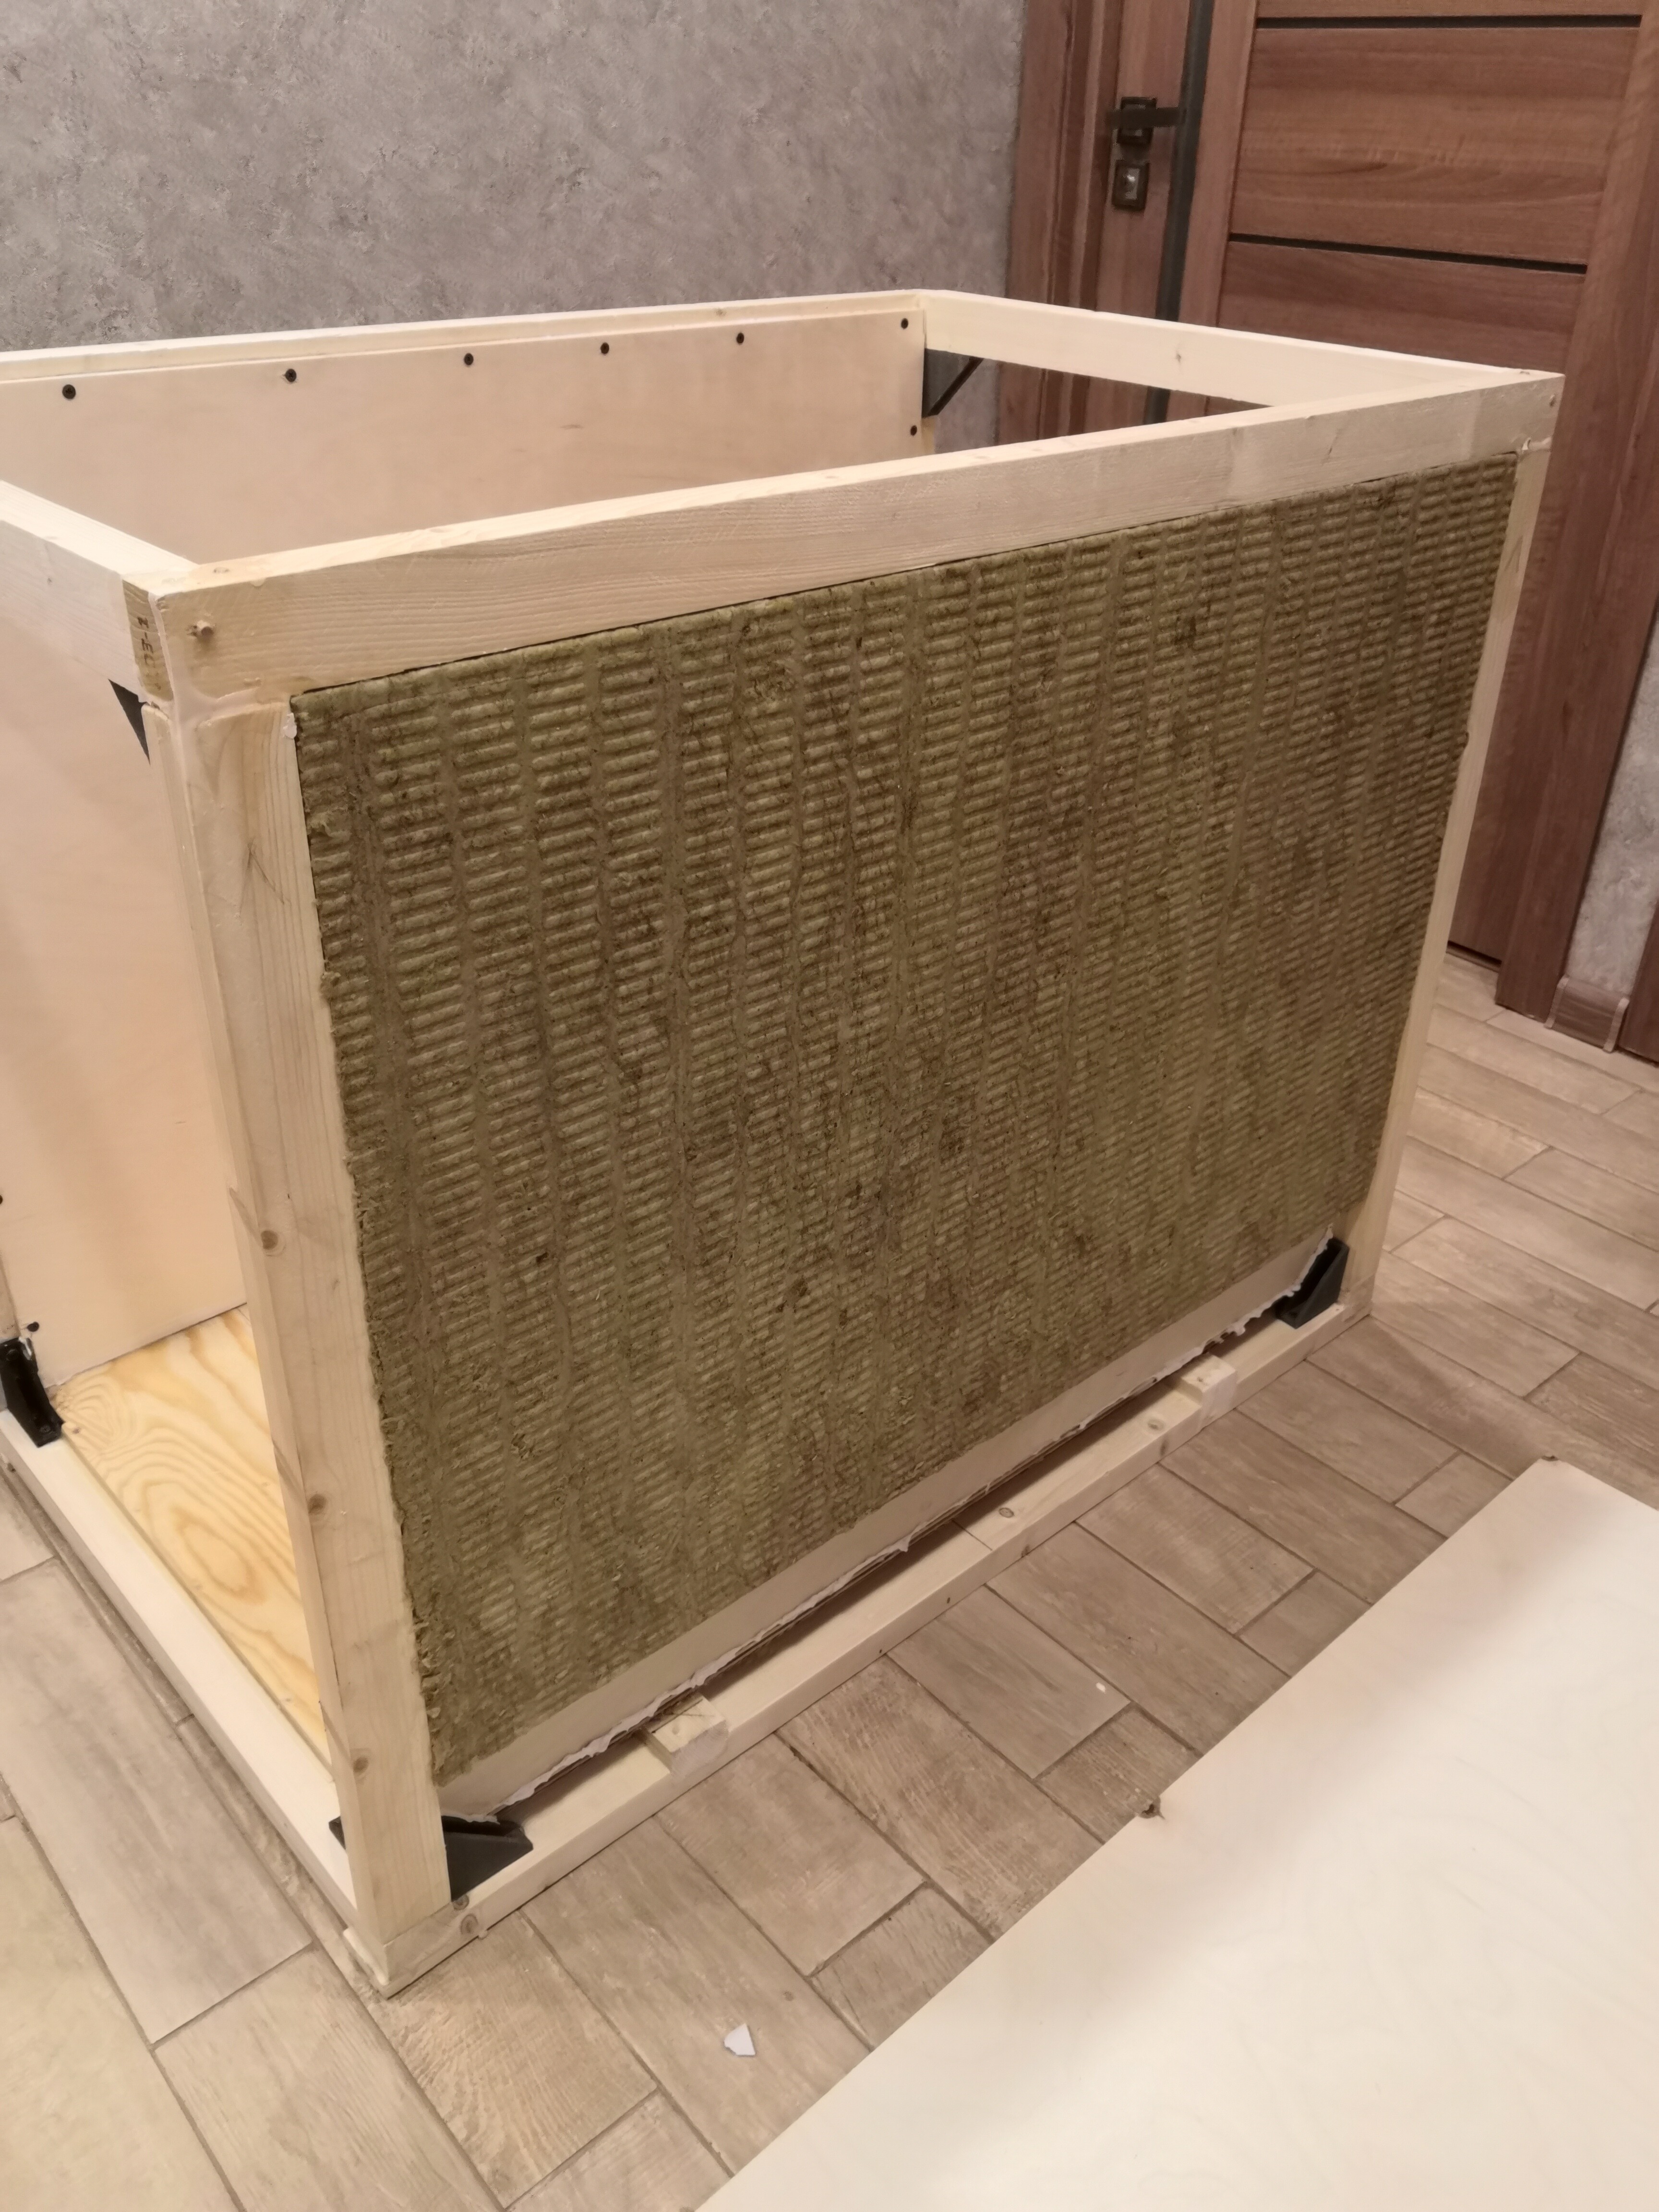
Hello dear friends! I wanted to share with you my box for the machine. Mainly used a wooden bar 30x40mm, joiner’s glue joints to eliminate the transmission of noise and vibration. In the walls between the two plywood is a stone wool. Four supply fans with a diameter of 40 mm each are installed in the base. In the ceiling there will be one exhaust pipe with a diameter of 120 mm. Temperature sensors, 5V LED strips, two web cameras. One allows you to observe the process remotely, the second allows you to monitor the quality of fixing the part on the table. The power is done via a WiFi socket, if something goes wrong you can always see and turn off the machine. All my construction is made on wheels, for a quick move. I attach a photo.