I’ve got two Ender and the Snapmaker A350, which I love but am struggling with perfect first layers. I have to of the magnetic build plates from Snapmaker. One is just terrible in terms of first layers and it seems warped from the factory to be honest. The second gets better but not great first layer printers (I am using a print test that does a first layer test all over the bed with squares in each corner and center.
I have calibrated my extruder. Leveled many times, changed to auto-leveling it at 25 points.
Bed installed with the nuts down I know that’s an issue. Also this is a later A350, only received in late Dec so I believe this is the later version that was supposed to be better.
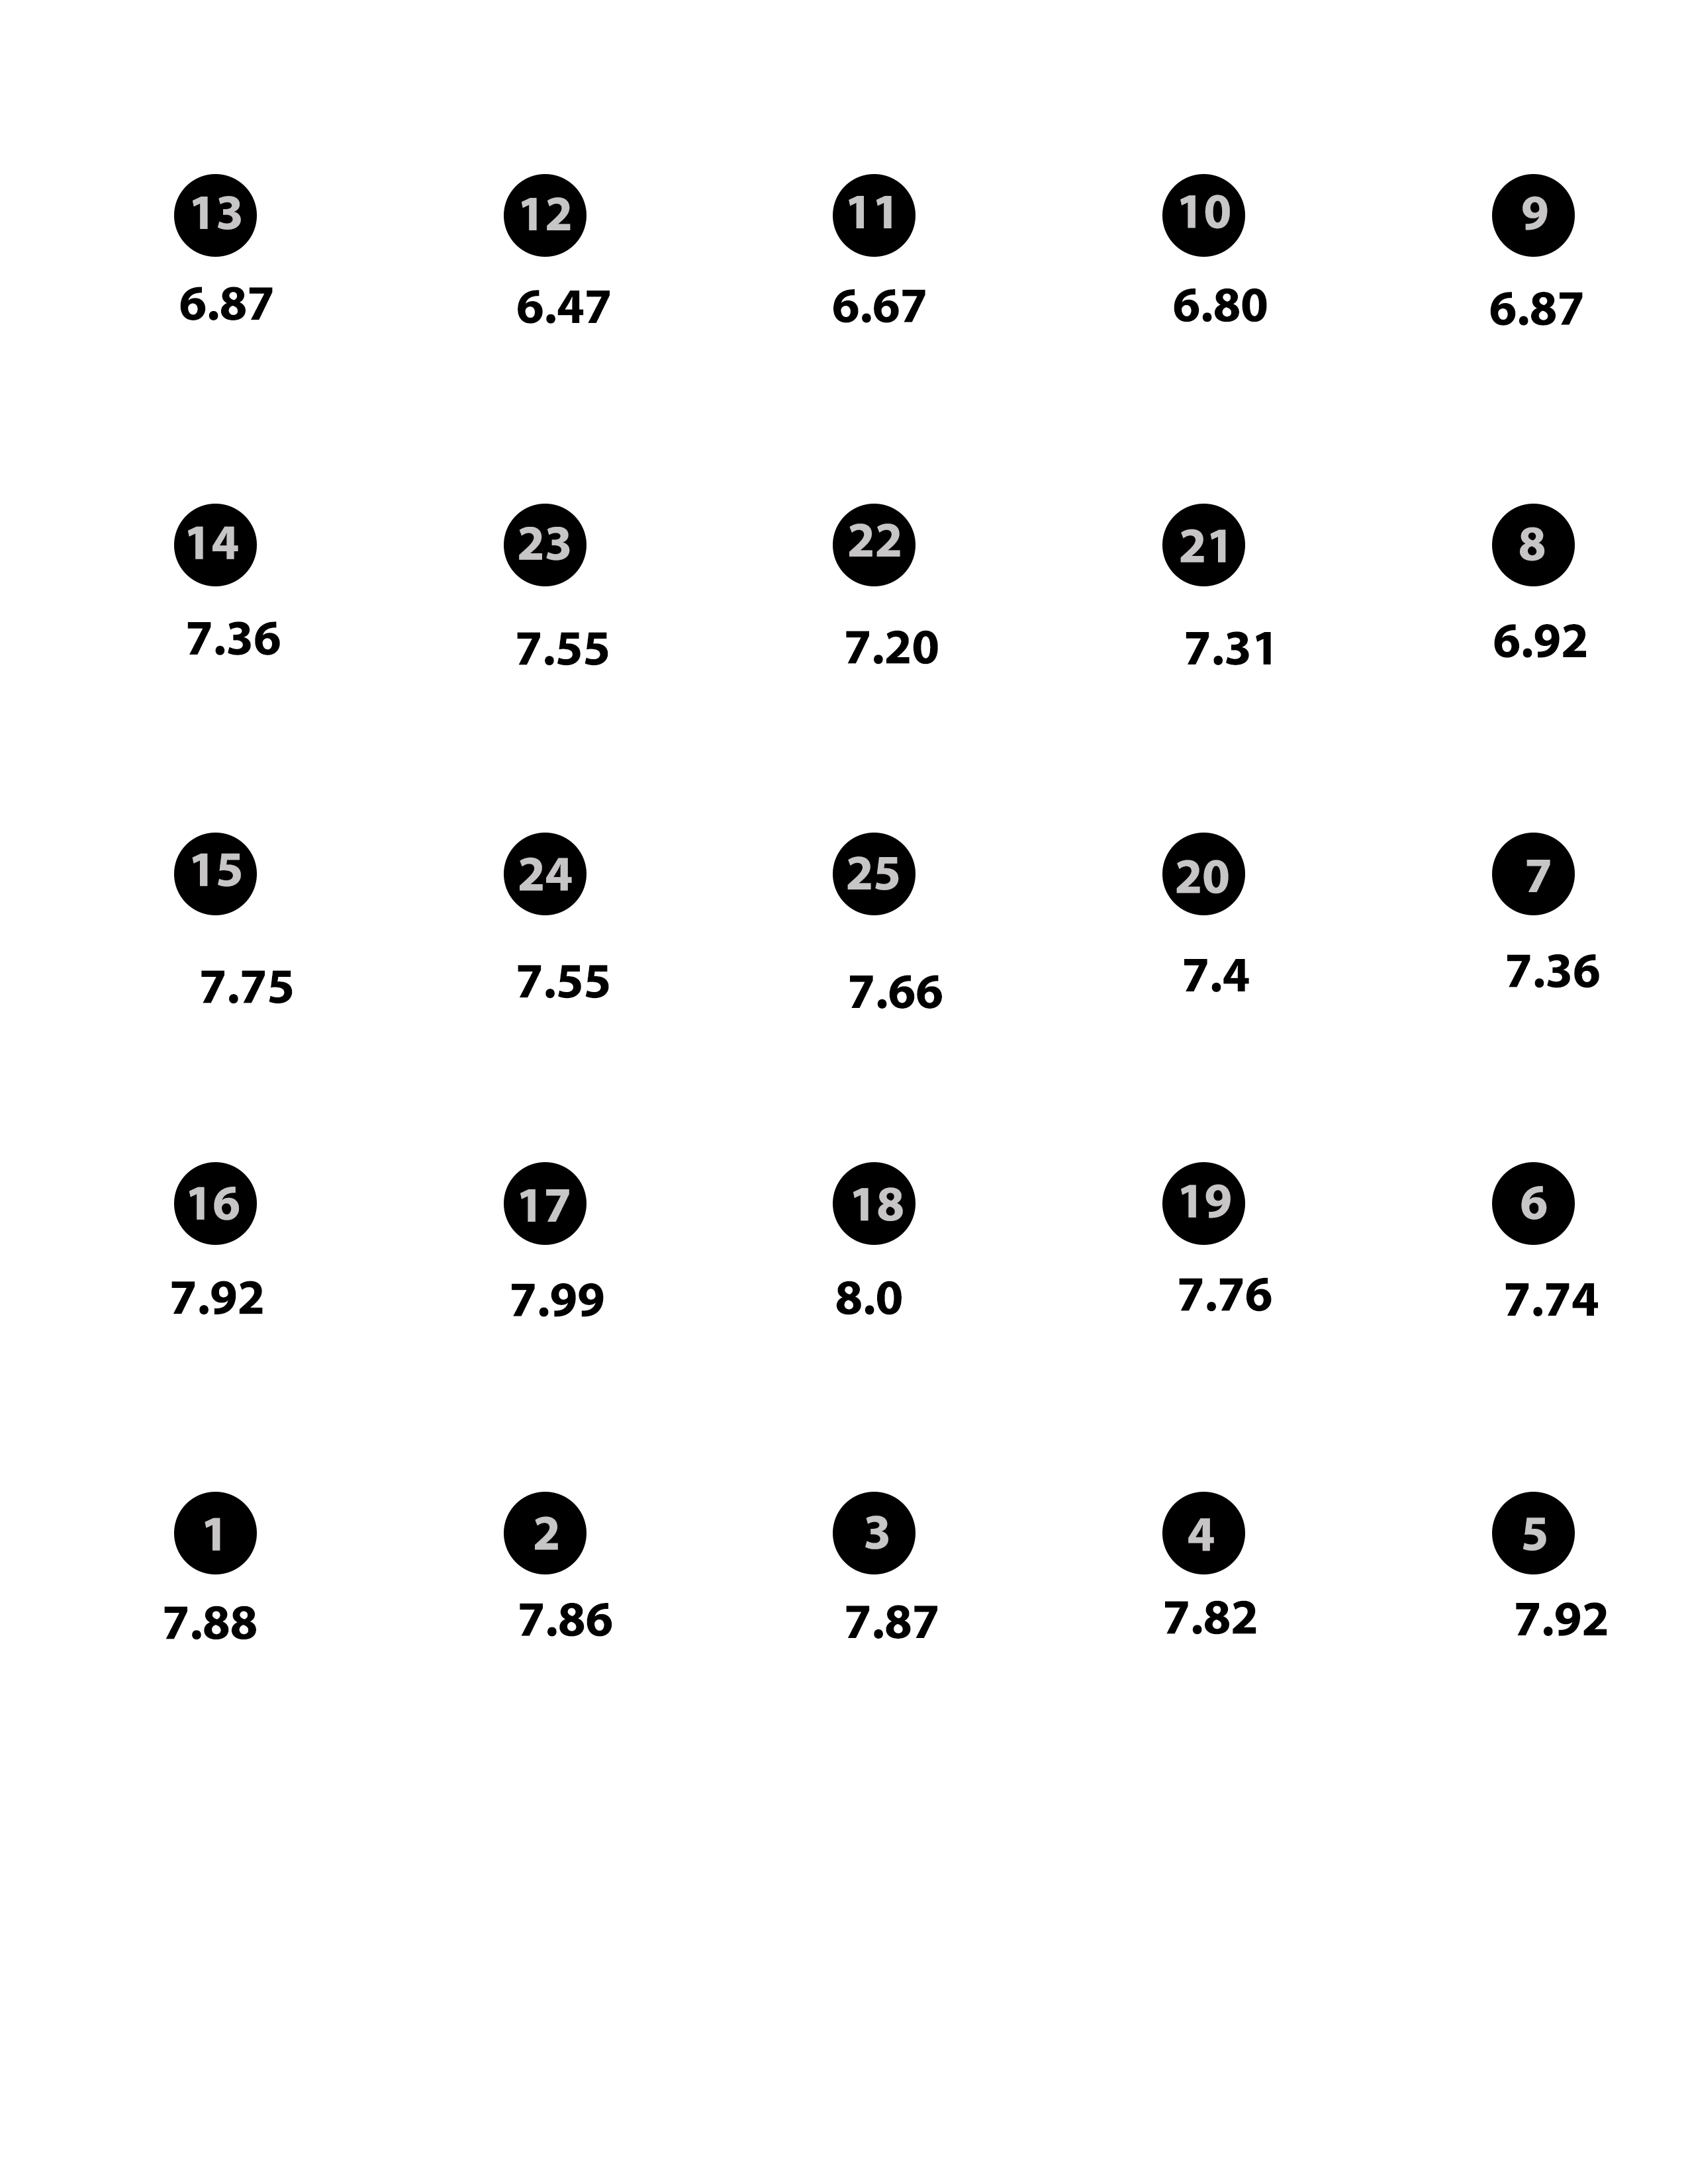
I hooked my laptop up to the snapmaker, set the auto-level to 25 points and this is what it came up with… measuring as low as 6.47 and as high as 8.0. This seems crazy off. I mad a map of it so I could visually see it.
How can I adjust this? Would loosening and tightening the screws holding it in help? Would a WhamBam plate (flexible steel) or a glass bed help this?
Unfortunately, it’s normal for the bed to be imperfect on these, so it really may be that far off.
Some people get better results by heating the bed before performing the auto-level routine (other people get the reverse).
Other than that, yes, consider going to a glass bed if perfect first layers are important to you. Keep in mind that the autolevel routine relies on a metal-detecting sensor and won’t work on glass without help.
I’ve been having the same problems. Loads of advice; see my post ‘Calibration but no celebration’ here; (don’t know how to link to a different topic.) My solution was to simply revert to the tried and tested hair-spray. Not ideal but it has worked.
One line in your post intrigued me. “I hooked my laptop up to the snapmaker, set the auto-level to 25 points”. My computer doesn’t have Wi-fi so I’m stuck with using the USB stick to transfer stuff. I’d love to use that 25 point auto-level but I can’t see how to do it. Do I need to sort out some sort of connection between my computer and the SM machine? Does the included USB cable do that? So many questions!
Just go into your control panel on the machine, settings > 3d printing > and you can change the leveling to three different settings, each with more measuring points. Use a USB cable hooked to your PC/Mac (you have to download the drivers from Snapmaker for you to do this) and this lets you see the actual code and responses from the machine. If you do a 25 point auto-level the command window shows you all the measurements it takes, it takes three per spot, I averaged each one and that’s where I got my numbers on my image. You do not need to hookup to USB for the 25 point auto-level just if you want to see the numbers it’s showing when doing the measuring.
Yes. When you connect the SM to a computer using the USB cable, Luban can then connect to the SM via serial port, and you will be able to issue gcode commands on the Luban console.
OK, I’ll need a two metre extension cable. Hmm, Covid rules may hinder that though as I’ll need to go to the Big Town for that; our little village can sell you a pig, but computer cables? Not so much! Amazon is not much help as I think the delivery drivers get lost trying to find the village, let alone a house.
Anyway, a job for when our lock-down ends, (they’re saying April 15, we’ll see,)
But the good news is that the hair-spray is allowing me to actually get prints off.
To clarify, the actual calibration grid is selected through the touch screen, the connection to the computer is to see what the measurements are from the auto-calibration which can help with troubleshooting.
But all you get from the touch screen is the default 3 x 3 grid I think. As I understand what’s been said you need to connect the computer to tell the touch screen that you’ve over-ridden the default. Have I got that right?
No you can switch in the touch screen on the machines to the 25 point calibration. You only need to hookup a computer to it if you want to know the measurements it’s taking, not a requirement to use the 25 point calibration.
I didn’t know that! Thanks for the info. Now to wait just 18 hours for the current print to finish, (sexy little drawer to fit between the Y-axis rails), and then I’ll have a crack at it. Oh dear, that means re-visiting the dreaded Calibration. I’m so nearly there with calibration now, just need to adjust Z-offset by +0.05 before every print. It would be nice if I could adjust that without having to do the whole ‘does it grip, does it buckle’ business again.
My problem is that I really don’t know this machine at all well. Just went straight into trying to print stuff without exploring all the options. The Quick Start Guide has been praised for it’s quality but an in-depth User Guide describing all the options wouldn’t have added much to the cost. Ah well, it is what it is!
Gah. Sorry Tylander. I’ve just read back through this thread and you told me that a few posts back. That’s what comes of my leaping in without checking; I wind up with my foot in my mouth. Situation normal for me!
If you are printing a drawer are you printing with the original nozzle? If so, I highly recommend changing to a 1mm nozzle for these prints. You need to print a little higher temp and a little slower but it lays down that filament super nice, makes the print stronger, and it prints a crazy amount faster.
I picked up a pack of all those different nozzle sizes but have yet to experiment with them. Using a larger nozzle for larger prints makes sense; maybe moving to a smaller nozzle will improve the craptastic small parts (1/8" high, 1/2" dia) I have been printing. Any general guidance for when to change nozzle size?
“Too late, too late”. I’m three hours in so I’ll just have to press on with this really slow print.
I’ll see what you have to say to Edf’s question about different nozzle size for different jobs. But that leads into the sticky question about how best to change a nozzle on the SM machine. It was well explained for the Ender but SM imply that you need to faff about with the whole hot-end. Oh for a decent User manual!
FWIW I’m having very nice first layer results. I put all the screws in when installing the bed, but left them all just barely tight. I have a theory that the inserts pressed into the bottom plate may not all be at the same height. It’s imporant that the bed not move, but I saw no reason to torque those down.
First layer height is nicely consistent. My only issue (probably unrelated) is that I need to set the magnetic plate about 1cm forward of where it should be.
@Tylander, the grid you posted could in part be explained by your X axis being out of tram, as there is a severe side to side slope. Either a) reset the x axis against the stops at the top, or b) a better method would be use 2 soda cans and reference off the Y axis.
You can search the forum for more on tramming the x axis.
This is of course assuming point 1 is the back left of the platform, and measurements proceed counter-clockwise.
Point 1 is at the front left where the extruder sits to warm up. I will look up tramming the x-axis thank you, that sounds like a good adjustment to check.
 I know that’s an issue. Also this is a later A350, only received in late Dec so I believe this is the later version that was supposed to be better.