Good tutorial from ALL3DP on the free STL editors
Editing STL files can be done in two different types of modelling software:
Tinkercad is a completely free online CAD program developed by Autodesk. The main feature is the use of basic shapes, or primitives, as building blocks to create 3D models. However, Tinkercad allows you to import and edit STLs as well. This can be very useful for simple edits such as adding text, removing part of the design, or combining two STLs into a single model.
Step 1: Import an STL
First off, you’ll need to create a free Tinkercad account if you don’t already have one, and log in.
- Open up a new design.
- Click Import in the upper right corner.
- Select Choose a File.
- Select your STL of choice, and click OK.

Step 2: Apply Size and Scaling Adjustments
Before importing into the workspace, Tinkercad gives you a basic overview of the STL, including the part dimensions. If you need to scale your design to a particular scale, this is the easiest way to do it.
- Simply enter the scaling percentage or the desired dimensions into the fields.
- Click Import.
It may take a minute for Tinkercad to upload the file into the workspace, depending on the complexity and file size.

Step 3: Edit STL File
Once Tinkercad has finished importing your file, you can use any of the basic shapes, shape generators, or various other shapes provided by Tinkercad to edit your STL. Additionally, you can import other STL files and use those to modify your design further. You can also adjust size and scale using the drag points within the workspace.

Step 4: Export as STL
Once you have edited the design to your liking, you can export it as an STL.
- Select everything you want to export.
- Click “Export” in the upper right corner.
- Follow the prompts to export the design as an STL file.
Tinkercad’s Pros and Cons
Tinkercad is easy to use, runs smoothly, and has all the basic tools you need to create a simple 3D model. However, it is missing some key features of a proper STL editor, particularly tools for surface modeling and mesh repair.
FreeCAD
FreeCAD is an open-source and free to use CAD software. It offers many different tools for construction, like Drafts, Drawings, and Design features. You can download FreeCAD for free from the FreeCAD project website. Simply select the correct version for your OS and install.
A serious limitation: FreeCAD has some problems with intercepting structures and may mess up the mesh when it contains intercepting edges!
Step 1: Open STL file and convert it to solid model
- Open FreeCAD and create a new document by clicking on File > New .
- Click File > Import and select the object you want to modify. FreeCAD can open other mesh formats such as OBJ and AST as well.
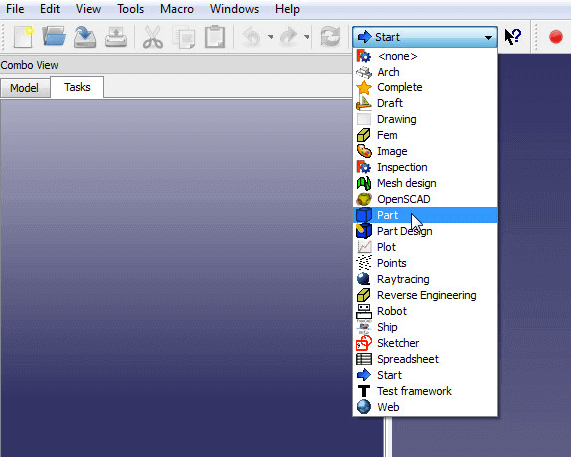
Change your workbench to Part.
- Change your workbench to Part .
- Select the imported object in the Model window.
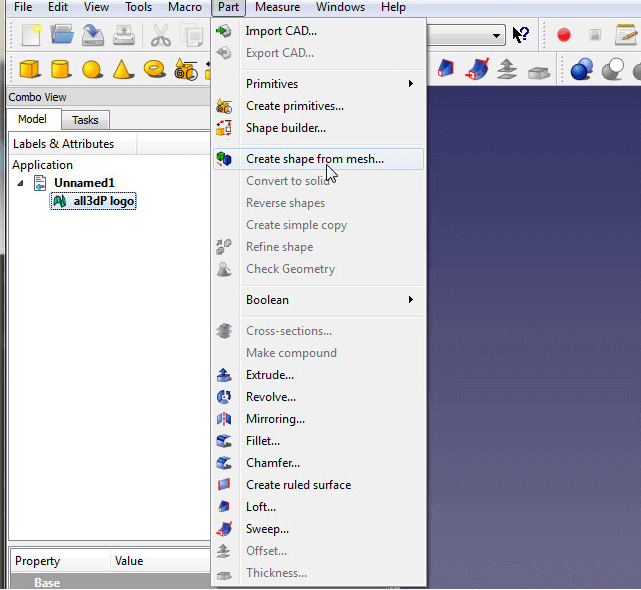
This useful tool will create a solid object out of many dots.
- Now click on Part > Create shape from mesh . This will split up the imported object into many small triangles. You can adjust the precision of tessellation, but 0.10 is perfectly fine for most objects. If the number gets smaller, it will take longer to convert the object.
- You can now delete or hide the imported mesh. This will show you the shape of your imported object consisting of many triangles.
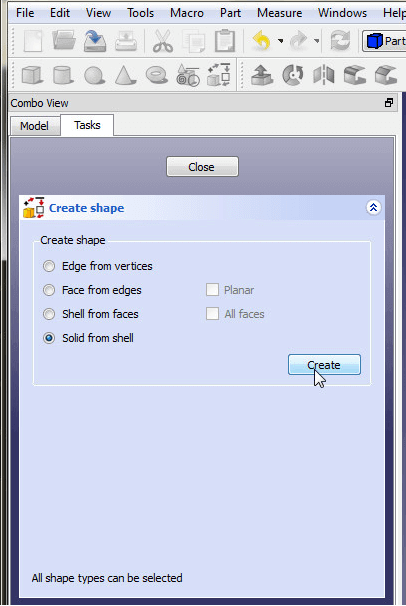
Check Solid from shell and also select one face of your object. Then click the Create button.
- Click Advanced utility to create shapes and select Solid from shell . Now click on any triangle forming your imported object and then on Create . You will not notice anything because the shape is overlapping the solid. Click Close to finish.
- Next, delete or hide the old shape. You now have a solid object of your mesh file ready for editing.
Step 2: Edit STL file
- Switch your workbench to Part Design .
- Click on any face you want to add or remove material, so it shines green.
- Now click Create Sketch .

First select one plane of your object then click Create Sketch.
- Create a shape you want to extrude or cut into using the tools for drawing a circle, rectangle or lines.
- Click on Close to confirm the sketch. If you want to edit the sketch, double-click it in the model tree.
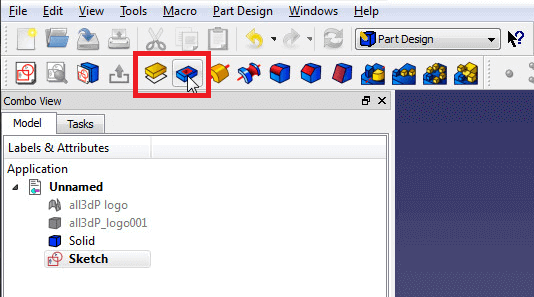
Use Pad to extrude and Pocket to cut.
- Now select a feature you want to apply. You can use the Pad tool to extrude or the Pocket tool to cut elements.
Of course, there are many more features and tools to use. If you want to learn more about FreeCAD, visit this tutorial!
Step 3: STL Repair
FreeCAD features an extensive mesh repair tool:
- Select Meshes > Analyze > Evaluate & repair mesh .

- In case you know what defects your mesh has, select the appropriate item in the list and then click Analyze .
Otherwise, choose All above tests together and then click Analyze . - After the Analysis is complete, click Repair .
Step 4: Export as STL file
To export your object as an STL file again, select the last feature in the model tree. Then click on File > Export and select Mesh formats .
The pros and cons of using FreeCAD
When using FreeCAD as an STL editor, you really notice its purpose. It is a CAD program to create exact and models for mechanical use, not for modeling. This is great when you want to construct technical objects. Sculpting a model in FreeCAD is very difficult; as FreeCAD lacks a free move-around 3D view, sculpting is nearly impossible.
Blender
Blender is another great free program to either create models for printing, games, or video clips. It contains many useful tools, for example various algorithms for smoothening or interpreting a surface. It is also very easy to import and prepare STL files for modeling. However, it will take some time to get used to Blender, and due to its huge amount of different tools and commands, it can be quite obscure. It also requires a powerful PC to display some models, especially if you subdivide the model into many smaller tiles.
You can download the software from the Blender project website.
Step 1: Open STL file
- Delete the cube by hovering with your mouse above it and pressing the Del button.
- Click on File > Import > STL , browse for the file you want to open, and import it.

Step 2: Edit STL file
- Switch from Object to Edit mode. You can now see all the edges your model is made of.

- Then hit Alt+L to select all elements so the model shines orange. You can also select individual points, edges, or planes by right-clicking them.
- To convert the triangles to rectangles, use Alt+J .
- You can now change the number of tiles the model is made of by either searching for Subdivide or Un-Subdivide , or right-clicking to access the Subdivide tool.

- Use the three different selection options Vertexes, Edge or Face select to extrude, move or delete parts of the model.
- Search for different shapes such as Add plane , Cube, or Sphere to add them to your model.

- The Extrude command extrudes an area.
- Use the Boolean command to cut or merge one form with another.
Visit this tutorial to learn how to create a 3D map in Blender.
Step 3: STL Repair
Apart from STL import, Blender offers a native STL repair tool.
- Activate the 3D Print Toolbox: Edit > Preferences > Add-Ons > Mesh: 3D-Print Toolbox.

- You can access the toolbox now in the left sidebar (ensure you have the sidebar enabled under View , press N to toggle this feature)
- Blender’s 3D Print Toolbox allows you to address all the issues that might cause your STL file to print incorrectly. The most pressing are:
Overhangs that require support structure when printing with FDM and other techniques.
Wall-thickness indicates areas that cannot be printed because they are too thin.
Manifolds confound 3D printers with identical edges directly on top of each other. - You can either check for all these issues by pressing Check All .
- On the bottom of the toolbox appears a list of errors you can cycle through.
- To repair vertices and edges, press Isolated .
- To make your mesh manifold, press Make Manifold .

Step 4: Export as STL file
To export your object go to File > Export > STL and follow the prompts to save your file.
The pros and cons of using Blender
Blender is a great STL editor if you want to create high-poly models. It offers many tools to sculpt and work out fine details in models. However, it takes a while to getting used to working with Blender, and as we already mentioned, it might require a lot of computing power for really complex meshes.
MeshMixer
MeshMixer is a free mesh editing program which you can download from AutoDesk’s website. It is very easy to edit STL files and also has a built-in slicer tool. This means you can send the edited model directly to your 3D printer to print it. If you want to learn how to prepare, repair or check your object for 3D printing with MeshMixer, visit this tutorial.
Step 1: Open STL file
- To import an STL file simply click on Import and browse for your object.
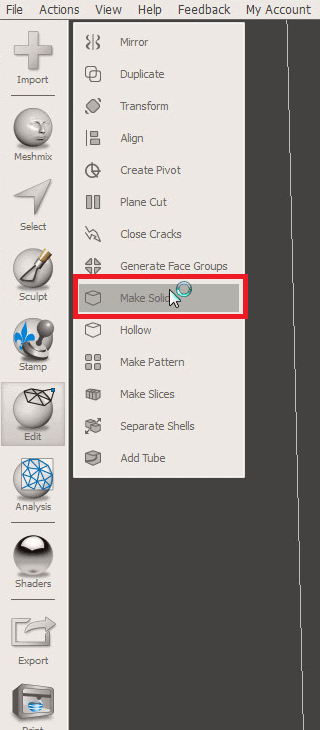
Make your object solid. Alternatively, you can make it hollow.
- Click on Edit > Make solid .
Step 2: Edit STL file
- You can now use Select to mark parts of your model.
- Press Del to remove marked tiles.
- Use Meshmix to open different forms.

Insert different forms and combine them with the Sculpt tool.
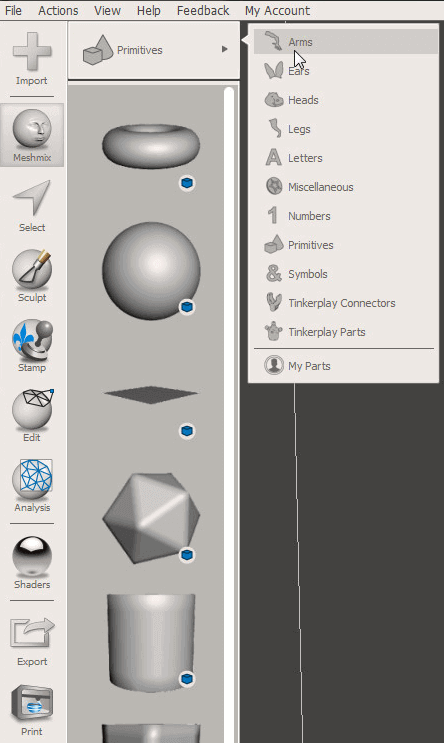
You can access more models by switching from basic forms to for example arms or legs. Drag and drop the object you want to insert. Use the different colored arrows to move or rotate to model. Use the little square in the middle of the arrows to scale the model. - Click on Sculpt to either smoothen or extrude different regions of the model.
Step 3: STL Repair and Preparation for 3D Printing
- In the sidebar, select Print . Here you find a comprehensive selection of tools that can help you prepare your STL file for 3D printing:
- First, select your 3D Printer from the drop-down list. The most common models on the market are on that list. Otherwise, you can add your 3D printer manually. Refer to your 3D printer’s manual for the specs.
- To repair your mesh select Repair Selected .
This little tool will automatically fix all holes, non-manifold vertices, etc.
Also, you can hollow your mesh to use less material.
And you can adjust the minimum wall thickness. - If you want to generate a support structure for your STL file, select Add Support . Adapt the settings to your 3D printer’s requirements and click Generate Support and then Done .
- Once you are satisfied with the state of your mesh, click Send to Printer .


Step 4: Export as STL file
To export your object go to File > Export and select the. Stl file format.
The pros and cons of using MeshMixer
MeshMixer is one of the best tools to edit your STL files. It takes all occurring problems like the paper-thin walls into account. Working with MeshMixer as an STL editor is easy and useful if you just want to resize your model or change something.
MeshLab
MeshLab is a free open source program that allows you to view or merge, transform or repair STL, PLY, STL, OFF, OBJ, 3DS, and many other file types as well as point clouds. You can download MeshLab for free from the Sourceforge project website.
Step 1: Open STL file
To open a supported mesh file go to File > Import Mesh and browse for your model.
Step 2: Edit STL file
MeshLab does not have the tools to create new vertices or objects. However, it is a great tool to combine two meshes of a 3D scan. You can also remove parts of the mesh and repair holes in the model.

In the Task bar you can find many useful tools.
How to merge two meshes:
- To combine two meshes load both models.
- Click on Show Layers. Select the models in the scene.
- To transform, rotate or scale an object, first select it in the Layer menu and then click on Manipulator Tools .
- You can now press T to select the Transform option, R to rotate the model and S to start scaling.
- The direction you are looking at the model determines the coordinate system you are working in. Simply drag and drop the arrows to move or scale the model in one direction. Turn the circle around the object to rotate it. When you want to rotate your view, press Escape, and when you have the desired view on the object press Escape again to continue transforming. Press Enter to confirm the placement.

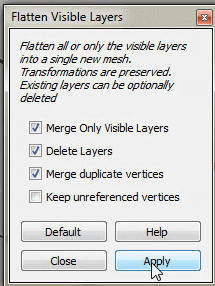
- When you have put all the parts in place, right-click on any part of your combined mesh and click on Flatten Visible Layers . Check the first three boxes and click on Apply.
How to delete a section of a model:
- To delete a part of the mesh, click on Select Face in a rectangular region.
- Then click Delete the Current Selected Face and Vertices.
How to repair your object or search for holes:
- Click on Fill Hole . Your model has to be manifold for this option.
- A window will pop up and show you all the holes in the model. You can now select the holes you want to fill. They will shine green when selected. Click on Fill and then on Accept to finish.
Step 3: STL Repair
- To check if your STL file is watertight select Filters > Quality Measures and Computations > Compute Geometric Measures. You should see a volume for your file or an error report in the dialog on the right side.

- In case your STL file is not watertight, select Filters > Cleaning and Repairing > Merge Close Vertices , click Apply.
Select Filters > Cleaning and Repairing > Remove Duplicate Faces , click Apply .
Select Filters > Cleaning and Repairing > Remove Duplicated Vertices. - Recheck your STL file.
Step 4: Export as STL file
To export the model, go to File > Export Mesh .
The pros and cons of using MeshLab
Even if MeshLab does not offer the option to create new objects, it is a great STL editor to combine or repair a mesh. Using MeshLab is a great and easy way to combine the mesh of a 3D scan or just to create new models by merging them.
3D Slash
3D Slash is a free and easy to use 3D modeling software that lets you create models using a simple building-block concept similar to Minecraft. You can download 3D Slash for free or even access the free STL editor on your browser.
Step 1: Open STL file
To open an STL file go to Start a new model and choose From a 3D file . You can browse for your file on the hard drive or drag and drop it into the browser.

Step 2: Edit STL file
The mesh has automatically been converted into a pixelated object that can be edited with 3D Slash.
-
- Select your tool in the upper left corner of the viewport. You can choose from a number of tools to add to and subtract from the mesh cubes in various sizes:
-
- Hammer : remove cubes.
- Trowel: rebuild cubes.
- Chisel : remove slices of cubes.
- Wall : rebuild slices of cubes.
- Drill : remove everything inside the limits selected.
You can add various primitives to the scene to get started with a new project.

-
- Adjust the size of the cubes with the palette on the left side of the viewport.

Step 3: Export as STL file
- To export the mesh select the floppy disk icon in the upper right corner.
- Choose Save as STL file .
The pros and cons of using 3D Slash
3D Slash will be especially gratifying for hobbyists who occasionally want to create their 3D designs without having to master the mysterious lore of conventional 3D modeling software.
However, if you are a beginner with aspirations of going pro one day, you will be better off with a traditional free STL editor like TinkerCAD.
Unfortunately, 3D Slash does not allow users of the free version to save modified 3D designs in the STL format. Although this seriously limits the user experience of the free version, we believe that 3D Slash is still an STL editor worthy of your time.